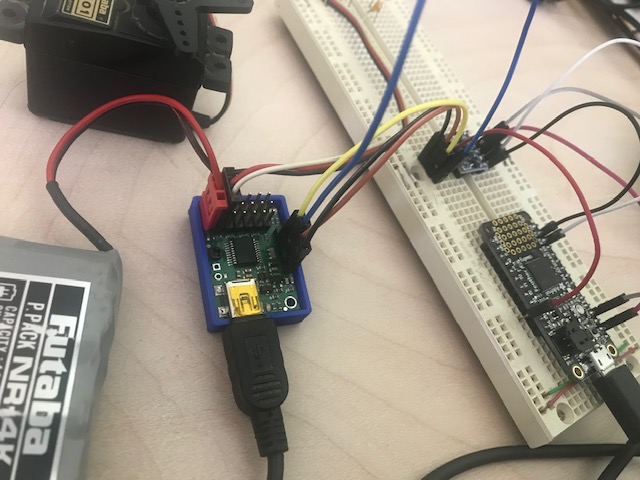
This is a customized verion of maestro.py for microcontrollers running MicroPython/CircuitPython.
The file umaestro.py was built for an Adafruit Feather M4 running CircuitPython 4.1.x. This should work on other Feather models, as is, and should work on many other devices, as long as they have an available UART. It has the same functionality as maestro.py, but the comments have been stripped down to save on micro-controller memory. See maestro.py for more complete documentation. The usage of this class is identical, except that the serial parameters are adapted to allow for pin selection and baudrate. Using the defaults works great.
The Maestro must be setup for UART mode (rather than USB mode) to work with the Feather (see Serial Settings on the Pololu Maestro Control Center app). I found that "UART detect baud rate" worked well.
To have full functionality, wiring the Feather to the Maestro requires a Level Shifter (like Adafruit's TXB0104) which allows the 3.3v Feather to safely communicate with the Maestro's 5v TTL serial. This isn't a requirement, if you are willing to sacrifice some functionality.
Both the Feather and the Maestro need power, and there are multiple approaches to this. The approach I used was to power the Feather over USB and then power the Maestro using the Feather's 5v USB pin. Note: The Maestro still needed a separate power source for the servo power rails (I used a 4.8v battery pack).
For full functionality you need bi-directional serial communications. Below are the wiring details and above is a photo showing what this looks like on a breadboard. Note that I was using a Micro Maestro, so the wiring may differ slightly for other Maestro variants. The photo shows the Maestro with a USB cable connected, but that isn't necessary, since power is provided by the Feather, as mentioned previously.
Bi-Directional Wiring

Feather      Level       Micro
  M4        Shifter     Maestro
=======     =======     =======
  Gnd  -----  Gnd  -----  Gnd
  3v   -----  LV
  USB  -----  HV   -----  +5
  RX   -----  LV1
  TX   -----  LV2
              HV1  -----  TX
              HV2  -----  RX
If you only need to control servos or run scripts, then there is a much simpler approach to wiring that doesn't require a level shifter. The functions that get positional data getPosition(), getMovingState(), and isMoving() won't work with this approach, but for most use cases, this is fine.
Uni-Directional Wiring

Feather      Micro
  M4        Maestro
=======     =======
  Gnd  -----  Gnd
  USB  -----  +5
  TX   -----  RX
import umaestro
m=umaestro.Controller()
m.setSpeed(0, 10)      #Set channel 0 speed to 10
m.setTarget(0,6000)    #Set channel 0 to center position
m.startScriptSub(0)    #Run the Maestro script subroutine 0
m.close()
- Make sure the Maestro is set to UART mode. If it isn't the maestro won't respond to commands and the red LED will light to indicate a serial communications fault.
- If the range of movement of a servo is too small, adjust the Channel Settings using Pololu Maestro Control Center.
- If the servos don't move at all, be sure you have a power source plugged into the servo rails. The 5v from the Feather USB pin is only powering the logic side of the Maestro, not the servos.
- Make sure CircuitPython is up to date. I tested with version 4.1.2. Version 3.x.x handled UART communications differently and could be problematic.
- This python module was set up for CircuitPython, but may work fine on with MicroPython. Let me know if you bump into any errors.
- It is fine to have the Feather and Maestro both plugged into your PCs USB ports at the same time. The Maestro Control Center will still get servo position information and show it in real-time, while the Feather can continue to send commands to the Maestro. You can also update Maestro script subroutines and then instantly launch them with the Feather.
