| title | summary | aliases | ||
|---|---|---|---|---|
Migrate MySQL-Compatible Databases to TiDB Cloud Using Data Migration |
Learn how to migrate data from MySQL-compatible databases hosted in Amazon Aurora MySQL, Amazon Relational Database Service (RDS), Google Cloud SQL for MySQL, or a local MySQL instance to TiDB Cloud using Data Migration. |
|
This document describes how to migrate data from a MySQL-compatible database on a cloud provider (Amazon Aurora MySQL, Amazon Relational Database Service (RDS), or Google Cloud SQL for MySQL) or self-hosted source database to TiDB Cloud using the Data Migration feature of the TiDB Cloud console.
This feature helps you migrate your source databases' existing data and ongoing changes to TiDB Cloud (either in the same region or cross regions) directly in one go.
If you want to migrate incremental data only, see Migrate Incremental Data from MySQL-Compatible Databases to TiDB Cloud Using Data Migration.
-
The Data Migration feature is available only for TiDB Dedicated clusters.
-
The Data Migration feature is only available to clusters in the projects that are created in the following regions after November 9, 2022. If your project was created before the date or if your cluster is in another region, this feature is not available to your cluster and the Data Migration tab will not be displayed on the cluster overview page in the TiDB Cloud console.
- AWS Oregon (us-west-2)
- AWS N. Virginia (us-east-1)
- AWS Singapore (ap-southeast-1)
- AWS Tokyo (ap-northeast-1)
- AWS Frankfurt (eu-central-1)
- AWS Seoul (ap-northeast-2)
- Google Cloud Oregon (us-west1)
- Google Cloud Singapore (asia-southeast1)
- Google Cloud Tokyo (asia-northeast1)
-
Amazon Aurora MySQL writer instances support both existing data and incremental data migration. Amazon Aurora MySQL reader instances only support existing data migration and do not support incremental data migration.
-
You can create up to 200 migration jobs for each organization. To create more migration jobs, you need to file a support ticket.
-
The system databases will be filtered out and not migrated to TiDB Cloud even if you select all of the databases to migrate. That is,
mysql,information_schema,information_schema, andsyswill not be migrated using this feature. -
During existing data migration, if the table to be migrated already exists in the target database with duplicated keys, the duplicate keys will be replaced.
-
During incremental data migration, if the table to be migrated already exists in the target database with duplicated keys, an error is reported and the migration is interrupted. In this situation, you need to make sure whether the upstream data is accurate. If yes, click the "Restart" button of the migration job and the migration job will replace the downstream conflicting records with the upstream records.
-
When you delete a cluster in TiDB Cloud, all migration jobs in that cluster are automatically deleted and not recoverable.
-
During incremental replication (migrating ongoing changes to your cluster), if the migration job recovers from an abrupt error, it might open the safe mode for 60 seconds. During the safe mode,
INSERTstatements are migrated asREPLACE,UPDATEstatements asDELETEandREPLACE, and then these transactions are migrated to the downstream cluster to make sure that all the data during the abrupt error has been migrated smoothly to the downstream cluster. In this scenario, for upstream tables without primary keys or not-null unique indexes, some data might be duplicated in the downstream cluster because the data might be inserted repeatedly to the downstream. -
When you use Data Migration, it is recommended to keep the size of your dataset smaller than 1 TiB. If the dataset size is larger than 1 TiB, the existing data migration will take a long time due to limited specifications.
-
In the following scenarios, if the migration job takes longer than 24 hours, do not purge binary logs in the source database to ensure that Data Migration can get consecutive binary logs for incremental replication:
- During existing data migration.
- After the existing data migration is completed and when incremental data migration is started for the first time, the latency is not 0ms.
Before performing the migration, you need to check the data sources, prepare privileges for upstream and downstream databases, and set up network connections.
Data Migration supports the following data sources and versions:
- MySQL 5.6, 5.7, and 8.0 local instances or on a public cloud provider. Note that MySQL 8.0 is still experimental on TiDB Cloud and might have incompatibility issues.
- Amazon Aurora (MySQL 5.6 and 5.7)
- Amazon RDS (MySQL 5.7)
- Google Cloud SQL for MySQL 5.6 and 5.7
The username you use for the upstream database must have all the following privileges:
| Privilege | Scope |
|---|---|
SELECT |
Tables |
LOCK |
Tables |
REPLICATION SLAVE |
Global |
REPLICATION CLIENT |
Global |
For example, you can use the following GRANT statement to grant corresponding privileges:
GRANT SELECT,LOCK TABLES,REPLICATION SLAVE,REPLICATION CLIENT ON *.* TO 'your_user'@'your_IP_address_of_host'The username you use for the downstream TiDB Cloud cluster must have the following privileges:
| Privilege | Scope |
|---|---|
CREATE |
Databases, Tables |
SELECT |
Tables |
INSERT |
Tables |
UPDATE |
Tables |
DELETE |
Tables |
ALTER |
Tables |
DROP |
Databases, Tables |
INDEX |
Tables |
TRUNCATE |
Tables |
For example, you can execute the following GRANT statement to grant corresponding privileges:
GRANT CREATE,SELECT,INSERT,UPDATE,DELETE,ALTER,TRUNCATE,DROP,INDEX ON *.* TO 'your_user'@'your_IP_address_of_host'To quickly test a migration job, you can use the root account of the TiDB Cloud cluster.
Before creating a migration job, set up the network connection according to your connection methods. See Connect to Your TiDB Dedicated Cluster.
-
If you use public IP (this is, standard connection) for network connection, make sure that the upstream database can be connected through the public network.
-
If you use AWS PrivateLink, set it up according to Connect to TiDB Dedicated via Private Endpoint with AWS.
-
If you use Google Cloud Private Service Connect, set it up according to Connect to TiDB Dedicated via Private Endpoint with Google Cloud.
-
If you use AWS VPC Peering or Google Cloud VPC Network Peering, see the following instructions to configure the network.
Set up AWS VPC Peering
If your MySQL service is in an AWS VPC, take the following steps:
-
Set up a VPC peering connection between the VPC of the MySQL service and your TiDB cluster.
-
Modify the inbound rules of the security group that the MySQL service is associated with.
You must add the CIDR of the region where your TiDB Cloud cluster is located to the inbound rules. Doing so allows the traffic to flow from your TiDB cluster to the MySQL instance.
-
If the MySQL URL contains a DNS hostname, you need to allow TiDB Cloud to be able to resolve the hostname of the MySQL service.
- Follow the steps in Enable DNS resolution for a VPC peering connection.
- Enable the Accepter DNS resolution option.
Set up Google Cloud VPC Network Peering
If your MySQL service is in a Google Cloud VPC, take the following steps:
-
If it is a self-hosted MySQL, you can skip this step and proceed to the next step. If your MySQL service is Google Cloud SQL, you must expose a MySQL endpoint in the associated VPC of the Google Cloud SQL instance. You might need to use the Cloud SQL Auth proxy developed by Google.
-
Set up a VPC peering connection between the VPC of your MySQL service and your TiDB cluster.
-
Modify the ingress firewall rules of the VPC where MySQL is located.
You must add the CIDR of the region where your TiDB Cloud cluster is located to the ingress firewall rules. This allows the traffic to flow from your TiDB cluster to the MySQL endpoint.
To perform incremental data migration, make sure you have enabled binary logs of the upstream database, and the binary logs have been kept for more than 24 hours.
-
Log in to the TiDB Cloud console and navigate to the Clusters page of your project.
Tip:
If you have multiple projects, you can click in the lower-left corner and switch to another project.
-
Click the name of your target cluster to go to its overview page, and then click Data Migration in the left navigation pane.
-
On the Data Migration page, click Create Migration Job in the upper-right corner. The Create Migration Job page is displayed.
On the Create Migration Job page, configure the source and target connection.
-
Enter a job name, which must start with a letter and must be less than 60 characters. Letters (A-Z, a-z), numbers (0-9), underscores (_), and hyphens (-) are acceptable.
-
Fill in the source connection profile.
- Data source: the data source type.
- Region: the region of the data source, which is required for cloud databases only.
- Connectivity method: the connection method for the data source. Currently, you can choose public IP, VPC Peering, or Private Link according to your connection method.
- Hostname or IP address (for public IP and VPC Peering): the hostname or IP address of the data source.
- Service Name (for Private Link): the endpoint service name.
- Port: the port of the data source.
- Username: the username of the data source.
- Password: the password of the username.
- SSL/TLS: if you enable SSL/TLS, you need to upload the certificates of the data source, including any of the following:
- only the CA certificate
- the client certificate and client key
- the CA certificate, client certificate and client key
-
Fill in the target connection profile.
- Username: enter the username of the target cluster in TiDB Cloud.
- Password: enter the password of the TiDB Cloud username.
-
Click Validate Connection and Next to validate the information you have entered.
-
Take action according to the message you see:
- If you use Public IP or VPC Peering, you need to add the Data Migration service's IP addresses to the IP Access List of your source database and firewall (if any).
- If you use AWS Private Link, you are prompted to accept the endpoint request. Go to the AWS VPC console, and click Endpoint services to accept the endpoint request.
In the Choose the objects to be migrated step, you can choose existing data migration, incremental data migration, or both.
To migrate data to TiDB Cloud once and for all, choose both Existing data migration and Incremental data migration, which ensures data consistency between the source and target databases.
To migrate only existing data of the source database to TiDB Cloud, choose Existing data migration.
To migrate only the incremental data of the source database to TiDB Cloud, choose Incremental data migration. In this case, the migration job does not migrate the existing data of the source database to TiDB Cloud, but only migrates the ongoing changes of the source database that are explicitly specified by the migration job.
For detailed instructions about incremental data migration, see Migrate Only Incremental Data from MySQL-Compatible Databases to TiDB Cloud Using Data Migration.
-
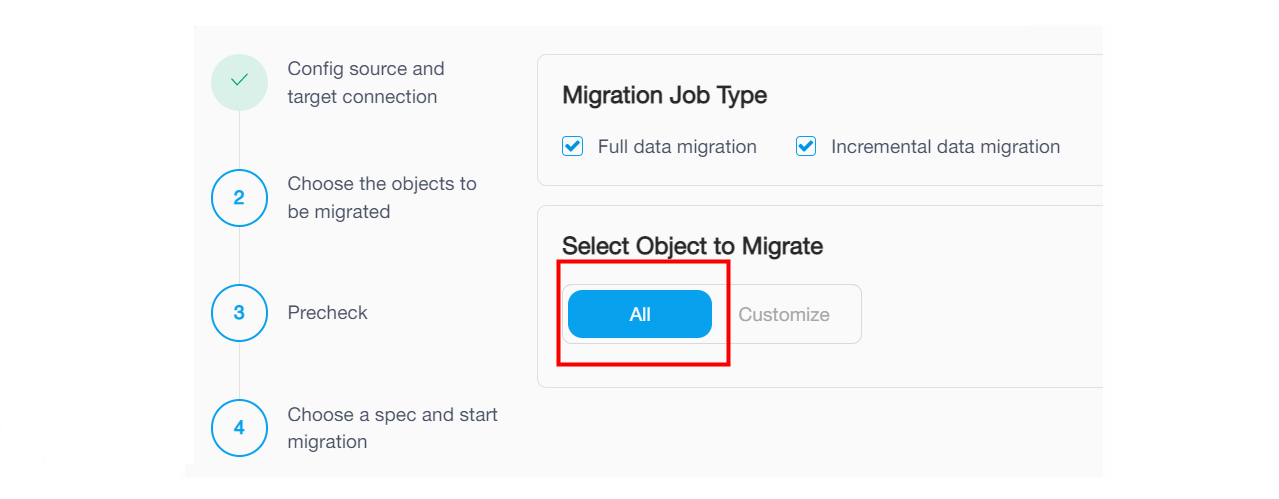
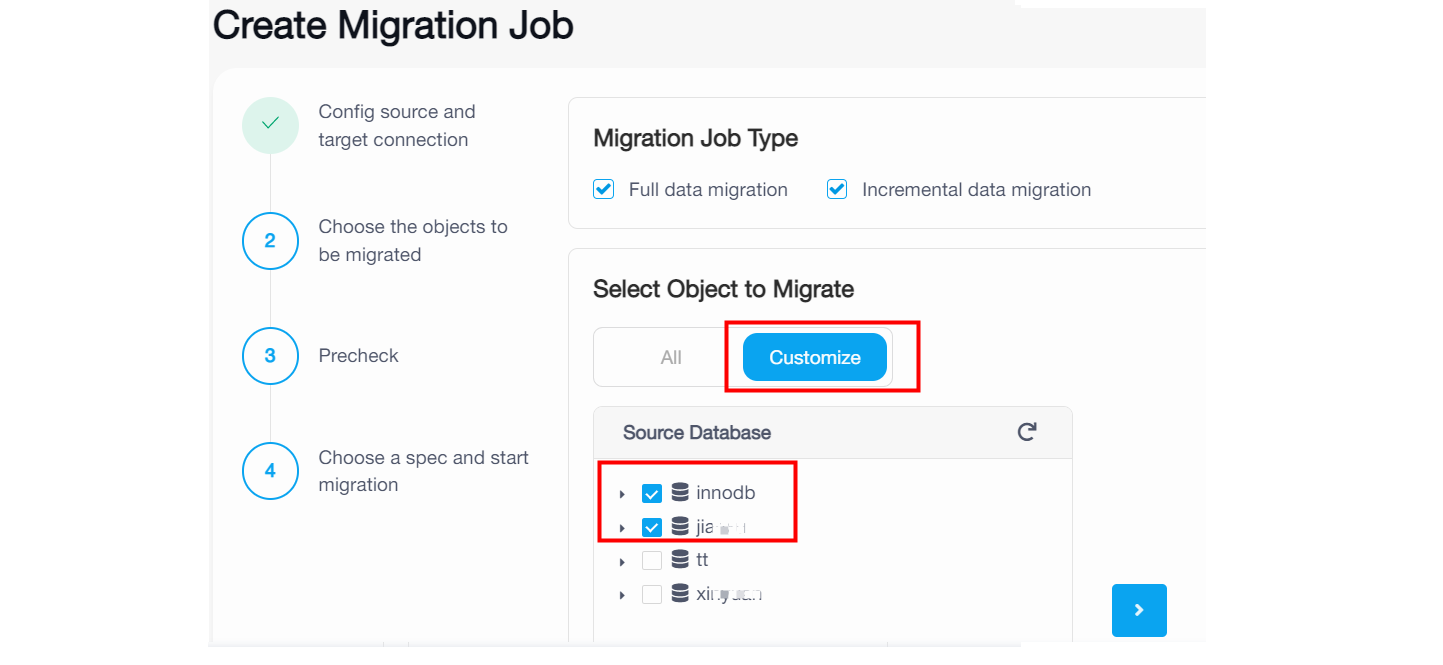
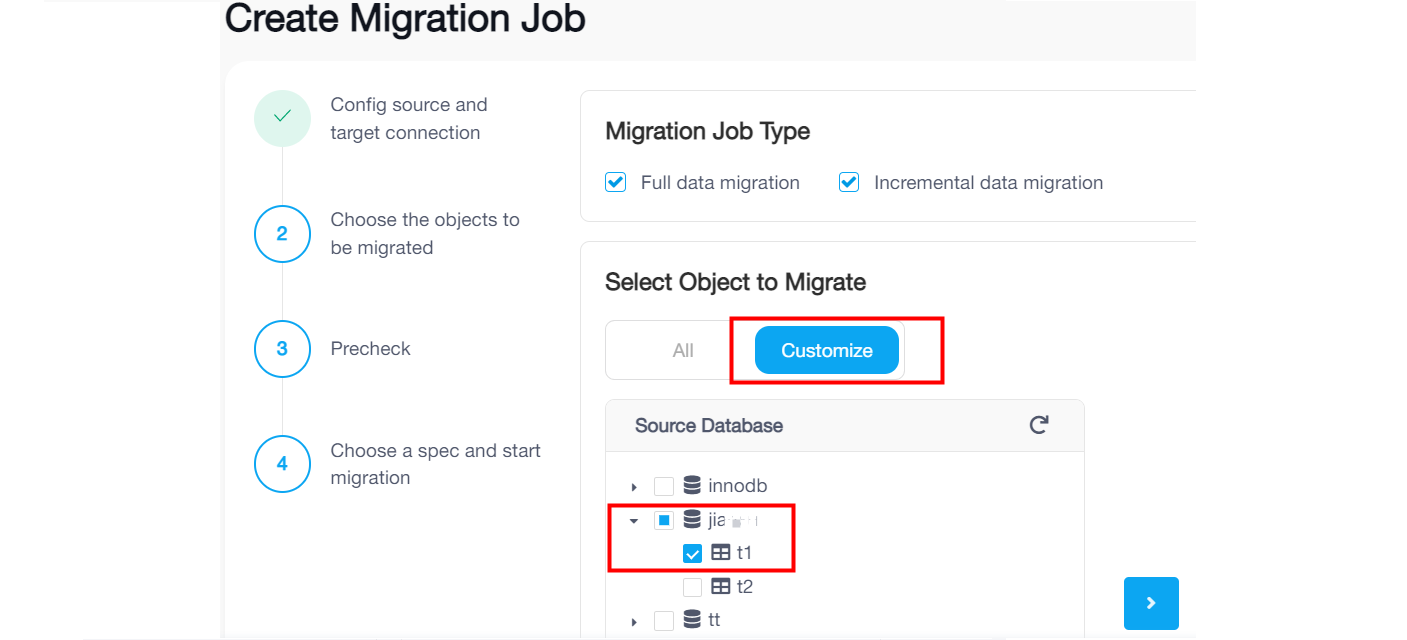
On the Choose Objects to Migrate page, select the objects to be migrated. You can click All to select all objects, or click Customize and then click the checkbox next to the object name to select the object.
-
If you click All, the migration job will migrate the existing data from the whole source database instance to TiDB Cloud and migrate ongoing changes after the full migration. Note that it happens only if you have selected the Existing data migration and Incremental data migration checkboxes in the previous step.
-
If you click Customize and select some databases, the migration job will migrate the existing data and migrate ongoing changes of the selected databases to TiDB Cloud. Note that it happens only if you have selected the Existing data migration and Incremental data migration checkboxes in the previous step.
-
If you click Customize and select some tables under a dataset name, the migration job only will migrate the existing data and migrate ongoing changes of the selected tables. Tables created afterwards in the same database will not be migrated.
-
-
Click Next.
On the Precheck page, you can view the precheck results. If the precheck fails, you need to operate according to Failed or Warning details, and then click Check again to recheck.
If there are only warnings on some check items, you can evaluate the risk and consider whether to ignore the warnings. If all warnings are ignored, the migration job will automatically go on to the next step.
For more information about errors and solutions, see Precheck errors and solutions.
For more information about precheck items, see Migration Task Precheck.
If all check items show Pass, click Next.
On the Choose a Spec and Start Migration page, select an appropriate migration specification according to your performance requirements. For more information about the specifications, see Specifications for Data Migration.
After selecting the spec, click Create Job and Start to start the migration.
After the migration job is created, you can view the migration progress on the Migration Job Details page. The migration progress is displayed in the Stage and Status area.
You can pause or delete a migration job when it is running.
If a migration job has failed, you can resume it after solving the problem.
You can delete a migration job in any status.
If you encounter any problems during the migration, see Migration errors and solutions.
TiDB Cloud supports scaling up or down a migration job specification to meet your performance and cost requirements in different scenarios.
Different migration specifications have different performances. Your performance requirements might vary at different stages as well. For example, during the existing data migration, you want the performance to be as fast as possible, so you choose a migration job with a large specification, such as 8 RCU. Once the existing data migration is completed, the incremental migration does not require such a high performance, so you can scale down the job specification, for example, from 8 RCU to 2 RUC, to save cost.
When scaling a migration job specification, note the following:
- It takes about 5 to 10 minutes to scale a migration job specification.
- If the scaling fails, the job specification remains the same as it was before the scaling.
- You can only scale a migration job specification when the job is in the Running or Paused status.
- TiDB Cloud does not support scaling a migration job specification during the existing data export stage.
- Scaling a migration job specification will restart the job. If a source table of the job does not have a primary key, duplicate data might be inserted.
- During scaling, do not purge the binary log of the source database or increase
expire_logs_daysof the upstream database temporarily. Otherwise, the job might fail because it cannot get the continuous binary log position.
-
Log in to the TiDB Cloud console and navigate to the Clusters page of your project.
-
Click the name of your target cluster to go to its overview page, and then click Data Migration in the left navigation pane.
-
On the Data Migration page, locate the migration job you want to scale. In the Action column, click ... > Scale Up/Down.
-
In the Scale Up/Down window, select the new specification you want to use, and then click Submit. You can view the new price of the specification at the bottom of the window.