First of all, download all the required material here
Oracle Cloud is available in some Regions.
Each region have 3 Availability Domains, which represents 3 different Data Centers. Each one have Fault Domains, which represents physical machines located at the Data Center.
These machines are connected via Physical Networks that makes sure our customer will have high speed / low latency services, but they do not have to manage these networks.
We offer off-box Network Virtualization, which moves storage and network IO out of the hypervisor and enables lower overhead and bare metal instances.
Over this basic infrastructure, we provide the PaaS and IaaS necessary for our customer to reach their goals.

Access https://cloud.oracle.com and login with the credentials provided by the trainer

Select Autonomous Data Warehouse in the Upper-left menu (aka hamburger menu)

Create a new database. You will have to choose:
(For this example you can keep the default values)
- The cloud compartment where it will be located.
- The database name and its display name.
- The workload type (ATP or ADW)
- The deployment type (Serverless or Dedicated)
- The CPU count and Storage
- The password for the admin account
- The license type (BYOL or New License)

To make sure the database is working as intended, we are going to log into SQL Developer Web.
In the Database, go to Service Console

Select SQL Developer Web in the Development Menu

Login with the admin user and your password, and use the following sample query:
SELECT channel_desc, TO_CHAR(SUM(amount_sold),'9,999,999,999') SALES$,
   RANK() OVER (ORDER BY SUM(amount_sold)) AS default_rank,
   RANK() OVER (ORDER BY SUM(amount_sold) DESC NULLS LAST) AS custom_rank
FROM sh.sales, sh.products, sh.customers, sh.times, sh.channels, sh.countries
WHERE sales.prod_id=products.prod_id AND sales.cust_id=customers.cust_id
  AND customers.country_id = countries.country_id AND sales.time_id=times.time_id
  AND sales.channel_id=channels.channel_id
  AND times.calendar_month_desc IN ('2000-09', '2000-10')
  AND country_iso_code='US'
GROUP BY channel_desc;
Your results should look like the picture below:

Autonomous Data Warehouse comes with a built-in suite of tools that can help you with many of the typical data warehouse tasks. This tool suite is complementary to various capabilities accessible via the SQL command line, which themselves are covered by other workshops. To explore how these new built-in tools can make you work smarter and faster, you will take on the role of a departmental analyst at MovieStream. As a departmental analyst, you have been assigned the task of reviewing the sales data from Q2 of fiscal year 2020 and making recommendations for a marketing campaign based on this analysis.
On the Autonomous Data Warehouse console page, click the Tools tab, and in the Database Actions card, click the link to Open Database Actions:

This will take you to the Autonomous Data Warehouse Database Actions home page (shown below). This page has a card for each of the most common tasks that the data warehouse user would want to perform. The cards are grouped by theme. For example, here you see groups for Development and Data Tools. Each card has a title and description.

If you want more information about each of the tasks related to each card, then you can access the online help by clicking the Question Mark in the title bar, as indicated in the image below:

This will pop out a tray containing links to the relevant topics in the Autonomous Data Warehouse documentation. To close the help tray, simply click the X.

Click the Data Load card on the Database Actions home page.

To load the files from your local computer, you need to click on the first card in each of the first two rows of cards (in row one - LOAD DATA and row two - LOCAL FILE) which will mark each box with a blue tick in the bottom right corner. To move forward to the next step in this process, simply click the blue Next button.

This is where you need to locate the four files (Movie_Sales_2020.csv, Countries.csv, Days_Months.xlsx and Devices.xlsx) that you downloaded earlier! If they are easily accessible, then you can simply drag ALL FOUR files at one time, and drop them onto to canvas as stated in the text on the screen.

Why do you have five cards listed on the data loading screen? This is because your spreadsheet file Days_Months.xlsx contains two worksheets: one for Days and one for Months. The data loading wizard automatically parsed your spreadsheet and created a separate data loading card for each worksheet.

Before you load any data, let's review what the data loading wizard has discovered about the data within your data files. Let's focus on the Countries.csv file. Click the pencil icon on the right side of the card to inspect the data loading properties:

In the bar on the left, there are links for Settings, File, Table, and an Error Log. This screenshot shows the Settings page. Observe that this shows the structural information and intelligent default values that data wizard has created from simply looking at the file.

Click Close in the bottom right to return to the Data Load card and then click the green button in the menu panel to start the Data Load job.

The time taken to load each file depends on factors including file size and network speed. The progress of the job can be monitored from the status bar and the ring to the left of each job card. When the ring is complete, the file has uploaded successfully.

Navigate to the Data Load main page and click the Explore card. You'll now see table MOVIE_SALES_2020 has been loaded into your Autonomous Data Warehouse.
Click this table and then click Source Statistics on the panel to the left of the screen. Statistics help you quickly understand the structure and content of the table. In this case, this data presents a nice simple way to characterize the data you've just loaded.

Click on the word DAY in the first column. You can see that there are 14 distinct values - which looks odd. The low value is FRIDAY (i.e. it's all uppercase) and the high value is Wednesday, which is in title case. The distribution of these values is shown in the bar chart at the bottom of the form (see the image above). As you move your mouse across these bars, you can see there are two separate bars for each day: one in uppercase and the other in title case.
You can also see that you have data for twelve months. This should not be a surprise, since the data extract you loaded in the previous step was for 2020. However, for your quarterly reporting project, it's obvious that you have too many months: your mission here is to analyze data only for Q2.
From the Autonomous Database Tools home page, access a SQL worksheet by clicking the SQL card on the Database Actions page. Copy and paste the following SQL statement into the Worksheet.
create table MOVIE_SALES_2020Q2 as
select COUNTRY
, initcap(DAY) as DAY -- Use title case for days
, MONTH
, GENRE
, CUSTOMER_SEGMENT
, DEVICE
, SALES
, PURCHASES
FROM MOVIE_SALES_2020
where month in ('April','May','June'); -- only want data from Q2
exec dbms_stats.gather_table_stats(user, 'MOVIE_SALES_2020Q2');
Select the entire text in the Worksheet and press the green button to run these two statements. You should see that both statements have executed successfully. Having completed this step you now have a table MOVIE_SALES_2020Q2, with data for just April, May, and June. The days have all been changed to title case. Refresh to see the new table created.

Start by clicking the Business Models card in the ADB Database Actions page. The page on which you'll land has some text explaining the Business Model utility in some detail, but let's dive straight in.
Press one of the Create Model buttons. If MOVIE_SALES_2020Q2 is not already identified as the Fact Table , select it from the pick list. (Be sure to select table MOVIE_SALES_2020Q2, which has just the data for April, May, June, and not table MOVIE_SALES_2020, which has data for the full year!)

Now, press Next to start the Auto-Business Model utility. This will take several seconds to complete, after which you'll see a dialog such as this.

Press Close and select Data Sources from the panel at the left of the screen. You'll see that a star schema has been identified, based on the tables that you loaded in previous steps of this lab. All columns of the Fact Table, MOVIE_SALES_2020Q2, are already shown.
Press the three dots to the right of table DAYS and select Expand. Repeat this for the other three dimension tables. You should see the star schema laid out as follows:

Select Hierarchies from the list on the left of the screen and click the three dots to the right of the row for hierarchy CONTINENT. Click Edit.

Notice that the business model tool has detected a hierarchy of Countries within Continents, based on the structure and contents of the tables in the Autonomous Data Warehouse.

This is a great head start, but a better term to use for this hierarchy would be geography. Override the default Hierarchy Name with GEOGRAPHY. Override Caption and Description with Geography as shown below. Then click Save.

Clean up hierarchy DAYS:
-
Click the three dots to the right of that hierarchy and select Edit.
-
Change Hierarchy Name to DAY.
-
Change Caption and Description to Day.

This is simply a day-of-week hierarchy, but now you'll see the value of the table that the sales analyst had set up in a previous analysis. Sorting days alphabetically is not particularly helpful. What's preferable is to sort by the day number of week. Conventions for day numbers vary across the world and the DAYS table supports both the European and the North American conventions. You'll use the North American convention for this exercise. Change the Sort By to DAY_NUM_USA. Then click Save.

Similarly, change the MONTHS dimension as follows:

Now select Measures, the last item on the list on the left of the screen. Notice that Auto-Business Model has identified SALES and PURCHASES as candidate Measures from the Fact Table (because these are numeric columns).
a. Measure SALES is a dollar amount.
b. Measure PURCHASES is a tally of the number of purchases made.
The default aggregation expression for the measures is SUM. Other expressions could be selected, but for the purposes of this workshop, SUM is the appropriate value to select in both cases.

Press Create and then Yes in the confirmation dialog. After a few seconds, the Business Model is successfully created, and represented by a card at the bottom of the screen.
Press the three dots on the top right of the card and select Show DDL from the list that appears.

Experienced users of Oracle Database will note that the Business Model is implemented in the database as an Analytic View. Experienced or not, it's nice to know that you didn't have to type any of that DDL! Click Close to return to the Business Model screen, click the three dots on the Business Model's card again and this time select Analyze from the list that appears.
You should see a data summary similar to this.

Then click Layout.
Notice that there are two tabs across the top of the Layout screen.
In the Hierarchies tab:
a. Change the layout of hierarchy GEOGRAPHY to All by selecting that value from the pick list.
b. Change the layout of hierarchy CUSTOMER_SEGMENT to Column.
c. Change the layout of hierarchy DEVICES to Row.

In the Measures tab:
a. Deselect measure SALES.
b. Select measure PURCHASES.
Click Close.
You should see a data summary similar to this.

Having completed this step, you now have a Business Model over table MOVIE_SALES_2020Q2. This features hierarchies, measures (including aggregation expressions), and provides a preview pane in which to view the data and do some rudimentary analysis. Press Close to return to the Business Model page.
Oracle Application Express (APEX) is a low-code development platform that enables you to build scalable, secure enterprise apps, with world-class features, that can be deployed anywhere. APEX is included on every Autonomous Database deployment, and is enabled by a single click.
For this Hands-on Lab I am going to use a guide included in the Workshop material (same download available in the first paragraph of this page).
My recommendation is to do the first 2 labs on this material:
- Lab 100 - Provision your Autonomous Database (Go straight to pg 17)
- Lab 200 - Adding Spatial to an APEX Application
- The other labs if you feel like you want to dive deeper into APEX.
Feel free to skip the introduction and begin on Page 17 - Prepare the APEX Workspace since the ADB instance is already created. (APEX lab -> ATP_APEX_HOL_TRIAL_V1.1_PART1_OAC.pdf)
PS: Follow every step of the guide, using the same Workspace Name otherwise the Import App process will fail. Also, you can skip the Create an Oracle Analytics Cloud exercise (pgs 22-24).
In this lab, you will be uploading files to the Oracle Cloud Infrastructure (OCI) Object Storage, creating sample tables, loading data into them from files on the OCI Object Storage, and troubleshooting data loads with errors.
To load data from files in the cloud into your Autonomous Data Warehouse database, use the new PL/SQL DBMS_CLOUD package. The DBMS_CLOUD package supports loading data files from the following Cloud sources: Oracle Cloud Infrastructure Object Storage, Oracle Cloud Infrastructure Object Storage Classic, Amazon AWS S3 and Microsoft Azure Object Store.
From the Autonomous Data Warehouse console, pull out the left side menu from the top-left corner and select Object Storage.

To learn more about the OCI Object Storage, refer to its documentation .
In OCI Object Storage, a bucket is the terminology for a container of multiple files.
Click the Create Bucket button:

Name your bucket and click the Create Bucket button.

Click on your bucket name to open it:

Click on the Upload Object button:

Using the browse button or select all the files downloaded in the earlier step, click Upload and wait for the upload to complete:

Copy following base URL that points to the location of your files staged in the OCI Object Storage. The simplest way to get this URL is from the "Object Details" in the right hand side ellipsis menu in the Object Store.


Take a look at the URL you copied. In this example above, the region name is us-phoenix-1, the tenant name is adwctraining8, and the bucket name is ADWCLab.
Note: The URL can also be constructed as below:
https://objectstorage.<region_name>.oraclecloud.com/n/<tenant_name>/b/<bucket_name>/o
Save the base URL you copied in a note. We will use the base URL in following steps.
To load data from the Oracle Cloud Infrastructure(OCI) Object Storage you will need an OCI user with the appropriate privileges to read data (or upload) data to the Object Store. The communication between the database and the object store relies on the Swift protocol and the OCI user Auth Token.
Go back to the Autonomous Data Warehouse Console in your browser. From the pull-out menu on the top left, under Identity, click Users.

Click the user's name to view the details. Also, remember the username as you will need that in the next step. This username could also be an email address.

On the left side of the page, click Auth Tokens.

Click Generate Token.

Enter a friendly description for the token and click Generate Token.

The new Auth Token is displayed. Click Copy to copy the Auth Token to the clipboard. You probably want to save this in a temporary notepad document for the next few minutes (you'll use it in the next step). Note: You can't retrieve the Auth Token again after closing the dialog box.

In order to access data in the Object Store you have to enable your database user to authenticate itself with the Object Store using your OCI object store account and Auth token. You do this by creating a private CREDENTIAL object for your user that stores this information encrypted in your Autonomous Data Warehouse. This information is only usable for your user schema.
Connected as your user in SQL Developer, copy and paste the code below to SQL Developer worksheet.
set define off
begin
  DBMS_CLOUD.create_credential(
    credential_name => 'OBJ_STORE_CRED',
    username => '<Username>',
    password => '<Auth Token>'
  );
end;
/
set define on
Specify the credentials for your Oracle Cloud Infrastructure Object Storage service: The username will be your OCI username (usually your email address, not your database username) and the password is the OCI Object Store Auth Token you generated in the previous step. In this example, the credential object named OBJ_STORE_CRED is created. You reference this credential name in the following steps.

Run the script.

Now you are ready to load data from the Object Store.
To check if your credential was correctly created, use the command below:
SELECT * FROM all_credentials;This will list every credential available on your Autonomous Database, along with its OWNER, CREDENTIAL_NAME, USERNAME, WINDOWS_DOMAIN, COMMENTS and if it is ENABLED or not.
Next we will create a Table to where we are going to load all the data we have just uploaded to the Object Storage
DROP TABLE admin.credit_scoring_100k;
CREATE TABLE admin.credit_scoring_100k
   (customer_id number(38,0),
    age number(4,0),
    income number(38,0),
    marital_status varchar2(26 byte),
    number_of_liables number(3,0),
    wealth varchar2(4000 byte),
    education_level varchar2(26 byte),
    tenure number(4,0),
    loan_type varchar2(26 byte),
    loan_amount number(38,0),
    loan_length number(5,0),
    gender varchar2(26 byte),
    region varchar2(26 byte),
    current_address_duration number(5,0),
    residental_status varchar2(26 byte),
    number_of_prior_loans number(3,0),
    number_of_current_accounts number(3,0),
    number_of_saving_accounts number(3,0),
    occupation varchar2(26 byte),
    has_checking_account varchar2(26 byte),
    credit_history varchar2(26 byte),
    present_employment_since varchar2(26 byte),
    fixed_income_rate number(4,1),
    debtor_guarantors varchar2(26 byte),
    has_own_phone_no varchar2(26 byte),
    has_same_phone_no_since number(4,0),
    is_foreign_worker varchar2(26 byte),
    number_of_open_accounts number(3,0),
    number_of_closed_accounts number(3,0),
    number_of_inactive_accounts number(3,0),
    number_of_inquiries number(3,0),
    highest_credit_card_limit number(7,0),
    credit_card_utilization_rate number(4,1),
    delinquency_status varchar2(26 byte),
    new_bankruptcy varchar2(26 byte),
    number_of_collections number(3,0),
    max_cc_spent_amount number(7,0),
    max_cc_spent_amount_prev number(7,0),
    has_collateral varchar2(26 byte),
    family_size number(3,0),
    city_size varchar2(26 byte),
    fathers_job varchar2(26 byte),
    mothers_job varchar2(26 byte),
    most_spending_type varchar2(26 byte),
    second_most_spending_type varchar2(26 byte),
    third_most_spending_type varchar2(26 byte),
    school_friends_percentage number(3,1),
    job_friends_percentage number(3,1),
    number_of_protestor_likes number(4,0),
    no_of_protestor_comments number(3,0),
    no_of_linkedin_contacts number(5,0),
    average_job_changing_period number(4,0),
    no_of_debtors_on_fb number(3,0),
    no_of_recruiters_on_linkedin number(4,0),
    no_of_total_endorsements number(4,0),
    no_of_followers_on_twitter number(5,0),
    mode_job_of_contacts varchar2(26 byte),
    average_no_of_retweets number(4,0),
    facebook_influence_score number(3,1),
    percentage_phd_on_linkedin number(4,0),
    percentage_masters number(4,0),
    percentage_ug number(4,0),
    percentage_high_school number(4,0),
    percentage_other number(4,0),
    is_posted_sth_within_a_month varchar2(26 byte),
    most_popular_post_category varchar2(26 byte),
    interest_rate number(4,1),
    earnings number(4,1),
    unemployment_index number(5,1),
    production_index number(6,1),
    housing_index number(7,2),
    consumer_confidence_index number(4,2),
    inflation_rate number(5,2),
    customer_value_segment varchar2(26 byte),
    customer_dmg_segment varchar2(26 byte),
    customer_lifetime_value number(8,0),
    churn_rate_of_cc1 number(4,1),
    churn_rate_of_cc2 number(4,1),
    churn_rate_of_ccn number(5,2),
    churn_rate_of_account_no1 number(4,1),
    churn_rate__of_account_no2 number(4,1),
    churn_rate_of_account_non number(4,2),
    health_score number(3,0),
    customer_depth number(3,0),
    lifecycle_stage number(38,0),
    credit_score_bin varchar2(100 byte)
   );

grant select any table to public;It is possible to use the DBMS_CLOUD package to load the data directly form object storage to the table. This is the preferred choice for any load automation.
begin
 dbms_cloud.copy_data(
    table_name =>'CREDIT_SCORING_100K',
    credential_name =>'<insert credential>',
    file_uri_list => '<insert URL>',
    format => json_object('ignoremissingcolumns' value 'true', 'removequotes' value 'true', 'dateformat' value 'YYYY-MM-DD HH24:MI:SS', 'blankasnull' value 'true', 'delimiter' value ',')
 );
end;
To check if all your data was uploaded, you can use the command below:
select count (*) from CREDIT_SCORING_100KIf your result is 100000, it means every row was correctly updated to the table.
Connected as your user in SQL Developer, run the following query to look at past and current data loads.
select * from user_load_operations;Notice how this table lists the past and current load operations in your schema. Any data copy and data validation operation will have backed up records in your Cloud.
Run the following query to see the load that errored out.
select * from user_load_operations where status='FAILED';In the Database, go to Service Console
Select Administration and Manage Oracle ML Users.

Log in as admin user and password that you assigned when you created the instance and Create new ML user. You will receive shortly an e-mail with your credentials and the link to the Oracle Machine Learning webpage.
- Login into OML
- Load a notebook
- Explore Zeppelin Notebooks features
For this example we are going to create a website running on Node.js and connect it to an Autonomous Transaction Processing Database. All the requests performed by the website are going to be sent directly to the database.
For this practice we are going to need:
- An Autonomous Transaction Processing instance (1OCPU)
- A Virtual Cloud Network
- A Linux Compute Instance
We are not going through the ADB instance creation all again, if you have any doubts just go back to Hands-on: Creating the Autonomous DB
To create the Virtual Cloud Network, you should go to the hamburger menu -> Networking -> Virtual Cloud Network (we usually call them VCNs)

Then, you can just choose the Networking Quickstart option

Choose the VCN with Internet Connectivity and click Start Workflow
A wizard will be launched, simply define a name for the VCN and configure the CIDR Block using the values on the examples (just below the boxes)

Click Next and your VCN will be created, along with a Private and a Public Subnet. Since we are going to connect to our Linux instance via ssh and via internet, we are going to use the Public Subnet when we're given the choice.
Click View Virtual Cloud Network to check the network details.
Since we are going to use some ports on this network, we will have to enable the connection via those ports. Scroll down to Resources -> Security Lists and choose the Default Security List for your VCN

Click Add Ingress Rules and unlock the ports 80,1522,443,3000,8080 That's all we are going to need in this example.

After clicking Add Ingress Rules, just check if you have 8 total Ingress Rules. We are now ready to create our Linux Virtual Machine.
To create the Linux VM, you will have to go to the Compute Instances console. You can find it at the Hamburger Menu -> Compute -> Instance

Click Create Compute Instance and a Wizard will show up.
- Choose the Oracle Linux 7.7 distribution under the Oracle Image tab
- Set the Intance Shape to VM.Standard.E2.1
- Make sure that you are using your VCN, and do not forget to choose the Public Subnet and to Assign a Public IP address to your Linux Instance
- Upload a ssh .pub file to use for connecting with your VM
After sending the request to create your VM, it should take some minutes to get it running (usually no more than 3 min). You will be able to find the Public IP Address on the Instance Details

We will use this Public IP Address to ssh into the OS and host our website. The code is ready and available to be cloned from our Github repository.
So you are going to need tools to ssh into the instance and transfer files via FTP. I am going to use MobaXTerm, but feel free to use other alternatives like Putty and WinSCP, for example.
Log into your instance by using:
- Your Public IP Address
- The opc username
- Port 22
- Your .ppk key file

After connecting to the VM, let's change to the root user and update the OS:
sudo su
yum update -y
This step may take a couple minutes to finish.
Install git, which we are going to use to clone the website code:
yum install -y gitCreate a directory and browse to it, then clone the git project with all the code needed:
mkdir /home/dev
cd /home/dev
git clone https://github.com/brenorc/workshops.git
Alter the instancePrep.sh permissions so you can run this script. This will prepare all the environment for us.
chmod 775 workshops/instancePrep.sh
source workshops/instancePrep.sh
Browse to the /workshop/lib directory and install the Oracle Database Instant Client 19.x by running:
cd workshops/lib
yum -y install oracle-instantclient19.3-basic-19.3.0.0.0-1.x86_64.rpm
Now we are going to connect our VM to the Autonomous DB services
Every time we connect to the Autonomous Database we need to use the Wallet file. This is a file containing the credentials needed to create a connection to the ADB.
Open your Autonomous Transaction Processing and click Database Connection. This will open a window where you are able to download the credentials. Save them as a .zip file.

Connect via FTP to your environment and copy the whole .zip file

Copy your wallet file to the Instant Client folder and unzip the files. Don't forget to put your wallet name in the code
cp /home/opc/<WalletName> /usr/lib/oracle/19.3/client64/lib/network/admin/

cd /usr/lib/oracle/19.3/client64/lib/network/admin/
unzip <WalletName>
Start the Instant Client services by running:
sh -c "echo /usr/lib/oracle/19.3/client64/lib > /etc/ld.so.conf.d/oracle-instantclient.conf"
ldconfig
Return to the directory created in the Instance configuration and install the npm packages:
cd /home/dev/workshops/backend
npm install
Edit the db.connect.js file according to your database configuration:
vim src/dbconnect.jsAfter opening the file, click i to enter the insert mode. Update your database password and connectionString (we will use your DatabaseName_TP). After editing the file, hit ESC and then :wq ENTER to save your updates and quit. We are now able to start the server:
npm start & Press ENTER to go back to terminal without ending the process.
To verify if your service is running you may use the command:
ps -aThe backend is all configured, so all we need is to edit the frontend and our application will be ready to run.
Browse to the dev directory and edit the app.js file:
cd /home/dev
vim /home/dev/workshops/frontend/app.js
You will have to input you Public IP Address, so identify the string, use i to enter insert mode and when finished use ESC :wq ENTER
Finally we are going to remove the content from nginx html folder and copy our frontpage into it:
rm -rf /var/www/html/*
cp /home/dev/workshops/frontend/* /var/www/html/
The next step is to open your browser and type the Public IP address of your VM. If everything is correct, you will see the page below:

Basically you're given 3 options:
-
Test your connection to the Database (mostly for troubleshooting)
-
By using Simple Oracle Document Access (SODA), creates a table named CARROS and inserts a BLOB into the database includiung a JSON payload.
-
Creates the table SERIES and inserts a simple record into the databse via SQL.
Click each one of the buttons and see if your result is a positive status. Those commands will create 2 tables in the database and insert some information into the tables. It's interesting to connect to the database via SQL Developer Web after doing the inserts to query the database and check which kind of information we have just loaded into the database.
If the data was added correctly, this is the end of our Tutorial.
Based on: https://blogs.oracle.com/jsondb/autonomous-json-database
It is also possible to work with JSON objects using any Oracle Autonomous Database, but the Autonomous JSON Database is optimized to do so. In this quick practice we are going to use SODA (Simple Oracle Document Access) - a native, open-source document store API for common programming languages including Java, JavaScript and Python. Developing applications with JSON and SODA is as easy with Oracle as it is with NoSQL databases like MongoDB.
First of all, create an Autonomous Database. I suggest creating an Autonomous JSON Database but this practice will work on the other ADB versions as well.
After logging in to SQL Developer Web, you can type in 'soda help' to get an overview of the soda commands:
soda help

Type the following to create a collection 'movies' and insert two JSON documents, with information related to 2 of my personal favorites
soda create movies;
soda insert movies {"name":"Matrix", "launch_year":"1999","genre":["Science Fiction","Action"]}
soda insert movies {"name":"Forrest Gump", "launch_year":"1994","genre":["Comedy","Drama"]}
We can now query the collection to find documents matching a search/filter criteria.For example, I will look for movies with the gender set as 'Comedy'
soda get movies -f {"genre":"Comedy"} 
It is also possible to filter using other expressions as 'greater than', The example below queries for any movies released after 1996 (launch year greater than 1996):
soda get movies -f {"launch_year":{"$gt":1996}}
In these examples we used a console to enter SODA commands. Typically, you would use SODA directly from a programming language. We do have SODA drivers for Java, JavaScript (nodeJS), Python, REST, Pl/Sql and ODPI-C.
With the JSON data stored in an Oracle Database it is also possible to use SQL to access the very same data. First, let's describe the collection:
describe movies;
As one can see the JSON collection is backed by a regular table. The JSON data is stored in a binary representation optimized for fast reads and piece-wise updates. In order to convert it to a JSON string we use JSON_SERIALIZE.
select JSON_Serialize(JSON_Document) from movies;
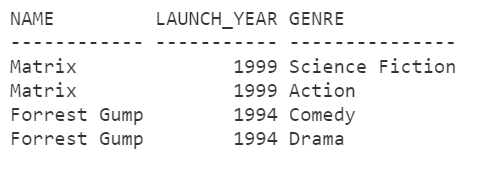
With JSON_Table it is possible to unnest the JSON data and project it to relational columns and rows. Please note that the two JSON documents generate 4 rows as both movie have two genres each.
select j.* from movies NESTED json_document
            COLUMNS (name, launch_year number,
              NESTED genre[*]
              COLUMNS(genre PATH '$')) j;
Going from a relational representation back to JSON is similarly easy. All we do is add one (or more) JSON generation functions to a query. In the following we are generating an array of all movies names.
select JSON_ArrayAgg(c.json_document.name) from movies c;
Autonomous JSON Database is part of the Oracle Autonomous Database family. Autonomous JSON Database shares all of the core features for automation, lifecycle management, security, availability, scalability and elasticity with all other Autonomous Database services and is now extending all of the autonomous benefits to JSON application developers.
You have completed all of the available tutorials.
For questions, comments, or feedback, feel free to send an e-mail message to me at [email protected].
Hope you have enjoyed!