py-shiny/README.md at main · posit-dev/py-shiny #675
Comments
Related issues#674: FastUI/README.md at main · pydantic/FastUI### DetailsSimilarity score: 0.88 - [ ] [FastUI/README.md at main · pydantic/FastUI](https://github.com/pydantic/FastUI/blob/main/README.md?plain=1)FastUI
Please note: FastUI is still an active work in progress, do not expect it to be complete. The Principle (short version)You can see a simple demo of an application built with FastUI here. FastUI is a new way to build web application user interfaces defined by declarative Python code. This means:
At its heart, FastUI is a set of matching Pydantic models and TypeScript interfaces that allow you to define a user interface. This interface is validated at build time by TypeScript and pyright/mypy and at runtime by Pydantic. The Practice — UsageFastUI is made up of 4 things:
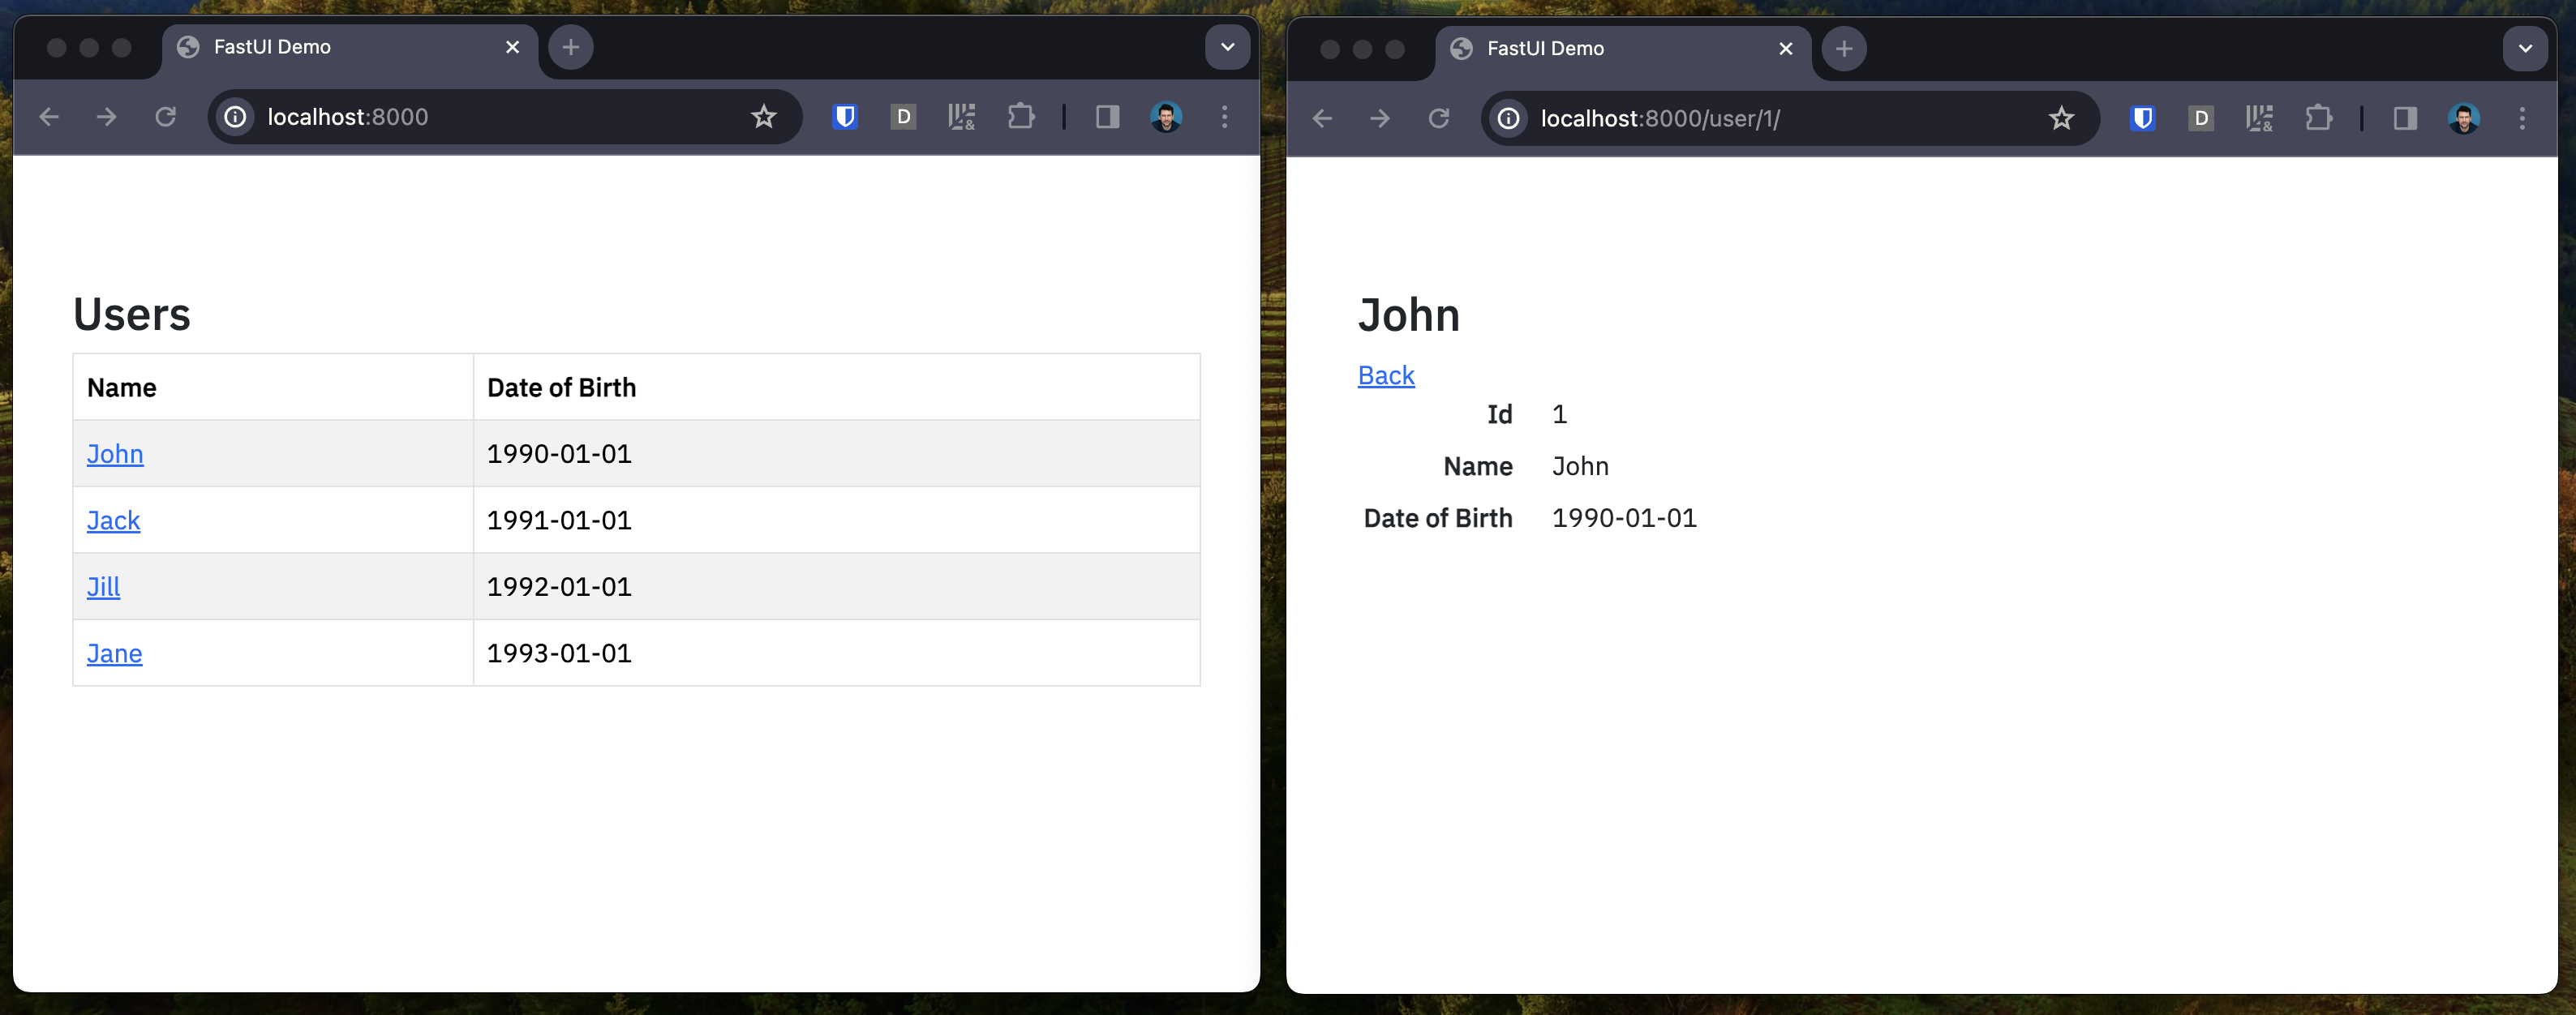
Here's a simple but complete FastAPI application that uses FastUI to show some user profiles: from datetime import date
from fastapi import FastAPI, HTTPException
from fastapi.responses import HTMLResponse
from fastui import FastUI, AnyComponent, prebuilt_html, components as c
from fastui.components.display import DisplayMode, DisplayLookup
from fastui.events import GoToEvent, BackEvent
from pydantic import BaseModel, Field
app = FastAPI()
class User(BaseModel):
id: int
name: str
dob: date = Field(title='Date of Birth')
# define some users
users = [
User(id=1, name='John', dob=date(1990, 1, 1)),
User(id=2, name='Jack', dob=date(1991, 1, 1)),
User(id=3, name='Jill', dob=date(1992, 1, 1)),
User(id=4, name='Jane', dob=date(1993, 1, 1)),
]
@app.get("/api/", response_model=FastUI, response_model_exclude_none=True)
def users_table() -> list[AnyComponent]:
"""
Show a table of four users, `/api` is the endpoint the frontend will connect to
when a user visits `/` to fetch components to render.
"""
return [
c.Page( # Page provides a basic container for components
components=[
c.Heading(text='Users', level=2), # renders `<h2>Users</h2>`
c.Table(
data=users,
# define two columns for the table
columns=[
# the first is the users, name rendered as a link to their profile
DisplayLookup(field='name', on_click=GoToEvent(url='/user/{id}/')),
# the second is the date of birth, rendered as a date
DisplayLookup(field='dob', mode=DisplayMode.date),
],
),
]
),
]
@app.get("/api/user/{user_id}/", response_model=FastUI, response_model_exclude_none=True)
def user_profile(user_id: int) -> list[AnyComponent]:
"""
User profile page, the frontend will fetch this when the user visits `/user/{id}/`.
"""
try:
user = next(u for u in users if u.id == user_id)
except StopIteration:
raise HTTPException(status_code=404, detail="User not found")
return [
c.Page(
components=[
c.Heading(text=user.name, level=2),
c.Link(components=[c.Text(text='Back')], on_click=BackEvent()),
c.Details(data=user),
]
),
]
@app.get('/{path:path}')
async def html_landing() -> HTMLResponse:
"""Simple HTML page which serves the React app, comes last as it matches all paths."""
return HTMLResponse(prebuilt_html(title='FastUI Demo'))Which renders like this:
Of course, that's a very simple application, the full demo is more complete. ComponentsFastUI already defines a rich set of components. All components are listed in the demo app. Suggested labels#642: TabbyML: Self-hosted AI coding assistant.### DetailsSimilarity score: 0.85 - [ ] [tabby/README.md at main · TabbyML/tabby](https://github.com/TabbyML/tabby/blob/main/README.md?plain=1)tabby/README.md at main · TabbyML/tabby🐾 Tabby
Tabby is a self-hosted AI coding assistant, offering an open-source and on-premises alternative to GitHub Copilot. It boasts several key features:
🔥 What's New
Archived
👋 Getting StartedYou can find our documentation here. Run Tabby in 1 MinuteThe easiest way to start a Tabby server is by using the following Docker command: ```bash 🤝 ContributingFull guide at CONTRIBUTING.md; Get the Code```bash If you have already cloned the repository, you could run the `git submodule update --recursive --init` command to fetch all submodules. Build
For MacOSbrew install protobuf For Ubuntu / Debianapt-get install protobuf-compiler libopenblas-dev
Start Hacking!... and don't forget to submit a Pull Request 🌍 Community
🌟 Star HistoryURL: tabby/README.md Suggested labels#508: microsoft/TaskWeaver: A code-first agent framework for seamlessly planning and executing data analytics tasks.### DetailsSimilarity score: 0.84 - [ ] [microsoft/TaskWeaver: A code-first agent framework for seamlessly planning and executing data analytics tasks.](https://github.com/microsoft/TaskWeaver)CONTENT:
🆕 News
💥 Highlights
✨ Quick Start🛠️ Step 1: InstallationTaskWeaver requires Python >= 3.10. It can be installed by running the following command: # [optional to create conda environment]
# conda create -n taskweaver python=3.10
# conda activate taskweaver
# clone the repository
git clone https://github.com/microsoft/TaskWeaver.git
cd TaskWeaver
# install the requirements
pip install -r requirements.txt🖊️ Step 2: Configure the LLMsBefore running TaskWeaver, you need to provide your LLM configurations. Taking OpenAI as an example, you can configure the OpenAI{
"llm.api_key": "the api key",
"llm.model": "the model name, e.g., gpt-4"
}💡 TaskWeaver also supports other LLMs and advanced configurations, please check the documents for more details. 🚩 Step 3: Start TaskWeaver⌨️ Command Line (CLI)Assume you are in the cloned TaskWeaver folder. python -m taskweaver -p ./project/This will start the TaskWeaver process and you can interact with it through the command line interface. If everything goes well, you will see the following prompt: or 💻 Web UI TaskWeaver also supports WebUI for demo purpose, please refer to web UI docs for more details. or 📋 Import as a Library TaskWeaver can be imported as a library to integrate with your existing project, more information can be found in docs 📖 Documentation More documentations can be found on TaskWeaver Website. Suggested labels{ "label-name": "taskweaver", "description": "A code-first agent framework for data analytics tasks.", "repo": "microsoft/TaskWeaver", "confidence": 68.7 }#625: unsloth/README.md at main · unslothai/unsloth### DetailsSimilarity score: 0.83 - [ ] [unsloth/README.md at main · unslothai/unsloth](https://github.com/unslothai/unsloth/blob/main/README.md?plain=1)unsloth/README.md at main · unslothai/unsloth
Finetune Mistral, Gemma, Llama 2-5x faster with 70% less memory!✨ Finetune for FreeAll notebooks are beginner friendly! Add your dataset, click "Run All", and you'll get a 2x faster finetuned model which can be exported to GGUF, vLLM or uploaded to Hugging Face.
🦥 Unsloth.ai News
🔗 Links and Resources
⭐ Key Features
🥇 Performance Benchmarking
Suggested labels#74: Sqlite WASM and Github Pages### DetailsSimilarity score: 0.83 - [ ] [merge sqlite - Kagi Search](https://kagi.com/search?q=merge+sqlite&from_date=2021-01-01) - [ ] [sql - Fastest Way merge two SQLITE Databases - Stack Overflow](https://stackoverflow.com/questions/9349659/fastest-way-merge-two-sqlite-databases) - [ ] [simonw/sqlite-utils: Python CLI utility and library for manipulating SQLite databases](https://github.com/simonw/sqlite-utils) - [ ] [sqlite-utils](https://sqlite-utils.datasette.io/en/stable/) - [ ] [GitHub Pages | Websites for you and your projects, hosted directly from your GitHub repository. Just edit, push, and your changes are live.](https://pages.github.com/) - [ ] [sqlite wasm sql.js github pages - Kagi Search](https://kagi.com/search?q=sqlite+wasm+sql.js+github+pages) - [ ] [phiresky/sql.js-httpvfs: Hosting read-only SQLite databases on static file hosters like Github Pages](https://github.com/phiresky/sql.js-httpvfs) - [ ] [sqlite3 WebAssembly & JavaScript Documentation Index](https://sqlite.org/wasm/doc/trunk/index.md) - [ ] [phiresky/youtube-sponsorship-stats/](https://github.com/phiresky/youtube-sponsorship-stats/) - [ ] [phiresky/world-development-indicators-sqlite/](https://github.com/phiresky/world-development-indicators-sqlite/) - [ ] [Show HN: Fully-searchable Library Genesis on IPFS | Hacker News](https://news.ycombinator.com/item?id=28585208) - [ ] [nalgeon/sqlime: Online SQLite playground](https://github.com/nalgeon/sqlime) - [ ] [nalgeon/sqlean.js: Browser-based SQLite with extensions](https://github.com/nalgeon/sqlean.js) - [ ] [Sqlime - SQLite Playground](https://sqlime.org/) - [ ] [sqlite-wasm-http - npm](https://www.npmjs.com/package/sqlite-wasm-http) - [ ] [Postgres WASM by Snaplet and Supabase](https://supabase.com/blog/postgres-wasm) - [ ] [rhashimoto/wa-sqlite: WebAssembly SQLite with experimental support for browser storage extensions](https://github.com/rhashimoto/wa-sqlite) - [ ] [jlongster/absurd-sql: sqlite3 in ur indexeddb (hopefully a better backend soon)](https://github.com/jlongster/absurd-sql) - [ ] [help: basic example for the web browser · Issue #23 · phiresky/sql.js-httpvfs](https://github.com/phiresky/sql.js-httpvfs/issues/23) - [ ] [phiresky/sql.js-httpvfs: Hosting read-only SQLite databases on static file hosters like Github Pages](https://github.com/phiresky/sql.js-httpvfs#minimal-example-from-scratch) - [ ] [sql.js-httpvfs/example at master · phiresky/sql.js-httpvfs](https://github.com/phiresky/sql.js-httpvfs/tree/master/example) - [ ] [Code search results](https://github.com/search?utf8=%E2%9C%93&q=sql.js-httpvfs&type=code) - [ ] [knowledge/docs/databases/sqlite.md at 7c4bbc755c64368a82ca22b76566e9153cd2e377 · nikitavoloboev/knowledge](https://github.com/nikitavoloboev/knowledge/blob/7c4bbc755c64368a82ca22b76566e9153cd2e377/docs/databases/sqlite.md?plain=1#L96) - [ ] [static-wiki/src/sqlite.js at b0ae18ed02ca64263075c3516c38a504f46e10c4 · segfall/static-wiki](https://github.com/segfall/static-wiki/blob/b0ae18ed02ca64263075c3516c38a504f46e10c4/src/sqlite.js#L2)#487: fgmacedo/python-statemachine: Python Finite State Machines made easy.### DetailsSimilarity score: 0.83 - [ ] [fgmacedo/python-statemachine: Python Finite State Machines made easy.](https://github.com/fgmacedo/python-statemachine)fgmacedo/python-statemachine: Python Finite State Machines made easy.Python finite-state machines made easy. Python StateMachine
Welcome to python-statemachine, an intuitive and powerful state machine framework designed for a great developer experience. 🚀 With StateMachine, you can easily create complex, dynamic systems with clean, readable code. 💡 Our framework makes it easy to understand and reason about the different states, events and transitions in your system, so you can focus on building great products. 🔒 python-statemachine also provides robust error handling and ensures that your system stays in a valid state at all times. A few reasons why you may consider using it: 📈 python-statemachine is designed to help you build scalable, maintainable systems that can handle any complexity. Getting startedTo install Python State Machine, run this command in your terminal: To generate diagrams from your machines, you'll also need pydot and Graphviz. You can install this library already with pydot dependency using the extras install option. See our docs for more details. Define your state machine:from statemachine import StateMachine, State
class TrafficLightMachine(StateMachine):
"A traffic light machine"
green = State(initial=True)
yellow = State()
red = State()
cycle = (
green.to(yellow)
| yellow.to(red)
| red.to(green)
)
def before_cycle(self, event: str, source: State, target: State, message: str = ""):
message = ". " + message if message else ""
return f"Running {event} from {source.id} to {target.id}{message}"
def on_enter_red(self):
print("Don't move.")
def on_exit_red(self):
print("Go ahead!")You can now create an instance: sm = TrafficLightMachine()This state machine can be represented graphically as follows: img_path = "docs/images/readme_trafficlightmachine.png"
sm._graph().write_png(img_path)URLSuggested labels{ "label-name": "state-machine-framework", "description": "A framework for creating complex, dynamic systems with clean, readable code.", "confidence": 85.89 } |


py-shiny/README.md at main · posit-dev/py-shiny
Description
"# Shiny for Python
Shiny for Python is the best way to build fast, beautiful web applications in Python. You can build quickly with Shiny and create simple interactive visualizations and prototype applications in an afternoon. But unlike other frameworks targeted at data scientists, Shiny does not limit your app's growth. Shiny remains extensible enough to power large, mission-critical applications.
To learn more about Shiny see the Shiny for Python website. If you're new to the framework we recommend these resources:
Join the conversation
If you have questions about Shiny for Python, or want to help us decide what to work on next, join us on Discord.
Getting started
To get started with shiny follow the installation instructions or just install it from pip.
To install the latest development version:
# First install htmltools, then shiny
pip install https://github.com/posit-dev/py-htmltools/tarball/main
pip install https://github.com/posit-dev/py-shiny/tarball/main
You can create and run your first application with
shiny create, the CLI will ask you which template you would like to use. You can either run the app with the Shiny extension, or callshiny run app.py --reload --launch-browser.Development
API documentation for the
mainbranch of Shiny: API DocumentationIf you want to do development on Shiny for Python:
pip install -e ".[dev,test]"Additionally, you can install pre-commit hooks which will automatically reformat and lint the code when you make a commit:
URL: py-shiny README
AI Suggested Labels
{'label-name': 'web-development', 'label-description': 'Topics related to web development, including building web applications and interactive visualizations.', 'confidence': 56.72}
The text was updated successfully, but these errors were encountered: