Image Extensions for Swift 3.0
To run the example project, clone or download the repo, and run.
// Fetches an image from a URL. If caching is set, it will be cached by NSCache for future queries. The cached image is returned if available, otherise the placeholder is set. When the image is returned, the closure gets called.
func imageFromURL(url: String, placeholder: UIImage, fadeIn: Bool = true, closure: ((image: UIImage?)// Creates an image from a solid color
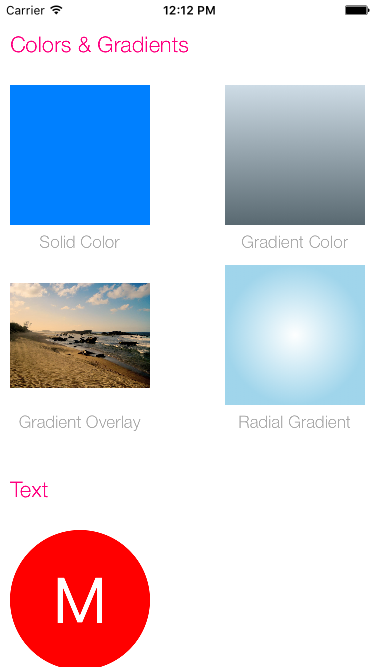
UIImage(color:UIColor, size:CGSize)
// Creates an image from a gradient color
UIImage(gradientColors:[UIColor], size:CGSize)
// Applies a gradient overlay to an image
func applyGradientColors(gradientColors: [UIColor], blendMode: CGBlendMode) -> UIImage
// Creates an image from a radial gradient
UIImage(startColor: UIColor, endColor: UIColor, radialGradientCenter: CGPoint, radius:Float, size:CGSize)// Creates an image with a string of text
UIImage(text: String, font: UIFont, color: UIColor, backgroundColor: UIColor, size:CGSize, offset: CGPoint)// Creates an image from a UIView
UIImage(fromView view: UIView)// Returns true if the image has an alpha layer
func hasAlpha() -> Bool
// Returns a copy(if needed) of the image with alpha layer
func applyAlpha() -> UIImage?
// Returns a copy of the image with a transparent border of the given size added around its edges
func applyPadding(padding: CGFloat) -> UIImage?// Crops an image to a new rect
func crop(bounds: CGRect) -> UIImage?
// Crops an image to a centered square
func cropToSquare() -> UIImage? {
// Resizes an image
func resize(size:CGSize, contentMode: UIImageContentMode = .ScaleToFill) -> UIImage?// Rounds corners of an image
func roundCorners(cornerRadius:CGFloat) -> UIImage?
// Rounds corners of an image with border
func roundCorners(cornerRadius:CGFloat, border:CGFloat, color:UIColor) -> UIImage?
// Rounds corners to a circle
func roundCornersToCircle() -> UIImage?
// Rounds corners to a circle with border
func roundCornersToCircle(border border:CGFloat, color:UIColor) -> UIImage?// Adds a border
func applyBorder(border:CGFloat, color:UIColor) -> UIImage?// Applies a light blur effect to the image
func applyLightEffect() -> UIImage?
// Applies a extra light blur effect to the image
func applyExtraLightEffect() -> UIImage?
// Applies a dark blur effect to the image
func applyDarkEffect() -> UIImage?
// Applies a color tint to an image
func applyTintEffect(tintColor: UIColor) -> UIImage?
// Applies a blur to an image based on the specified radius, tint color saturation and mask image
func applyBlur(blurRadius:CGFloat, tintColor:UIColor?, saturationDeltaFactor:CGFloat, maskImage:UIImage? = nil) -> UIImage?// To create an image that is Retina aware, use the screen scale as a multiplier for your size. You should also use this technique for padding or borders.
let width = 140 * UIScreen.mainScreen().scale
let height = 140 * UIScreen.mainScreen().scale
let image = UIImage(named: "myImage")?.resize(CGSize(width: width, height: height))


