TI USB stick
This repository lets you communicate with the Medtronic pumps in alternative ways. See https://github.com/oskarpearson/mmeowlink/wiki for more information on the available options.
Note that this is not the smallest or cheapest connection method, and doesn't necessarily have the best range. However, it does work a lot better than the CareLink, and doesn't require soldering.
Here's a picture of the complete setup. I've included the Carelink simply for comparison purposes - you don't need the Carelink!
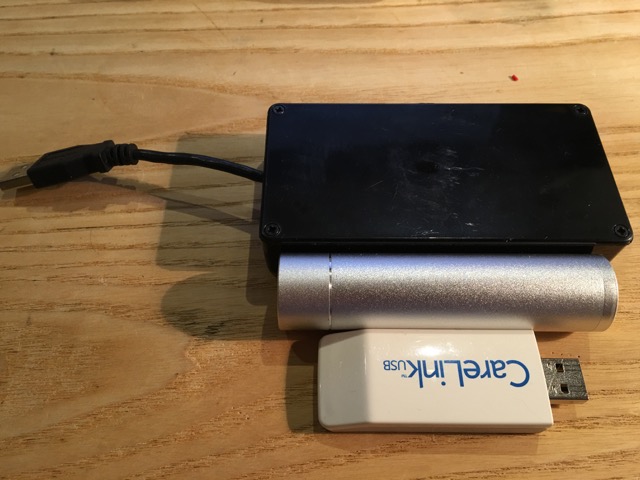
Our original closed-loop setup weighed 430 grams (15oz). The new setup weighs 170 grams (6oz).
Inside the box, I've used double-sided Velcro tape to hold the components in place. I've also placed a cable-tie around the power cable that leads out the box, so that it won't pull out accidentally.
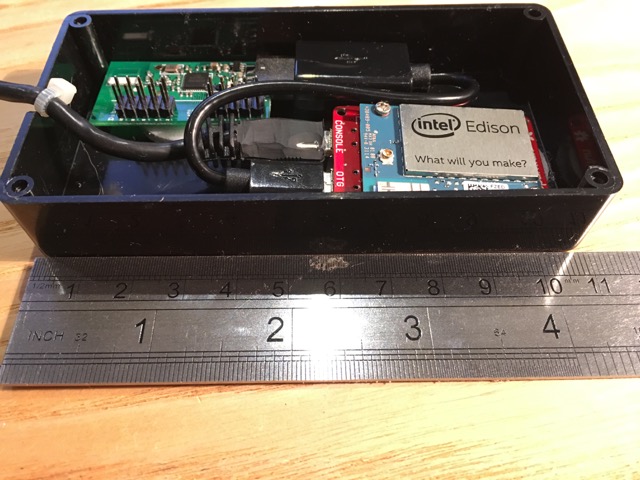
As this image shows, 50% or more of space inside the box is currently empty, but is required for the usb extension cable.
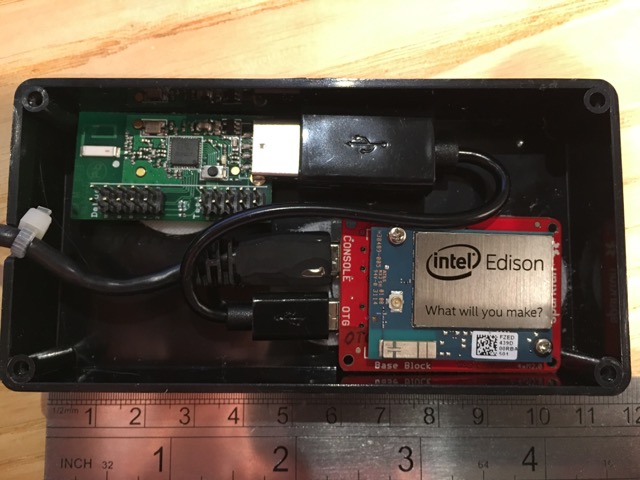
If we replace the OTG cable with a OTG Adapter we can reduce the size even further, at the expense of requiring a longer case.
Once you've got a working solution, you can also cut the pins off the TI stick with a Dremel. This would shrink the width even further.
NOTE You might want to consider one of the other options on The Wiki as they might be cheaper, smaller, or have larger range.
- Intel Edison Compute Module - Get it from Amazon, Adafruit, Sparkfun or your nearest provider.
- The photographed version uses the Sparkfun Base Block, but you can also use the slightly bigger and more versatile Intel Edison Breakout board. (NOTE - not the Arduino board). You might find it cheaper to buy the Intel Edison Module and Breakout board as a kit. Future and smaller versions of this project are likely to use the official Intel Breakout board rather than the Sparkfun Base Block. (NOTE - the Sparkfun Base Block allows power via Micro-USB in either port. The Intel Breakout board only allows power via USB from the same port as the OTG connector. The other Micro-USB there is serial only. So be aware if you go with the Intel Breakout you will need to connect the TI via serial ribbon cable as shown below OR supply power via batteries/2 pin JST in order to use the USB for the TI)
- Battery - we use the 3350mAh Anker battery Without wifi or bluetooth hotspots running, the Anker battery powers the Intel Edison for approximately 13 hours. It also does passthrough charging. Note that some other higher-power chargers that work with the Pi will randomly turn off as the Intel Edison draws too little power and the charger decides nothing is connected to it.
- A short OTG adapter/cable to connect the TI stick to the Edison. Amazon has many of these - the exact one you use probably doesn't really matter. Note that you might consider using a nano OTG adapter.
- A box to house it in. You might want to visit your local electronics store to find a box that fits everything snugly.
- Double-sided Velcro stickers to hold the pieces in place in the box.
- A short micro-USB cable to connect the Anker battery to the Edison Base Board. This gets a lot of wear - so get a good quality cable.
- A cable-tie to tie inside the box, to stop the micro-USB being pulled loose.
- A craft knife or drill to cut a hole into the box that you can fit the micro-USB cable through.
Additionally, you will need the items:
- A CC1111EMK868-915
- A programmer for the CC1111EMK868-915 - the CC-Debugger or GoodFET or Adafruit GoodFET. Note that you should only need this once. Ask other users in your area if they have one, or check with a local Hackspace.
I'm going to experiment with putting rechargable lipo batteries and the controller inside a case, and dispense with the external battery pack. I'm also considering using a QI charger unit. This way the device can be charged by placing it on a bedside charger and no cables are required. It seems that a set of 6000mAh lipo batteries would give us full-day functionality in a pocket-sized device.
You will need the following:
- cc1111emk868-915
- TI Debugger or a GoodFET or similar. (You only need this for the first installation. See if a local Hackspace or other user could help you)
- [Prepare the Edison] (https://github.com/oskarpearson/mmeowlink/wiki/Prepare-the-Edison-for-OpenAPS)
- Grab the current firmware which you plan to flash onto the TI stick. (eg. USA + TI stick it'd be usb_ep0_TI_DONGLE_US_STDLOC.hex). Save the .hex file for use in the next step
- Flash the TI Stick (aka CC1111EMK868-915) 1. Linux - [cc-tool] (https://github.com/oskarpearson/mmeowlink/wiki/Firmware-install-with-CC-Tool-(Linux)) 2. Windows - TI Flash Programmer Tool - [Instructions for flashing] (https://github.com/oskarpearson/mmeowlink/wiki/Instructions-for-Flashing-TI-stick-or-SRF-ERF-using-Windows-utilities) 3. Mac - Not available
- [Install MMeowlink and setup mmtune] (https://github.com/oskarpearson/mmeowlink/wiki/Installing-MMeowlink)