An example project demonstrating event sourcing and Command Query Responsibility Segregation (CQRS) using a couple of NestJS microservices with an Angular frontend app. Redis is used as a read database and also acts as the message broker for the pub/sub communication between the microservices. All the events are persisted into a MongoDB database.
- Responsible for the management of orders
- Each order can only be at a single state at a time
- Order states: created, confirmed, delivered, cancelled
- Once an order is created, the orders app publishes an event which is subscribed by the payments app to process a payment for the order
- If the payment of the order is declined, the order is set to cancelled
- If the payment of the order is confirmed, the order is set to confirmed
- After X amount of seconds a confirmed order is automatically set to delivered
- Has endpoints to do the following:
- view all orders
- create an order
- cancel an order
- check order status
- Responsible for payment processing
- Each order is handled by the payments app by setting the payment of the order to confirmed or declined based on random logic
- Each payment is persisted into its own table in the MongoDB database
- Once a payment is processed, the payments app publishes an event which is subscribed by the orders app to continue with order processing
- A user of the portal app can do the following:
- view list of orders
- view the details of an order
- create an order
- cancel an order
- Login requires a Gmail account for auth
- Implements server-sent events (SSE) to update the state of an order
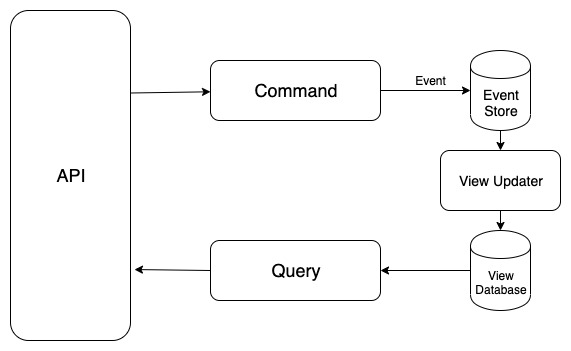
- Events that are stored in the event store are highlighted in red
- The dotted green lines represent pub/sub messaging via Redis


- It is assumed that the user has a basic understanding of Kubernetes and Helm charts
- A Firebase developer account is required to handle auth for the portal and orders app
- Installation scripts available for Minikube and Google Cloud Platform
- Please ensure to copy the file .firebase-configmap.example.yaml and set the values accordingly prior to starting installation.
$ cp firebase-configmap.example.yaml firebase-configmap.yaml
Open a shell and run these commands:
$ minikube start
$ cd orders-payments-microservices/helm/scripts
$ ./install.sh
Open a shell and run these commands:
$ gcloud auth login
$ cd orders-payments-microservices/helm/scripts
$ ./gcloud_add_helm.sh
$ ./gcloud_startup.sh
$ ./install.sh
Set the configuration values / enviroment variable of each application.
Copy the file .env.example and set each environment variable accordingly.
$ cp .env.example .env
Set the configuration values in the EnvService class.
export class EnvService {
  // The values that are defined here are the default values that can
  // be overridden by the generated env.js file.

  public production = false;
  public ordersURL = '';
  public apiKey = '';
  ...
Note: the env.js file is only generated when installation is made on a Kubernetes cluster.
Once installation is done, please ensure to whitelist the IP/domain in the Firebase console as shown below.

The materialized view can be reconstructed by opening a shell to the orders pod and running the script below.
# npm run reconstruct-view-db
A working example of the demo project can be found here.