As the title suggest our project in a nutshell was to design a moving robot vehicle, with automated driving feature, which would be capable of avoiding dynamic obstacles and Line following just as added bonus.
We started this project as complete beginners and was worried how could we manage to do this stuffs. So Let's Start from beginning.
obviously, designing.

To start designing on solidworks it's better if you have some drawing or some reference that you want to improvise and re-create
The best place to find references is YouTube
So go on YouTube and search for "How to make a car in solidworks"

Following steps were used in making the car:
- Make all the parts mentioned in the video (.sldprt)
- Assemble these parts on solidworks (.sldasm)
- While making the report you can use drawings (.slddrw)
- Make sure that you have added all the coordinate systems, points and axes for URDF
Tip: get a big cup of coffee and follow and make the car while following the video 🍵
After few hours of redoing and few cups of coffee we were finally done with the model.
Tadaaa!!


Tip: Don't be lazy and add colors and maybe your initials too
Now you have your super car ready To actually be able to stimulate this car and spawn it we need to convert our CAD model to URDF (Universal Robot Description Format). For making our life easier we have an URDF exporter (Bless the maker)
The Robot Operating System (ROS) is an open-source framework that helped us build and reuse code between robotics applications.
All processes in ROS run in a Node. For eg: In our Car each wheek Link (the joint between the wheel and the base), the camera, IMU sensors are all nodes. The python script we write itself creates many nodes.
Topics are named buses over which nodes exchange messages. Topics have anonymous publish/subscribe semantics, which decouples the production of information from its consumption for example:
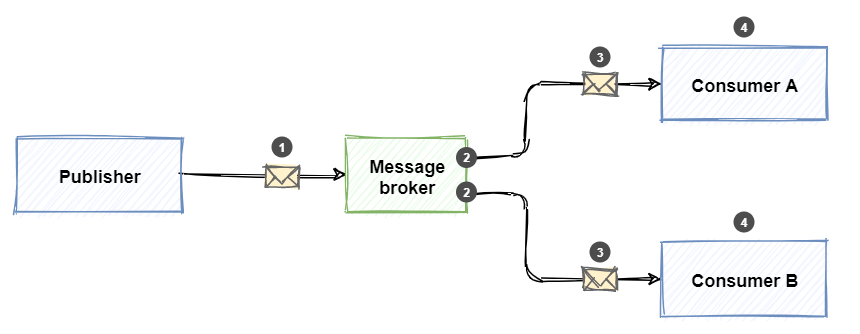
Message Broker is a topic
2. Gazebo
So now URDF has all about your car, ROS will help you in controlling the car but where will this happen? That's where gazebo helps you
Gazebo is a powerful robot simulator used by industry and academia that calculates physics, generates sensor data and provides convenient interfaces.
We hope you are familiar enough with the softwares now. Let's simulate our Racecar in world to Drive-in.
Now we have everything we need but where is your car going to be on ? float in air?
obviously not
for all the movements of our car we need a platform for it or you can say a world for it to be in


Now our car is all set for moving! the wheels of our vehicle can only rotate so how will our car turn? to counter this aspect we use the diff_drive_controller which would turn the car by rotating the wheels in 2 different direction

we don't have to look at the math behind it thanks to the lovely guy who made these formulas for us to use

Vooho... Our Racecar not only looks great but also glides like wind on the track. Now, the most important aspect of our project the Algorithm.

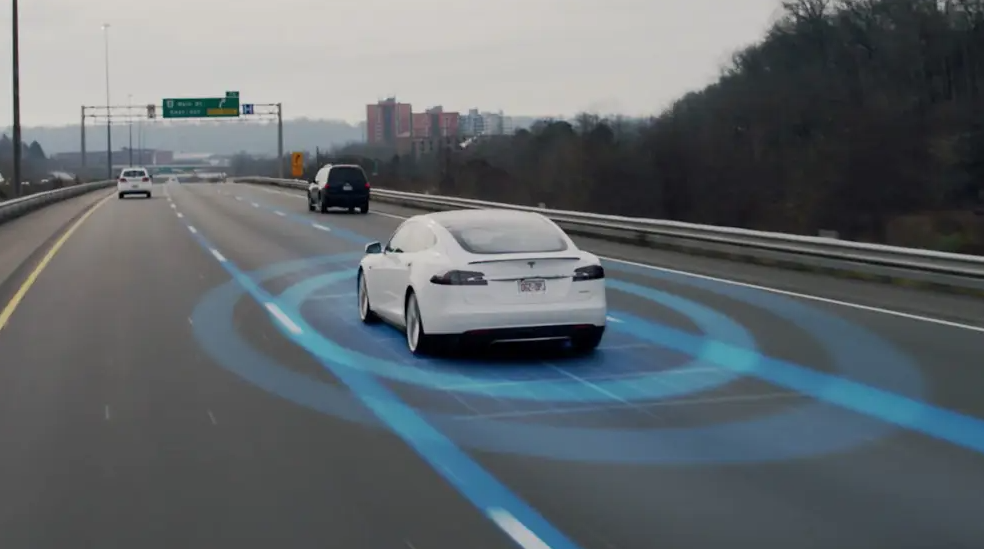
With Developing world the latest technologies like self-driven car attracts most of us but, have you ever thought how this machines are built, what are their requirements in terms of hardwares, coding, testing and simulations?
Talking about the hardwares ignoring the vehicle, the most importants are Sensors. What kind of specially? As for self-driving we need to know the surrounding enviroment, a very renowned sensor called as the LiDar Sensors, are used to get the a rough view of enviroment.

Now what is a Lidar Sensor?
Lidar is an acronym for “light detection and ranging.” It is sometimes called “laser scanning” or “3D scanning.” The technology uses eye-safe laser beams to create a 3D representation of the surveyed environment. Lidar is used in many industries, including automotive, infrastructure, robotics, trucking, UAV/drones, industrial, mapping, and many more. Because lidar is its own light source, the technology offers strong performance in a wide variety of lighting and weather conditions.
We had used hokuyo.dae mesh in our Racecar for Lidar sensing which can be easily pluged-in from Gazebosim head_hokuyo_sensor plugin.
<gazebo reference="hokuyo_link">
    <sensor type="gpu_ray" name="head_hokuyo_sensor">
      <pose>0 0 0 0 0 0</pose>
      <visualize>false</visualize>
      <update_rate>40</update_rate>
      <ray>
        <scan>
          <horizontal>
            <samples>720</samples>
            <resolution>1</resolution>
            <min_angle>-1.570796</min_angle>
            <max_angle>1.570796</max_angle>
          </horizontal>
        </scan>
        <range>
          <min>0.10</min>
          <max>30.0</max>
          <resolution>0.01</resolution>
        </range>
        <noise>
          <type>gaussian</type>
          <!-- Noise parameters based on published spec for Hokuyo laser
               achieving "+-30mm" accuracy at range < 10m.  A mean of 0.0m and
               stddev of 0.01m will put 99.7% of samples within 0.03m of the true
               reading. -->
          <mean>0.0</mean>
          <stddev>0.01</stddev>
        </noise>
      </ray>
      <plugin name="gazebo_ros_head_hokuyo_controller" filename="libgazebo_ros_gpu_laser.so">
        <topicName>/rrbot/laser/scan</topicName>
        <frameName>hokuyo_link</frameName>
      </plugin>
    </sensor>
  </gazebo>
We had added two hokuyo sensor on the Racecar and shown below are the GPU-rays of Lidar.


As we have two sensors, their are two point-clouds made for each obstacle, on analyzing closely we get to know their is a bit distant error in the point-clouds due to different positons of Lidars.
So, we use an open-source library called as the ira_laser_tools for Lidar Scan-Data Merging, you can check this out here. Finally we have the perfect laserscan data to be used in our algorithm (will be discused in the next section).
Aaa aa a.. We are not over yet, we need one more sensor the imu sensor to get the orientations of the robot specially the yaw which is the orientation about the z-axis so, as to keep track were the Racecar is heading and in which angle and to much extent we have to rotate it to counter the obstacles.
An IMU is a specific type of sensor that measures angular rate, force and sometimes magnetic field. IMUs are composed of a 3-axis accelerometer and a 3-axis gyroscope, which would be considered a 6-axis IMU. They can also include an additional 3-axis magnetometer, which would be considered a 9-axis IMU. Technically, the term “IMU” refers to just the sensor, but IMUs are often paired with sensor fusion software which combines data from multiple sensors to provide measures of orientation and heading. In common usage, the term “IMU” may be used to refer to the combination of the sensor and sensor fusion software; this combination is also referred to as an AHRS (Attitude Heading Reference System).
As we move on to our next section we shall know all the avialable Algorithms for Obstacle Avoidance.
Here, are some of them :-
- Bug Algorithm
- Artificial Potential Feild Algorithm
- The Convetional Potential Field Method
- The Follow-The-Gap Method
- The Advanced Fuzzy Potential Method
- The Obstacle Dependent Gaussian Potential Field Method
All algorithm except the The Obstacle Dependent Gaussian Potential Field Method (ODG-PF) has their own drawbacks due to errors and in-efficency.
Impressive... I hope we are clear with the algorithms available in our toolbox and why ODG-PF is most suitable. It's Time to implement this.

1. Range Data From Lidar After merging the lidar datas of two Sensors we get an array of distance readings of Lidar of length 542, in 180 degree angle, ranging from 0-11m.
2. Thresold Thresolding is the step which we use to specify the the range at which Racecar should start avoiding the Obsctacle here we are taking it as 3m.
3. Defining and enlargening the obstacles After we had decided the range we need to clearly define the obstacle and to enlarge it. Now, why we are enlargening the obstacles ? As, we want to avoid the obstacle and also very safely, we enlarge the obstacle so that, the racecar is not much close to an object.
4. Repulsive Feild
We calculate the repulsive feild for the range data readings using the formula shown below.

But, the problem here is the algorithm according to the research paper is for 180 degrees from -90 to 90 degrees and we have around 542 readings. So, to solve this we used the unitary method to convert 542 reading <-> 180 degree => 1 reading <-> 0.33 degree,
And here's the graphical representation of the feild.


5. Attractive Feild
Similar to the repulsive feild it's calculated using the formula shown below.

where, gamma is an constant and is chosen to be 5, After performing tasks, also theta_goal is taken to be zero so as to keep the racecar moving straight.
6. Total Feild and Suitable angle with Minimum Feild value Now, you have the values of attractive as well as the repulsive feilds, you just need to add them both with their respective indexes of each element. The resultant feild values are total feild and simply now we have to calculate the local minima of the total feild array and the index where the value is minimum is the required index position our racecar should move but index is for array and we need an angle for racecar so simply again use unitary method to convert the index to angle.
The racecar is published with the required Twist message to acheive found using the imu sensor as a rectifier.


The image shows that we should follow an angle of around -25 degree to avoid obstacle which seems acceptable.
Screen.Recording.2022-10-14.at.4.38.18.PM.mp4
Screen_Recording_2022-09-15_at_11.11.06_PM.mp4
Well Done... I hope you are thorough with the implementation and didn't found it intimidating. You have now reached the Bonus Section (Line-Following).

Line Following is really popular feature and you can get tons of examples, source code, explanations, etc.
It's really simple, steps for Line following are:
- Subscribe to the raw image topic and convert raw image to cv2 image using the cv2bridge method.
- the image obtained is RGB image convert this image to HSV for better comparison and definition.
- define upper bound and lower bound of the colour you want racecar to follow
- After Masking the image we get contour of the red line whose centroid is calculated and compared with the centre of the image and error is the required counter deviation.
- this error is resolved using PID.
Screen.Recording.2022-10-14.at.5.01.46.PM.mp4
Racecar is perpetually following the line... Now, It's time to wrap-up. Let's us brief the blog.
Being Second Year students there were a few things which we learned (Some of them were learned the hard way 🥲) So here's what we learned
- Bunking lectures is fine as long as you're doing something productive 😜
- Ctrl C + Ctrl V is your best friend
- Break down the project into smaller goals 🤓
- Working offline together is more productive than zoom and gmeets
- Effective googling is one of the best skills 🤹🏻
- Projects are really fun when you get along with your mentors and teammates
- All you need is a big cup of coffee and an all nighter to cover up 😇
So for everyone who survived this tsunami of information or skipped directly to conclusions we would like to conclude by saying that It's not about what you know. It's all about how much more effort you put in to learn After all we were just 2 SYs thinking about making the next Tesla
- the Basic Science Research Program through the National Research Foundation of Korea (NRF) for ODG-PF resource paper.
- ira_laser_tools.
- Documetation inspiration.