Skip to content
New issue

Have a question about this project? Sign up for a free GitHub account to open an issue and contact its maintainers and the community.

By clicking “Sign up for GitHub”, you agree to our terms of service and privacy statement. We’ll occasionally send you account related emails.

Already on GitHub? Sign in to your account

CUSTOM TRAINING EXAMPLE (OLD) #192

Closed
glenn-jocher opened this issue Apr 6, 2019 · 170 comments
Closed

CUSTOM TRAINING EXAMPLE (OLD) #192

glenn-jocher opened this issue Apr 6, 2019 · 170 comments
Assignees
Labels
Stale tutorial Tutorial or example

Comments

@glenn-jocher
Copy link
Member

glenn-jocher commented Apr 6, 2019

This guide explains how to train your own custom dataset with YOLOv3.

Before You Start

Clone this repo, download COCO dataset, and install requirements.txt dependencies, including Python>=3.7 and PyTorch>=1.4.

git clone https://github.com/ultralytics/yolov3
bash yolov3/data/get_coco2017.sh  # 19GB
cd yolov3
pip install -U -r requirements.txt

Train On Custom Data

1. Label your data in Darknet format. After using a tool like Labelbox to label your images, you'll need to export your data to darknet format. Your data should follow the example created by get_coco2017.sh, with images and labels in separate parallel folders, and one label file per image (if no objects in image, no label file is required). The label file specifications are:

  • One row per object
  • Each row is class x_center y_center width height format.
  • Box coordinates must be in normalized xywh format (from 0 - 1). If your boxes are in pixels, divide x_center and width by image width, and y_center and height by image height.
  • Class numbers are zero-indexed (start from 0).

Each image's label file must be locatable by simply replacing /images/*.jpg with /labels/*.txt in its pathname. An example image and label pair would be:

../coco/images/train2017/000000109622.jpg  # image
../coco/labels/train2017/000000109622.txt  # label

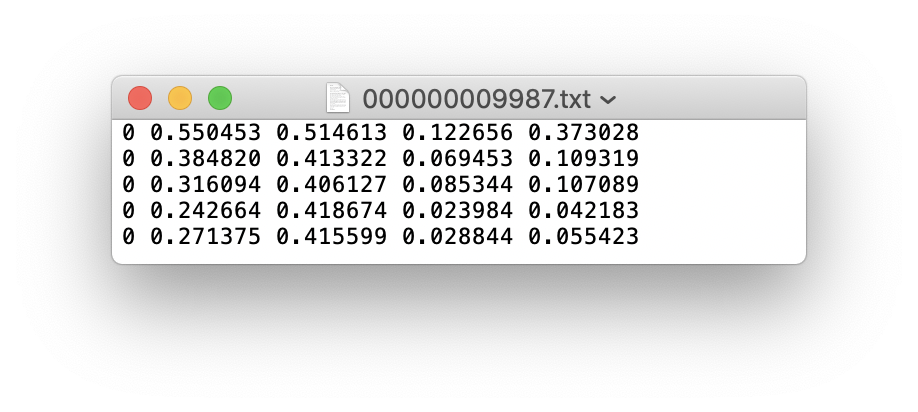
An example label file with 5 persons (all class 0):
Screen Shot 2020-04-01 at 11 44 26 AM

2. Create train and test *.txt files. Here we create data/coco16.txt, which contains the first 16 images of the COCO2017 dataset. We will use this small dataset for both training and testing. Each row contains a path to an image, and remember one label must also exist in a corresponding /labels folder for each image containing objects.
Screen Shot 2020-04-01 at 11 47 28 AM

3. Create new *.names file listing the class names in our dataset. Here we use the existing data/coco.names file. Classes are zero indexed, so person is class 0, bicycle is class 1, etc.
Screenshot 2019-04-06 at 14 06 34

4. Create new *.data file with your class count (COCO has 80 classes), paths to train and validation datasets (we use the same images twice here, but in practice you'll want to validate your results on a separate set of images), and with the path to your *.names file. Save as data/coco16.data.
Screen Shot 2020-04-01 at 11 48 41 AM

5. Update yolov3-spp.cfg (optional). By default each YOLO layer has 255 outputs: 85 values per anchor [4 box coordinates + 1 object confidence + 80 class confidences], times 3 anchors. Update the settings to filters=[5 + n] * 3 and classes=n, where n is your class count. This modification should be made in all 3 YOLO layers.
Screen Shot 2020-04-02 at 12 37 31 PM

6. (OPTIONAL) Update hyperparameters such as LR, LR scheduler, optimizer, augmentation settings, multi_scale settings, etc in train.py for your particular task. If in doubt about these settings, we recommend you start with all-default settings before changing anything.

7. Train. Run python3 train.py --cfg yolov3-spp.cfg --data data/coco16.data --nosave to train using your custom *.data and *.cfg. By default pretrained --weights yolov3-spp-ultralytics.pt is used to initialize your model. You can instead train from scratch with --weights '', or from any other weights or backbone of your choice, as long as it corresponds to your *.cfg.

Visualize Results

Run from utils import utils; utils.plot_results() to see your training losses and performance metrics vs epoch. If you don't see acceptable performance, try hyperparameter tuning and re-training. Multiple results.txt files are overlaid automatically to compare performance.

Here we see training results from data/coco64.data starting from scratch, a darknet53 backbone, and our yolov3-spp-ultralytics.pt pretrained weights.

download

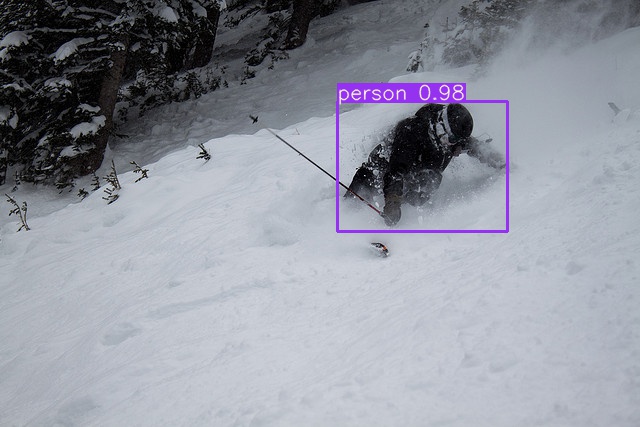
Run inference with your trained model by copying an image to data/samples folder and running
python3 detect.py --weights weights/last.pt
coco_val2014_000000001464

Reproduce Our Results

To reproduce this tutorial, simply run the following code. This trains all the various tutorials, saves each results*.txt file separately, and plots them together as results.png. It all takes less than 30 minutes on a 2080Ti.

git clone https://github.com/ultralytics/yolov3
python3 -c "from yolov3.utils.google_utils import gdrive_download; gdrive_download('1h0Id-7GUyuAmyc9Pwo2c3IZ17uExPvOA','coco2017demos.zip')"  # datasets (20 Mb)
cd yolov3
python3 train.py --data coco64.data --batch 16 --epochs 300 --nosave --cache --weights '' --name from_scratch
python3 train.py --data coco64.data --batch 16 --epochs 300 --nosave --cache --weights yolov3-spp-ultralytics.pt --name from_yolov3-spp-ultralytics
python3 train.py --data coco64.data --batch 16 --epochs 300 --nosave --cache --weights darknet53.conv.74 --name from_darknet53.conv.74
python3 train.py --data coco1.data --batch 1 --epochs 300 --nosave --cache --weights darknet53.conv.74 --name 1img
python3 train.py --data coco1cls.data --batch 16 --epochs 300 --nosave --cache --weights darknet53.conv.74 --cfg yolov3-spp-1cls.cfg --name 1cls

Reproduce Our Environment

To access an up-to-date working environment (with all dependencies including CUDA/CUDNN, Python and PyTorch preinstalled), consider a:

@glenn-jocher glenn-jocher added the tutorial Tutorial or example label Apr 6, 2019
@glenn-jocher glenn-jocher changed the title TRAIN CUSTOM DATA EXAMPLE CUSTOM TRAINING EXAMPLE Apr 6, 2019
@mahiratmis
Copy link

I trained and tested mnist data by using this tutorial. Thank you for guidance.

@agp-ka32
Copy link

Hi @glenn-jocher ,

I am trying to train on my custom dataset and I get the following error

image

Can you please let me know the fix for this error? I see that 'model' class in utils.py does not have an attribute 'hyp'. I followed all the steps outlined in order.

Thanks.

@agp-ka32
Copy link

Hi @glenn-jocher ,

I am trying to train on my custom dataset and I get the following error

image

Can you please let me know the fix for this error? I see that 'model' class in utils.py does not have an attribute 'hyp'. I followed all the steps outlined in order.

Thanks.

I tried on coco_10img.data; I get the same error.

@glenn-jocher
Copy link
Member Author

@akshaygadipatil the hyp attribute contains hyperparameters set in train.py and attached to model as an easy way to pass the hyperparameters to build_targets() and compute_losses(). We just made this change today. Please git pull to get the absolute latest changes and try again.

Also, what happens if you simply run python3 train.py?

@glenn-jocher
Copy link
Member Author

glenn-jocher commented Apr 18, 2019

@akshaygadipatil the example executes correctly on CPU and single GPU. Your issue may be multi-GPU related (you did not specify in your post). If so, git pull and try again.

python3 train.py --data data/coco_1img.data
Namespace(accumulate=1, backend='nccl', batch_size=16, cfg='cfg/yolov3-spp.cfg', data_cfg='data/coco_1img.data', dist_url='tcp://127.0.0.1:9999', epochs=273, evolve=False, img_size=416, multi_scale=False, nosave=False, notest=False, num_workers=4, rank=0, resume=False, transfer=False, var=0, world_size=1)

Using CPU

layer                                     name  gradient   parameters                shape         mu      sigma
    0                          0.conv_0.weight      True          864        [32, 3, 3, 3]   -0.00339     0.0648
    1                    0.batch_norm_0.weight      True           32                 [32]      0.987       1.07
    2                      0.batch_norm_0.bias      True           32                 [32]     -0.698       2.07
    3                          1.conv_1.weight      True        18432       [64, 32, 3, 3]   0.000298     0.0177
    4                    1.batch_norm_1.weight      True           64                 [64]       0.88      0.389
    5                      1.batch_norm_1.bias      True           64                 [64]     -0.409       1.01
 ...
  223                      112.conv_112.weight      True        65280     [255, 256, 1, 1]   0.000119     0.0362
  224                        112.conv_112.bias      True          255                [255]  -0.000773     0.0356
Model Summary: 225 layers, 6.29987e+07 parameters, 6.29987e+07 gradients

   Epoch       Batch        xy        wh      conf       cls     total  nTargets      time
   0/272         0/0     0.192     0.105      15.3      2.36        18         4      5.58
               Class    Images   Targets         P         R       mAP        F1
Computing mAP: 100%|████████████████████████████████████████████████████████████████| 1/1 [00:01<00:00,  1.90s/it]
                 all         1         6         0         0         0         0

              person         1         3         0         0         0         0
           surfboard         1         3         0         0         0         0

   Epoch       Batch        xy        wh      conf       cls     total  nTargets      time
   1/272         0/0     0.218    0.0781      15.3      2.36      17.9         5       8.2
               Class    Images   Targets         P         R       mAP        F1
Computing mAP: 100%|████████████████████████████████████████████████████████████████| 1/1 [00:01<00:00,  1.64s/it]
                 all         1         6         0         0         0         0

              person         1         3         0         0         0         0
           surfboard         1         3         0         0         0         0

   Epoch       Batch        xy        wh      conf       cls     total  nTargets      time
   2/272         0/0     0.165    0.0669      14.7      2.31      17.2         5         7
               Class    Images   Targets         P         R       mAP        F1
Computing mAP: 100%|████████████████████████████████████████████████████████████████| 1/1 [00:01<00:00,  1.49s/it]
                 all         1         6         0         0         0         0

              person         1         3         0         0         0         0
           surfboard         1         3         0         0         0         0

@agp-ka32
Copy link

@glenn-jocher, thanks!
Sorry abt not mentioning single/multi gpu usage.
I am actually running on a 2-GPU machine.

To be in sync, I tried with the latest changes in the repo.
The training has begun. Thank you!

image

@agp-ka32
Copy link

agp-ka32 commented Apr 18, 2019

Hi @glenn-jocher ,

Ran into a problem- requesting help:
For some reason, there was a power cut and so the gpu's shut off.
I would like to resume the training process from the latest checkpoint "latest.pt". This was on a multi gpu machine.
I tried changing the weight file in line 87 in train.py file:
cutoff = load_darknet_weights(model, weights + 'latest.pt')

When I run python3 train.py, I get an error message:
image

Can you help me solve this?
Thanks!

Never mind, I should have changed line 67 instead of 87 (in train.py).
BTW, in train.py, I changed line 122 to- sampler=None as I was getting an error like as shown below with sampler=sampler

sampler option is mutually exclusive with shuffle

And the error was gone after my fix and the training began ( this was all yesterday).
It is not wrong I believe. What do you say?

@glenn-jocher
Copy link
Member Author

glenn-jocher commented Apr 18, 2019

@akshaygadipatil as the README clearly states https://github.com/ultralytics/yolov3#training

Start Training: python3 train.py to begin training after downloading COCO data with data/get_coco_dataset.sh.
Resume Training: python3 train.py --resume to resume training from weights/latest.pt.

@glenn-jocher glenn-jocher self-assigned this Apr 24, 2019
@Jriandono
Copy link

@glenn-jocher Hi Glen didn't know that this custom training exist. Thanks for the reply earlier, I just abit confuse on how we actually train.

when we run

  1. Train. Run python3 train.py --data data/coco_10img.data to train using your custom data. If you created a custom *.cfg file as well, specify it using --cfg cfg/my_new_file.cfg.

are we actually training the model to look for the bounding box of a random image(from coco dataset)

because Im confused with step 1 and 2;

where 1 you convert your data into darknet format where it consist of 1.jpg(image) and 1.txt(bounding boxes)

but in 2 we actually train with our coco dataset, not our data set? since the text file is the path of images
I guess I just don't get on how to modify #2

@glenn-jocher
Copy link
Member Author

@Jriandono you need to create your own *.txt files pointing to your own list of training and testing images. coco_10img.txt is an example with 10 images in it. Clearly, you make your own if you want to use your own data.

@guxiaowei1
Copy link

guxiaowei1 commented May 11, 2019

I want to train custom data ,but the following error happened. I think my converted.pt was not correct ,i dont kown how to modify it ,please help me .

Namespace(accumulate=1, backend='nccl', batch_size=1, cfg='cfg/yolov3.cfg', data_cfg='data/coco_10img.data', dist_url='tcp://127.0.0.1:9999', epochs=273, evolve=False, img_size=416, multi_scale=False, nosave=False, notest=False, num_workers=0, rank=0, resume=False, transfer=False, var=0, world_size=1)

Using CUDA device0 _CudaDeviceProperties(name='GeForce GTX 1050', total_memory=2048MB)
Traceback (most recent call last):
  File "G:/pycharm/yolo/yolov3-master/train.py", line 309, in <module>
    multi_scale=False,
  File "G:/pycharm/yolo/yolov3-master/train.py", line 88, in train
    chkpt = torch.load(latest, map_location=device)  # load checkpoint
  File "C:\Users\HP\Anaconda3\envs\wei\lib\site-packages\torch\serialization.py", line 368, in load
    return _load(f, map_location, pickle_module)
  File "C:\Users\HP\Anaconda3\envs\wei\lib\site-packages\torch\serialization.py", line 532, in _load
    magic_number = pickle_module.load(f)
_pickle.UnpicklingError: invalid load key, '5'.

@glenn-jocher
Copy link
Member Author

@you don't need converted.pt to train custom data, you can start training from scratch (i.e. the darknet53 backbone). Just run:
python3 train.py --data data/mycustomfile.data --cfg cfg/mycustomfile.cfg

@guxiaowei1
Copy link

guxiaowei1 commented May 11, 2019

@you don't need converted.pt to train custom data, you can start training from scratch (i.e. the darknet53 backbone). Just run:
python3 train.py --data data/mycustomfile.data --cfg cfg/mycustomfile.cfg

@you don't need converted.pt to train custom data, you can start training from scratch (i.e. the darknet53 backbone). Just run:
python3 train.py --data data/mycustomfile.data --cfg cfg/mycustomfile.cfg

Thank u so much for your kind reply. if i want to tranfer learning ,how to deal with that question?The converted.pt was created by convert.py in yolov3

@Sam813
Copy link

Sam813 commented May 15, 2019

@glenn-jocher
First of all, Thank you for creating this repository.
I have followed all the above steps to train the model on my own dataset.
I have 3 classes of samples. so I have modified the filters in *.cfg to filters = 24
but I have one error of
image

I guess most probably it is due to my image input size. My images are all in the fixed size of 100x100.
would you please guide me which part of the code would be affected by this?

@glenn-jocher
Copy link
Member Author

@Sam813 this may be related to a recent commit which was fixed. git pull and try again?

@Sam813
Copy link

Sam813 commented May 16, 2019

@Sam813 this may be related to a recent commit which was fixed. git pull and try again?

Hi @glenn-jocher,
I have tried the new git pull.
After that, I the below error happens in some recently added part of the code.
image

I have 3 classes, and also modified the data.cfg and *.cfg

@glenn-jocher
Copy link
Member Author

glenn-jocher commented May 18, 2019

@Sam813 your custom data is not configured correctly. If you have 3 classes they should be zero indexed and the class counts in your cfg and .data file should correspond. The error message is saying you are stating 4 classes somewhere and it is not matching up with 3.

  • Your custom data. If your issue is not reproducible with COCO data we can not debug it. Visit our Custom Training Tutorial for exact details on how to format your custom data. Examine train_batch0.jpg and test_batch0.jpg for a sanity check of training and testing data.

@Sam813
Copy link

Sam813 commented May 20, 2019

@Sam813 your custom data is not configured correctly. If you have 3 classes they should be zero indexed and the class counts in your cfg and .data file should correspond. The error message is saying you are stating 4 classes somewhere and it is not matching up with 3.

  • Your custom data. If your issue is not reproducible with COCO data we can not debug it. Visit our Custom Training Tutorial for exact details on how to format your custom data. Examine train_batch0.jpg and test_batch0.jpg for a sanity check of training and testing data.

@glenn-jocher
Thank you for your help, I found the problem, I had forgotten to set num classes in the cfg file.
But now my training results are not making any sense.

image

all the Precision, recall and F1 are constantly 0. Yet, I can see the confidence is reducing true the training.
Do you have any idea whats wrong here?

@glenn-jocher
Copy link
Member Author

@Sam813 you are plotting multiple runs sequentially, as results.txt is not erased between runs. If you have zero losses for bounding box regresions, it means you have no bounding boxes to regress, which likely means you have no targets at all, and that the repo can not find your training data.

@Sam813
Copy link

Sam813 commented May 23, 2019

@Sam813 you are plotting multiple runs sequentially, as results.txt is not erased between runs. If you have zero losses for bounding box regresions, it means you have no bounding boxes to regress, which likely means you have no targets at all, and that the repo can not find your training data.

@glenn-jocher thank you for the help,
If I am not mistaken what you said means my data is not prepared properly?
But I have followed the steps to prepare the data. Moreover, I got this output picture for the test batch which confused me:
image

Does it have any meaning for you? I guess the bounding boxes have been detected but the image is pure white? could you help to explain it a bit more?

@glenn-jocher
Copy link
Member Author

@Sam813 no this is not correct, your data seems to be missing the images. The train_batch0.jpg file generated when training starts (for correctly prepared data) should look similar to this:

train_batch0.jpg
train_batch0

@glenn-jocher glenn-jocher pinned this issue May 29, 2019
@Ai-is-light
Copy link

@glenn-jocher would mind give me an example about
"Box coordinates must be in normalized xywh format (from 0 - 1)."
I'm a little bit confused about normalized xywh

@sanazss
Copy link

sanazss commented Jul 12, 2019

Dear glenn,
I have satellite single channel data and a single class. I already followed the instruction on data preparation and provided bounding boxes; however, I still have two issues. First I want to load images which is different from loading other pictures and I should use gdal for that. then I want to resize them because their size is 512*512 at the moment as well as normalize them and convert them to tensor.
The second issue is splitting them into training and validation set. I am following ultralytics code and would like to get some advice on customizing my data in the class LoadImages and class LoadImagesAndLabels(Dataset). Many thanks for any advice.Sanaz

@matg41
Copy link

matg41 commented Jul 4, 2020

Hi
During training my custom data a RuntimeError happend
Traceback (most recent call last): File "train.py", line 431, in <module> train(hyp) # train normally File "train.py", line 333, in train multi_label=ni > n_burn) File "C:\Matg\yolov3-master\test.py", line 76, in test _ = model(torch.zeros((1, 3, imgsz, imgsz), device=device)) if device.type != 'cpu' else None # run once File "C:\Users\Azad\AppData\Local\Programs\Python\Python37\lib\site-packages\torch\nn\modules\module.py", line 550, in __call__ result = self.forward(*input, **kwargs) File "C:\Matg\yolov3-master\models.py", line 244, in forward return self.forward_once(x) File "C:\Matg\yolov3-master\models.py", line 312, in forward_once x = torch.cat(x, 1) # cat yolo outputs RuntimeError: Sizes of tensors must match except in dimension 2. Got 85 and 10

I could not find any way to fix it
Thanks

@ObKsEm
Copy link

ObKsEm commented Jul 13, 2020

Hi
During training my custom data a RuntimeError happend
Traceback (most recent call last): File "train.py", line 431, in <module> train(hyp) # train normally File "train.py", line 333, in train multi_label=ni > n_burn) File "C:\Matg\yolov3-master\test.py", line 76, in test _ = model(torch.zeros((1, 3, imgsz, imgsz), device=device)) if device.type != 'cpu' else None # run once File "C:\Users\Azad\AppData\Local\Programs\Python\Python37\lib\site-packages\torch\nn\modules\module.py", line 550, in __call__ result = self.forward(*input, **kwargs) File "C:\Matg\yolov3-master\models.py", line 244, in forward return self.forward_once(x) File "C:\Matg\yolov3-master\models.py", line 312, in forward_once x = torch.cat(x, 1) # cat yolo outputs RuntimeError: Sizes of tensors must match except in dimension 2. Got 85 and 10

I could not find any way to fix it
Thanks

Hi, I got a same error, have you solved it yet?

@glenn-jocher
Copy link
Member Author

glenn-jocher commented Jul 13, 2020

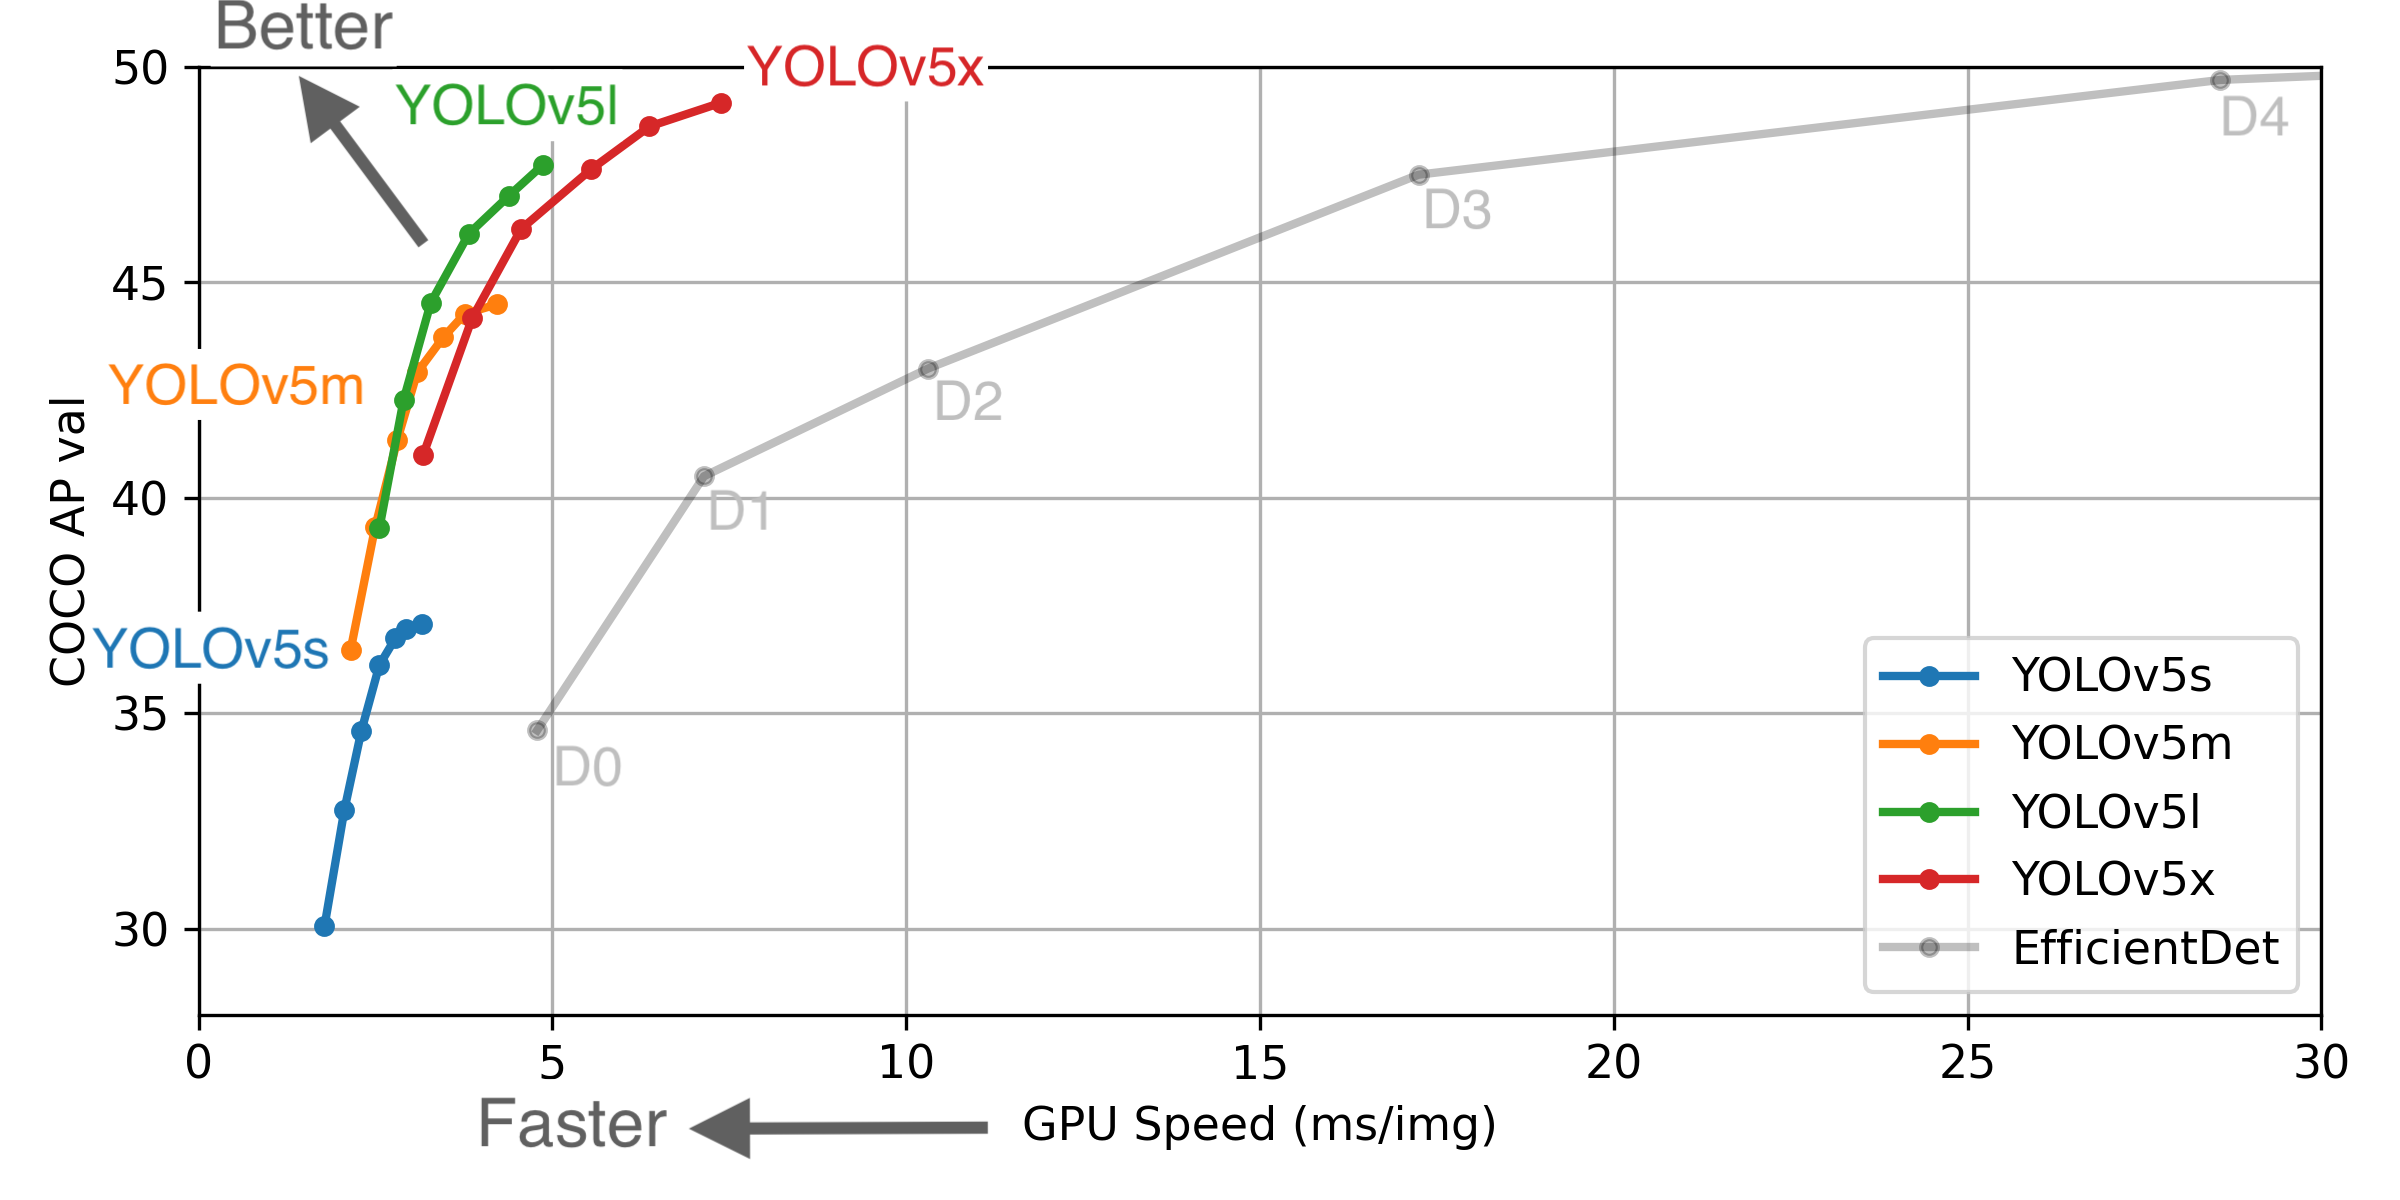
Ultralytics has open-sourced YOLOv5 at https://github.com/ultralytics/yolov5, featuring faster, lighter and more accurate object detection. YOLOv5 is recommended for all new projects.


** GPU Speed measures end-to-end time per image averaged over 5000 COCO val2017 images using a V100 GPU with batch size 32, and includes image preprocessing, PyTorch FP16 inference, postprocessing and NMS. EfficientDet data from [google/automl](https://github.com/google/automl) at batch size 8.
  • August 13, 2020: v3.0 release: nn.Hardswish() activations, data autodownload, native AMP.
  • July 23, 2020: v2.0 release: improved model definition, training and mAP.
  • June 22, 2020: PANet updates: new heads, reduced parameters, improved speed and mAP 364fcfd.
  • June 19, 2020: FP16 as new default for smaller checkpoints and faster inference d4c6674.
  • June 9, 2020: CSP updates: improved speed, size, and accuracy (credit to @WongKinYiu for CSP).
  • May 27, 2020: Public release. YOLOv5 models are SOTA among all known YOLO implementations.
  • April 1, 2020: Start development of future compound-scaled YOLOv3/YOLOv4-based PyTorch models.

Pretrained Checkpoints

Model APval APtest AP50 SpeedGPU FPSGPU params FLOPS
YOLOv5s 37.0 37.0 56.2 2.4ms 416 7.5M 13.2B
YOLOv5m 44.3 44.3 63.2 3.4ms 294 21.8M 39.4B
YOLOv5l 47.7 47.7 66.5 4.4ms 227 47.8M 88.1B
YOLOv5x 49.2 49.2 67.7 6.9ms 145 89.0M 166.4B
YOLOv5x + TTA 50.8 50.8 68.9 25.5ms 39 89.0M 354.3B
YOLOv3-SPP 45.6 45.5 65.2 4.5ms 222 63.0M 118.0B

** APtest denotes COCO test-dev2017 server results, all other AP results in the table denote val2017 accuracy.
** All AP numbers are for single-model single-scale without ensemble or test-time augmentation. Reproduce by python test.py --data coco.yaml --img 640 --conf 0.001
** SpeedGPU measures end-to-end time per image averaged over 5000 COCO val2017 images using a GCP n1-standard-16 instance with one V100 GPU, and includes image preprocessing, PyTorch FP16 image inference at --batch-size 32 --img-size 640, postprocessing and NMS. Average NMS time included in this chart is 1-2ms/img. Reproduce by python test.py --data coco.yaml --img 640 --conf 0.1
** All checkpoints are trained to 300 epochs with default settings and hyperparameters (no autoaugmentation).
** Test Time Augmentation (TTA) runs at 3 image sizes. Reproduce by python test.py --data coco.yaml --img 832 --augment

For more information and to get started with YOLOv5 please visit https://github.com/ultralytics/yolov5. Thank you!

@matg41
Copy link

matg41 commented Jul 13, 2020

Hi
During training my custom data a RuntimeError happend
Traceback (most recent call last): File "train.py", line 431, in <module> train(hyp) # train normally File "train.py", line 333, in train multi_label=ni > n_burn) File "C:\Matg\yolov3-master\test.py", line 76, in test _ = model(torch.zeros((1, 3, imgsz, imgsz), device=device)) if device.type != 'cpu' else None # run once File "C:\Users\Azad\AppData\Local\Programs\Python\Python37\lib\site-packages\torch\nn\modules\module.py", line 550, in __call__ result = self.forward(*input, **kwargs) File "C:\Matg\yolov3-master\models.py", line 244, in forward return self.forward_once(x) File "C:\Matg\yolov3-master\models.py", line 312, in forward_once x = torch.cat(x, 1) # cat yolo outputs RuntimeError: Sizes of tensors must match except in dimension 2. Got 85 and 10
I could not find any way to fix it
Thanks

Hi, I got a same error, have you solved it yet?

Hi
Actually I did.
You need to edit *.cfg file and change "filters" and "classes" numbers to your custom amount as it is mentioned in reedme. Just consider there are three of each and you need to change six numbers.
For example if you want to have one class, filters are equal to 18 and classes are equal to one and you should change them all in the file. I suggest you use "find" in your IDLE.

@TAOSHss
Copy link

TAOSHss commented Jul 15, 2020

@glenn-jocher I have received your reply that the map errors of multiple Gpus have been fixed, but I can't get good results. I'm using Coco64 to test and it still doesn't work. You are using Coco64 for this tutorial, and can you give me the results for coco64 with multiple GPU training, which may take more than ten minutes

@summeryumyee
Copy link

@glenn-jocher Hello,bro. --weights '' will be remind '' missing,try downloading.... How to solve it? I'm looking forward to your answer
image

@summeryumyee
Copy link

@glenn-jocher
my command line:python train.py --cfg cfg/yolov3.cfg --data data/voc0712.data --weights weights/yolov3.weights
can run the training program.
but use command line :python train.py --cfg cfg/yolov3.cfg --data data/voc0712.data --weights ''
can't run thr training program.
image
I made some network improvements, so I need train from scratch. The newest repo is cancelled --weights "?

Thank you. I love you ~~

@glenn-jocher
Copy link
Member Author

@summeryumyee pushed a fix for this in cec59f1

@summeryumyee
Copy link

summeryumyee commented Jul 19, 2020

@glenn-jocher Thank you very much!! After I replace the code, using -Weights "gives an error, but using -Weights "" can run the training program. I love you ~

@summeryumyee
Copy link

@glenn-jocher oh!!!!! my idol!! Creators of Mosaic data augment!!! I have a question to ask you, this mosaic augment of the repo can blend in with Mixup?I want to simulate overlap and occlusion situation.
Thank you ,my prince charming !
looking forward to your reply.

@glenn-jocher
Copy link
Member Author

@summeryumyee haha, thank you. Yes Mosaic and Mixup (and CutMix) can be used together. See ultralytics/yolov5#357 for an example.

@goldwater668
Copy link

@glenn-jocher I trained with my own data. I only marked 1000 pieces of training for the first time, and then 1000 pieces for the second time. How can I continue to train 1000 pieces of training in the weight of the first training, instead of merging the first data into the second training again? thank you

@Bingcor
Copy link

Bingcor commented Aug 16, 2020

Hi, Doctor, I have trained 300 times with my data set, map is no longer promoted and I have saved weights.
Then I imported the weight training, and the Map immediately doubled and trained 500 times.
But I want to train a full 800 times at a time and get a high map. What should I do?
Looking forward to your reply.

@glenn-jocher
Copy link
Member Author

@honghande @Bingcor I would highly recommend starting from YOLOv5 rather than v3.

For more information and to get started with YOLOv5 please visit https://github.com/ultralytics/yolov5. Thank you!

@github-actions
Copy link

This issue has been automatically marked as stale because it has not had recent activity. It will be closed if no further activity occurs. Thank you for your contributions.

@github-actions
Copy link

github-actions bot commented Nov 8, 2020

This issue has been automatically marked as stale because it has not had recent activity. It will be closed if no further activity occurs. Thank you for your contributions.

@github-actions github-actions bot added the Stale label Nov 8, 2020
@glenn-jocher glenn-jocher changed the title CUSTOM TRAINING EXAMPLE CUSTOM TRAINING EXAMPLE (OLD) Nov 26, 2020
@glenn-jocher glenn-jocher unpinned this issue Nov 26, 2020
@glenn-jocher
Copy link
Member Author

@ikramelhattab the trainloader will utilize all valid images in your supplied directory (2112 in total). If images are not appearing they may not be suitable image formats for training. The list of possible image formats is here. If your format is not here you might try adding it to the list, though there is not guarantee it will load correctly:

https://github.com/ultralytics/yolov5/blob/9ccfa85249a2409d311bdf2e817f99377e135091/utils/datasets.py#L27-L32

@glenn-jocher
Copy link
Member Author

glenn-jocher commented Apr 5, 2021

@ikramelhattab then you should be all set. If all of your images are *.jpeg then they should all be detected and used for training. You should also make sure you are using the latest code from master. If you believe you have a reproducible issue, we suggest you close this issue and raise a new one using the 🐛 Bug Report template, providing screenshots and a minimum reproducible example to help us better understand and diagnose your problem. Thank you!

@kalikhademi
Copy link

I would like to use this guide to train yolov3 on my custom dataset. I have used self supervised model like BYOL to pretrain the weight for the first 10 layers. I would like yolov3 model use these weights for the first 10 layers and random initialization for the rest of it. Could you please let me know what changes I need to make to incorporate this method?

Sign up for free to join this conversation on GitHub. Already have an account? Sign in to comment
Labels
Stale tutorial Tutorial or example
Projects
None yet
Development

No branches or pull requests