This repository aims to provide a demo of various WebRTC features on Android. Step-3 is the completed app and provides bidirectional audio, video, and text transmission. This includes a demo of basic screen sharing. If you want to create an app using WebRTC on Android, this repository will help you implement the basic features. The main limitations of the code are that group calls are not supported and there can be only one call at a time.
This fork builds on vivek1794's WebRTC Android codelab. The main changes to the code are as follows:
- Bug fixes, especially in the signalling server code.
- Step 3 of the codelab (the finished app) has been migrated to androidx.
- The code has been updated to work with the new Xirsys ICE server framework.
- The quickstart for the project includes a guide to host the signalling server code on Heroko. Along with the ICE servers, this allows the app to work with the two phones running the app on separate networks, in distant locations.
- A demo of using the DataChannel to send or receive messages has been added.
- The ScreenCaptureActivity adds screen sharing support using the ScreenCapturerAndroid class.
- In the original app, the audio played only on the earpiece on both phone. I have added support for playing the audio on the speakerphone. Other audio settings can also be easily changed using Android's AudioManager
First, download this repository as a ZIP file.
- Extract the ZIP and open the Step-3 folder in Android Studio (latest version if possible). To do this, open Android Studio then click File > Open > webrtc-android-codelab-master > Step-3 > Okay
- If Android Studio asks you to configure the android framework, configure it.
- You can now push the app to your android devices. But, since the signalling server is not up yet, the app won't work just yet.
- Find your computer's local IP address using
ipconfig(Windows),ifconfig(Mac), orip address show(Linux) - In the SignallingClient class, go to line 74 and replace the placeholder for the url with the
http://followed by the IP address of your computer. Set the port number to 1794. For example, if your computer's local IP address is 192.168.0.110, line 74 will look like
socket = IO.socket("http://192.168.0.110:1794");
Make sure to include http:// in the URL! The code won't work without it.
- Download Node.js here
- Navigate to the heroku_signalling folder located in the signalling folder
- Install the required packages by running
npm install - Run the signalling server code using
node index.js - The app will now work on 2 devices connected to the same network as the computer running the signalling server
- Create an account on Heroku
- Download the Heroku CLI here
- Open a command prompt and navigate to the heroku_signalling folder
- Initialize an empty git repository :
git init - Add everything in the folder to the folder :
git add . - Commit the changes to the repo :
git commit -m "Commit message here" - Login to Heroku :
heroku login - Create a heroku app :
heroku create - Push the local repo to Heroku :
git push heroku master - In line 74 of SignallingClient.java, set the URL to the URL of your Heroku app and set the port number to 443. For example, if the URL of your Heroku app is https://peaceful-cliffs-12345.herokuapp.com, line 74 of SignallingClient.java will look like
socket = IO.socket("https://peaceful-cliffs-12345.herokuapp.com:443");
- Signalling will now work if you push the app to 2 devices on different networks. However, you might still get a black screen in place of the video since we have not added any ICE servers yet. For more information on how to deploy a Node.js app to Heroku, click here
This quickstart uses the Xirsys platform for STUN and TURN servers
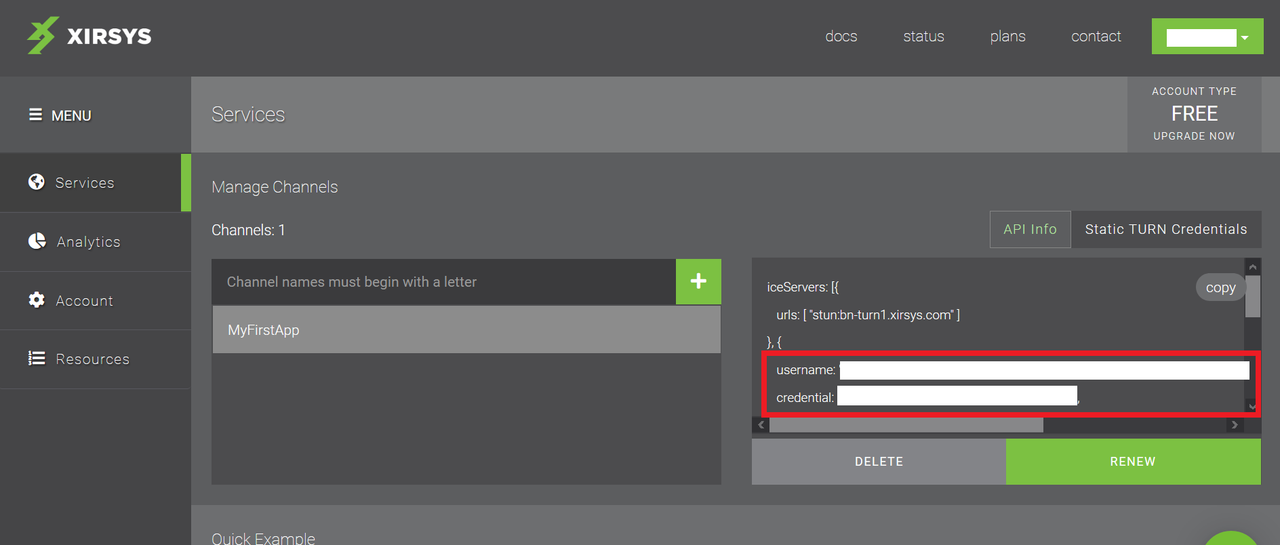
- Create an account on Xirsys here
- Go to the Services section of the Dashboard
- Create a new channel
- Go to Static TURN Credentials and click plus. You now have your Static TURN Credentials The static turn credentials will look like
- In the
getIceServers()method of MainActivity.java, replace the placeholders with the URL for the STUN server, the URL for the TURN server, and the username and password for the TURN servers. Currently, the app uses only one TURN server, but you can add as many as you want. If you want to add all the TURN servers, I would reccomend parsing the JSON and adding the servers programmatically. - Now, the app should work completely with both devices on different networks (for example with one device on your home WiFi and the other on cellular data
To use screen sharing, you can enable screen sharing on one device and leave the code on the other device transmitting video. This way, the device whose code is unchanged(transmitting video) will receive the screencast from the other device.
- Go to
AndroidManifest.xmlin the Step-3 app - Uncomment the
<intent-filter>under the ScreenCaptureActivity and comment out the<intent-filter>under the MainActivity - In line 212 of
MainActivity.java, changesetMirrorforremoteVideoVideoto false - Push the app with these changes to one device (not both)
- If you now launch the app on the two devices, the device which is running the app without the above changes should receive the screencast from the device to which you just pushed the app.
- In
MainActivity.java, thesetSpeakerPhonemethod allows you to play the audio on the speaker phone (default is earpiece). You can use Android'sAudioManagerto make other changes to the audio settings
- The
onDataChannelmethod (Lines 268-297 ofMainActivity.java) has basic demos of sending and receiving text messages
Click on the thumbnails to view the videos


