- 基于 Cloudflare Workers 运行时构建, 轻量使用完全免费
- 支持多种图床(Telegram/Cloudfalre R2/Backblaze B2, 更多图床正在支持中)
- 快速部署。使用 Wrangler 可快速实现自部署
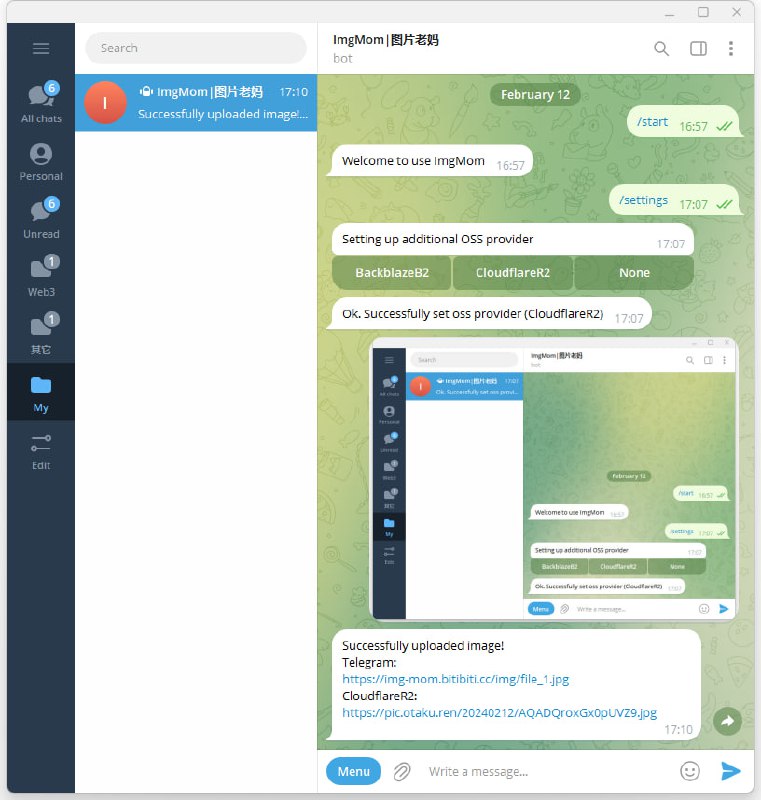
- 将图片通过私聊发送给 Bot, Bot 默认将只回复对应的 Telegram 图床链接
- 发送
/settings指令,可以指定额外的图床,设置完成后,将图片通过私聊发送给 Bot, Bot 将回复你指定的额外图床链接 - 可使用 https://t.me/img_mom_bot , 进行在线体验
- 该项目使用 NodeJS + TypeScript 开发,需要你的本地环境安装 NodeJS (推荐 NodeJS 20.11.0 以上版本)
- 该项目最终会部署并运行在 Cloudflare Workers 上,所以需要你拥有一个 Cloudflare 账户。具体可去 Cloudflare 官网注册
- 该项目是 Telegram 机器人的服务端,所以需要你创建一个 Telegram 机器人。具体如何创建见 Telegram 官方文档 https://core.telegram.org/bots/features#creating-a-new-bot
-
克隆该项目
[email protected]:beilunyang/img-mom.git
cd img-mom
-
安装项目依赖
npm install
-
创建 wrangler 配置文件
cp wrangler.example.toml wrangler.toml -
编辑新创建的 wrangler.toml 文件
-
当编辑完成后,运行
npm run deploy
等待项目编译完成并自动部署到 Cloudflare Workers
-
浏览器打开
https://<域名>/setup, 完成必要的 Webhook 初始化
# 你的 Cloudflare 账户ID
# 必填
account_id = "<string>"

[vars]
# 填写你创建的 Telegram Bot Token
# 必填
TG_BOT_TOKEN = "<string>"
# 长度为 1-256 字符,字符集为 A-Z,a-z,0-9,_,- 的字符串,用于防止 Webhook 接口被除当前Telegram Bot以外的应用恶意调用
# 非必填,但强烈推荐填写
TG_WEBHOOK_SECRET_TOKEN = "<string>"
# Telegram Bot 的所有者用户名
# 必填
TG_BOT_OWNER_USERNAME = "<string>"
# 是否允许非 Owner 用户使用 Telegram 图床 (注意:即使设置为 true, 非 Owner 用户也不能使用 CloudflareR2/BackblazeB2 图床)
# 非必填
TG_BOT_ALLOW_ANYONE = "<boolean>"

# Cloudflare R2 自定义域名
# 启用 Cloudflare R2 图床时,必填
R2_CUSTOM_DOMAIN = "<string>"
# Backblaze B2 keyID
# 启用 Backblaze B2 图床时,必填
B2_KEY_ID = "<string>"
# Backblaze B2 secretKey
# 启用 Backblaze B2 图床时,必填
B2_SECRET_KEY = "<string>"
# Backblaze B2 Endpoint
# 启用 Backblaze B2 图床时,必填
B2_ENDPOINT = "<string>"
# Backblaze B2 Bucket名
# 启用 Backblaze B2 图床时,必填
B2_BUCKET = "<string>"
# Backblaze B2 自定义域名
# 非必填
B2_CUSTOM_DOMAIN = "<string>"

[[kv_namespaces]]
# kv ID, 详见 https://developers.cloudflare.com/workers/runtime-apis/kv
# 必填
id = "<string>"

[[r2_buckets]]
# r2 Bucket名,详见 https://developers.cloudflare.com/r2/api/workers/workers-api-usage/
# 必填
bucket_name = "<string>"
提示:
- Backblaze B2 KeyId/SecretKey 可前往 https://secure.backblaze.com/app_keys.htm 获取
- Backblaze B2 Endpoint/Bucket 可前往 https://secure.backblaze.com/b2_buckets.htm 获取
要使用 GitHub Actions 部署 Cloudflare Workers,需要在 GitHub 仓库中设置以下 Secrets:
CLOUDFLARE_ACCOUNT_ID: Your Cloudflare account ID.CLOUDFLARE_API_TOKEN: Your Cloudflare API token.CLOUDFLARE_KV_NAMESPACE_ID: The namespace ID for your Cloudflare KV storage.CLOUDFLARE_BUCKET_NAME: The bucket name for your Cloudflare storage.R2_CUSTOM_DOMAIN: Custom domain for your Cloudflare R2 storage.TG_BOT_TOKEN: Your Telegram bot token.TG_WEBHOOK_SECRET_TOKEN: A secret token for the Telegram webhook.TG_BOT_OWNER_USERNAME: The username of the Telegram bot owner.TG_BOT_ALLOW_ANYONE: Configuration to allow anyone to use the Telegram bot.B2_KEY_ID: Your Backblaze B2 key ID.B2_SECRET_KEY: Your Backblaze B2 secret key.B2_ENDPOINT: The endpoint for your Backblaze B2 storage.B2_BUCKET: The bucket name for your Backblaze B2 storage.B2_CUSTOM_DOMAIN: Custom domain for your Backblaze B2 storage.
- 访问您的 GitHub 仓库。
- 点击
Settings>Secrets and variables>Actions>New repository secret(新建仓库密钥)。 - 按照上面列出的密钥添加每个 Name 和 Secret 并填入相应的值。
请确保替换为实际的 Cloudflare 和 Backblaze B2 账户详情。
配置好后,当推送代码到 master 分支,GitHub Actions 工作流将会使用这些 Secrets 动态生成 wrangler.toml 配置文件并自动部署您的 Cloudflare Worker。
- 英文文档
- 更多图床
- fork 该项目
- 基于 master 分支 checkout 你的开发分支
- 配置 wrangler.toml
- 安装依赖并本地运行
注意:由于该项目是作为 Telegram Bot 的 Webhook 后端,本地运行该项目无法让 Telegram Bot 访问,所以需要进行内网穿透,让本地运行的服务能够通过外网访问。(推荐使用 Cloudflare tunnels 进行免费内网穿透,当然也可以使用 ngrok 等服务)
npm install npm run dev # 使用 Cloudflare tunnels 进行内网穿透 npm run tunnel - 浏览器打开
https://<域名>/setup, 完成必要的 Webhook 初始化 - 编写代码并测试
- 发送 PR, 等待合并

MIT License.


