Tutorial
Home | Installing | Tutorial | GUI | Node Classes | Topology Generators |Routing | Publications | Related Projects
This will be a step-by-step guide of how to use Mini-CCNx. This tutorial assumes you already have Mini-CCNx installed. If that's not the case, please see Installing. Mini-CCNx is a fork of Mininet. It would be nice to get familiar with it first. See the Mininet Walkthrough for more information on Mininet.
The main executable, miniccnx, needs one argument, that is the Mini-CCNx configuration file. In this configuration file, you'll specify a lot of things, such as the hosts, routers, the links between them, the apps that will be executed on the hosts, FIB entries and CPU limit for each host/router. This configuration file is a simple text file, so it can be generated with your favorite editor or by your scripts.
Every Mini-CCNx configuration file has 2 sections, namely, [nodes] and [links]. Let's suppose we want to build a topology with 2 hosts ( h1 and h2), and a central CCN router ( s1 ) between them. That would be something like this:
h1 ---------- s1 ---------- h2
Below there's an example of a Mini-CCNx configuration file that represents such topology, plus another extra configuration parameters.
[nodes]
h1: app1 ccnx:/,s1
h2: _ cpu=0.1
s1: _ ccnx:/test,h2
[links]
h1:s1 bw=100
h2:s1 bw=100 loss=1 delay=10ms
Let's check the details of each section and each possible parameter.
Each line in this section represents a host in your topology. Basically, a host is a CCN node that executes an specific application, acting like a client (issuing Interests to the network), a server (responding to Interest with ContentObjects) or both. The syntax of each line is:
hostName: (appName|_) [cpu=<0.00-1.00>][mem=x][cache=x] [ccn_uri1,next_node1] [ccn_uri2,next_node2] ...
- hostName: any string representing the host name. We recommend using h1, h2, ... such as in the example for maintaining the Mininet standard. This field is mandatory.
- appName: the name of the application that you want the host to automatically execute when Mini-CCNx begins. Please, note that you can start any other applications you want later. If you don't want any applications to be started at all, use the underscore mark. This field is mandatory.
- cpu: this field is optional. If specified, the host will be limited to the percentage of cpu usage specified. If not specified, there will be no CPU limits for the host.
- mem: optional field. If specified, the host will be limited to the percentage of memory usage specified (where x is an integer, representing the memory in KB). If not specified, there will be no memory limits for the host.
- cache: optional field. If specified, the host will be limited to the percentage of cache usage specified (where x is an integer, representing the cache memory in KB). If not specified, there will be no cache limits for the host.
- fib entries: the next entries will be tuples of ccn URIs and the next hop. These will be automatically inserted in the FIB of the host at its creation. They are optional, and you can add as many as you want.
So, in the example the host h1 will automatically execute app1, will have no CPU limit, and will have a FIB entry saying that the Interests matching the URI ccnx:/ will be forwarded to the node s1. Host h2 has no default app (see the underscore) and will have a CPU limit of 10%. Its FIB will be initially empty.
This section describes the links between the previously created nodes. The syntax is:
node1:node2 [bw=<1-1000>] [loss=<0-100>] [delay=<1-1000>ms]
- node1:node2: The name of the nodes in each end of the link. In the example, h1 is linked to s1, that is linked to h2. The order doesn't matter, that is, s1:h2 will have the same effect as h2:s1.
- bw: Bandwidth, in Mbps, ranging from 1 to 1000 Mbps
- loss: The percentage of packet loss. Useful for emulating wireless links.
- delay: The delay, in ms, of the link.
Therefore, the link s1:h2 from the example has a bandwidth of 100 Mbps, with 1% packet loss and 10ms of delay.
Now that we have the configuration file, save it with the name miniccnx.conf . This is a default name used by miniccnx. You can save the configuration file with the name that you want, as long as you pass its full path as the first argument to the miniccnx program.
To run Mini-CCNx, do
sudo miniccnx
in the same directory that you have your miniccnx.conf file. Alternatively, execute it with
sudo miniccnx /full/path/to/conf_file
if you have the configuration file with another name or in a different directory. Again, note that you'll need administrative privileges to run it.
The miniccnx binary will parse all the hosts, routers and links in the configuration file and will instantiate each of them, according to the desired configurations.
You'll now have a complete CCNx environment running. Like in Mininet, in the prompt, you can use the commands net, dump and others to check the connectivity of the running topology. You can run specific xterms to each of the nodes. That is, using
miniccnx> xterm h1 h2
will open 2 xterms, one for each host.
Now, use the new ccndump in the prompt.
miniccnx> ccndump
This will list, for each node, the FIB entries. You will get something like this:
h1: ('ccnx:/', 's1')
h2:
s1: ('ccnx:/videos', 'h2')
This is exactly what we've specified in the configuration file.
If you want a more detailed output, such as the one given by ccndstatus (built-in from CCNx), do:
miniccnx> h1 ccndstatus
This will give detailed information about faces, faces status and the FIB entries as seen by ccnd of node h1.
As an example, we'll use the ccnping application. We'll run a ccnpingserver in host h2 that will respond to h1's ccnpings . Be sure to have the ccnping application installed (in the VM, it's already available!).
Open an xterm for h2 and another for h1.
miniccnx> xterm h1 h2
Now, in h2's terminal execute
ccnpingserver ccnx:/test
This will make h2 to respond to any ccnpings with the prefix ccnx:/test/ping.
Now, let's use h1 to ping h2. In h1's terminal, execute
ccnping ccnx:/test
Now you can see the ccnpings flowing and the RTT values.
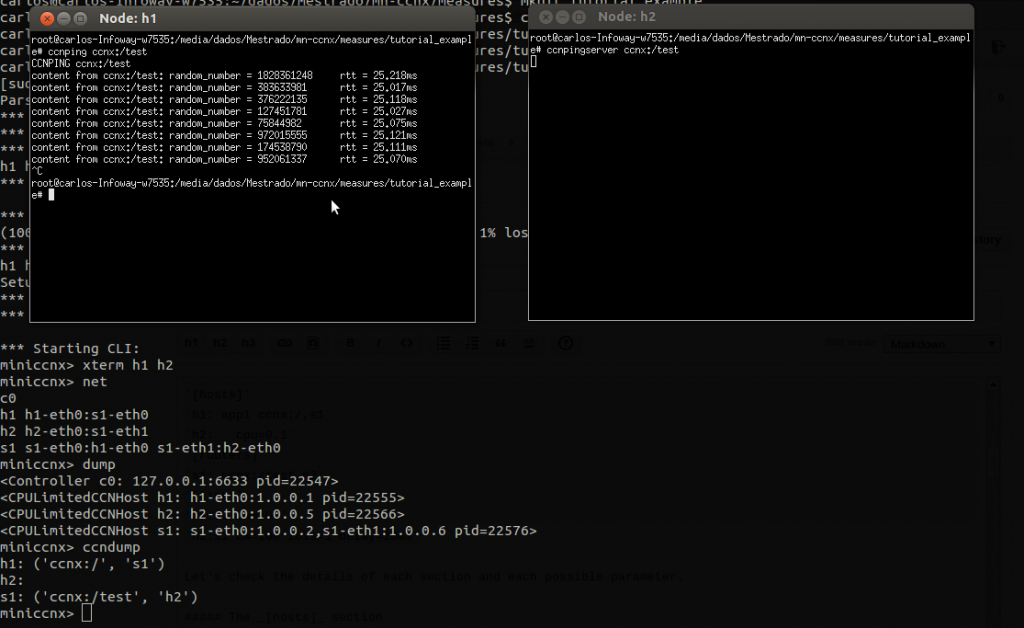
What happened here?
Well, the ccnping on h1 generated Interests for the content names ccnx:/test/ping/<< random-number >>. The local ccnd on h1 received such Interests and forwarded them to s1, because in the configuration file we'be added an entry that said: "forward to s1 all Interests with a prefix that matches ccnx:/ ". Well, when the Interest arrived in s1 it was forwarded to h2, because of the rule with inserted with the prefix ccnx:/test . Finally, our Interest arrived on h2, was forwarded to the ccnpingserver application that built, in response to this Interest, a ContentObject. This ContentObject then goes all the way back to h1, and them the RTT is calculated, as shown above.
To close Mini-CCNx simply type in the command line
miniccnx> quit
To generate templates for the configuration file, one can easily use the provided miniccnxedit application.
Execute it in a shell.
miniccnxedit
A GUI will open. You can then drag-and-drop routers and hosts to the canvas and draw the links between them. For instance:
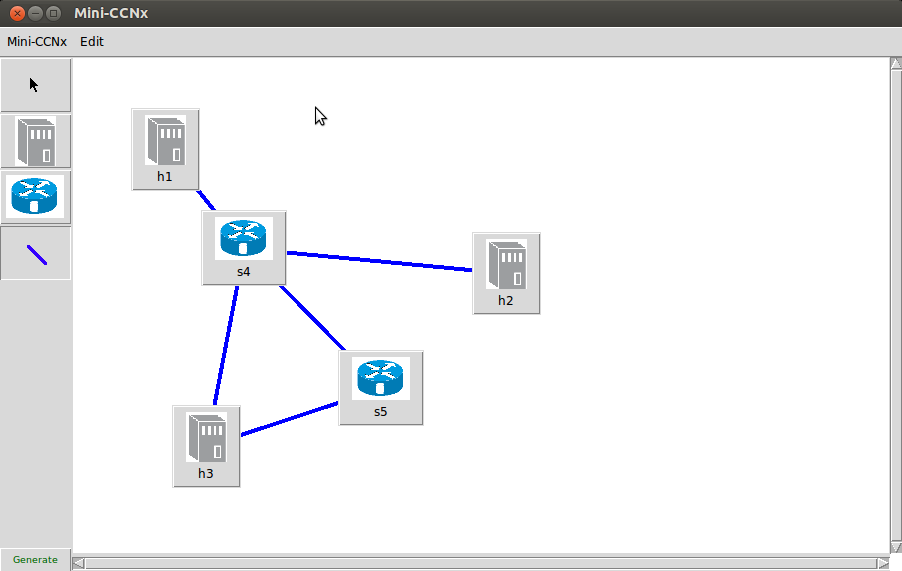
This will make a template like this:
[nodes]
h1:
h2:
h3:
s4:
s5:
[links]
s4:s5
h3:s5
h3:s4
h1:s4
s4:h2
Now, you can manually insert FIB entries, CPU limits and link configurations, or use scripts, as you wish.
Using miniccnxedit is useful when you need a graphical view of your scenario.