This is an example application to run a CLIP inference on a video in real-time. The image embeddings are accelerated by the Hailo-8/8L AI processor, while the text embeddings run on the host. Text embeddings are sparse and should be calculated only once per text. If they do not need to be updated in real-time, they can be saved to a JSON file and loaded on the next run. By default, the app starts without enabling online text embeddings, which speeds up load time and saves memory.
Click the image below to watch the demo on YouTube.
This example has been tested with the following Hailo TAPPAS versions:
- TAPPAS v3.28.0, v3.29.0, v3.29.1
- TAPPAS-CORE v3.28.2, v3.29.1 Please ensure that one of these versions is installed on your system. This application is compatible with x86 and RPi5 (8GB) systems.
sudo apt-get -y install libblas-dev nlohmann-json3-devTo run the example, ensure your environment is set up correctly. We use Hailo pkgconfig files to manage Hailo dependencies. We support two packages, but you only need to install one of them:
hailo-tappas-core: TAPPAS core installation using a.debfile orapt install.hailo_tappas: For full TAPPAS installation. See instructions in our TAPPAS repository.
You can set everything up by sourcing the setup_env.sh script. This script sets the required environment variables and activates the Hailo virtual environment (if it doesn't exist, it will create it). For TAPPAS installation, the script reuses the TAPPAS default virtual environment ${TAPPAS_WORKSPACE}/hailo_tappas_venv. For TAPPAS-CORE installation, it creates a new local virtual environment named hailo_clip_venv. The script also checks which Hailo device you have and sets the architecture accordingly. Make sure you have the Hailo device connected to your machine.
source setup_env.shIf you get a response that looks like this, you're good to go:
Setting up the environment...
Setting up the environment for hailo-tappas-core...
TAPPAS_VERSION is 3.28.2. Proceeding...
You are not in the venv_hailo_rpi5_examples virtual environment.
Virtual environment exists. Activating...
TAPPAS_POST_PROC_DIR set to /usr/lib/aarch64-linux-gnu/hailo/tappas//post-process/
Device Architecture is set to: HAILO8LMake sure you run source setup_env.sh before running the installation. To install the application, run the following in the application root directory:
python3 -m pip install -v -e .This will install the app as a Python package in "editable" mode. It will also compile the CPP code and download the required HEF files and videos.
Make sure you run source setup_env.sh before running the application.
Run the example:
clip_app --input demoOn the first run, CLIP will download the required models. This will happen only once.
When running with TAPPAS docker, you might encounter this error:
ImportError: cannot import name 'packaging' from 'pkg_resources'
This is a known issue with setuptools version 70.0.0 and above. To fix it, either downgrade setuptools to version 69.5.1:
pip install setuptools==69.5.1Or upgrade setuptools to the latest version:
pip install --upgrade setuptoolsThe code can also be run directly using python:
python3 -m clip_app.clip_appclip_app -h
usage: clip_app [-h] [--input INPUT] [--detector {person,face,none}] [--json-path JSON_PATH] [--disable-sync] [--dump-dot]
[--detection-threshold DETECTION_THRESHOLD] [--show-fps] [--enable-callback] [--callback-path CALLBACK_PATH]
[--disable-runtime-prompts]
Hailo online CLIP app
options:
-h, --help show this help message and exit
--input INPUT, -i INPUT
URI of the input stream. Default is /dev/video0. Use '--input demo' to use the demo video.
--detector {person,face,none}, -d {person,face,none}
Which detection pipeline to use.
--json-path JSON_PATH
Path to JSON file to load and save embeddings. If not set, embeddings.json will be used.
--disable-sync Disables display sink sync, will run as fast as possible. Relevant when using file source.
--dump-dot Dump the pipeline graph to a dot file.
--detection-threshold DETECTION_THRESHOLD
Detection threshold.
--show-fps, -f Print FPS on sink.
--enable-callback Enables the use of the callback function.
--callback-path CALLBACK_PATH
Path to the custom user callback file.
--disable-runtime-prompts
When set, app will not support runtime prompts. Default is False.- Default mode (
--detector none): Runs only the CLIP inference on the entire frame. This mode is what CLIP is trained for and will give the best results. CLIP will be run on every frame. - Person mode (
--detector person): Runs the CLIP inference only on detected persons. In this mode, we first run a person detector and then run CLIP on the detected persons. CLIP acts as a person classifier in this mode and will run only on detected persons. To reduce the number of CLIP inferences, we run CLIP only every second per tracked person. This can be changed in the code. - Face mode (
--detector face): Runs the CLIP inference only on detected faces. This is similar to person mode but for faces. Results in this mode are not as good as person mode (cropped faces are probably not well represented in the dataset). You can experiment with it to see if it fits your application.
Before running the application, ensure a camera is connected to your device. Use the --input flag to specify the camera device, defaulting to /dev/video0.
Verify that the camera device you use is mapped to a supported camera, particularly relevant for the Raspberry Pi. To confirm camera support, run the following command:
ffplay /dev/video0If you see the camera feed, the device is supported. If not, try /dev/video2, /dev/video4, etc. (devices are usually mapped to an even number).
Once you identify your camera device, you can run the application as follows:
clip_app --input /dev/video0
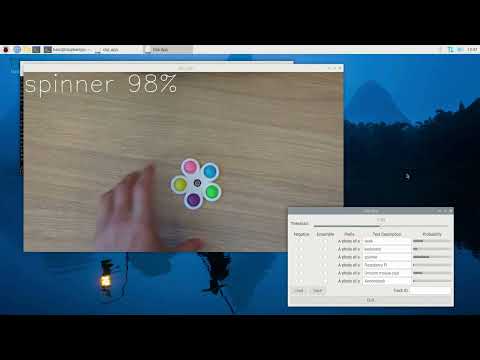
- Threshold Slider: Adjusts the threshold for CLIP classification. Classifications with probabilities lower than this threshold will be ignored.
- Negative Checkbox: Marks the classification as a negative prompt. It will be included in the Softmax calculation but will not be shown in the output.
- Ensemble Checkbox: Enables ensemble mode, where the prompt text embedding is calculated with variations to improve results. See
ensemble_templateintext_image_matcher.pyfor more details. - Text Description: The text prompt for CLIP classification.
- Probability Bars: Displays the probability of various classifications in real-time.
- Load Button: Loads the text embeddings from a JSON file specified by the
--json-pathflag. - Save Button: Saves the text embeddings to a JSON file specified by the
--json-pathflag. - Track ID: Displays the classification probabilities for a specific person in person mode. The track ID appears in the bottom left corner of the bounding box.
- Quit Button: Exits the application.
- Keep in mind that the network was trained on image + caption pairs. Your text description should be somewhat similar. For example, a text description of "A photo of a cat" will give a better score than "cat".
- The app has a pre-defined "prefix" of "A photo of a" which you can change in the
TextImageMatcherclass. - The pipeline output will select one of the classes as "the best one". There is no
backgroundclass. You should define a "negative" prompt (or prompts) to be used asbackground. When set asnegative, the class will be used in the "best match" algorithm but will not be shown in the output. - You can also use
thresholdto fine-tune detection sensitivity. However, usingnegativeprompts is better for detecting specific classes. - Negative prompts should be used to "peel off" similar classifications to your target. For example, "a man with a red shirt" will have a high score for just a man or a shirt of a different color. Add negative prompts like "a man with a blue shirt" to ensure you do not get lots of false classifications.
- Play around with prompts to see what works best for your application.
You can integrate your code in the user_callback.py file. This file includes a user-defined app_callback function that is called after the CLIP inference and before the display. You can use it to add your logic to the app. The app_callback_class will be passed to the callback function and can be used to access the app's data.
To enable executing the callback function, use the --enable-callback flag.
By default, the application will use clip_app/user_callback.py as the callback file. You can change it using the --callback-path flag. When setting a custom callback file, the callback will be enabled automatically.
- The application will run the text embeddings on the host, allowing you to change the text on the fly. This mode might not work on weak machines as it requires a host with enough memory to run the text embeddings model (on CPU). See Offline Text Embeddings for more details.
- You can set which JSON file to use for saving and loading embeddings using the
--json-pathflag. If not set,embeddings.jsonwill be used. - If you wish to load/save your JSON, use the
--json-pathflag explicitly.
- To run without online text embeddings, you can set the
--disable-runtime-promptsflag. This will speed up the load time and save memory. Additionally, you can use the app without thetorchandtorchvisiondependencies. This might be suitable for final application deployment. - You can save the embeddings to a JSON file and load them on the next run. This will not require running the text embeddings on the host.
- If you need to prepare text embeddings on a weak machine, you can use the
text_image_matchertool. This tool will run the text embeddings on the host and save them to a JSON file without running the full pipeline. This tool assumes the first text is a 'positive' prompt and the rest are negative.
text_image_matcher -h
usage: text_image_matcher [-h] [--output OUTPUT] [--interactive] [--image-path IMAGE_PATH] [--texts-list TEXTS_LIST [TEXTS_LIST ...]]

options:
  -h, --help            show this help message and exit
  --output OUTPUT       Output file name (default: text_embeddings.json).
  --interactive         Input text from an interactive shell.
  --image-path IMAGE_PATH
                        Optional, path to an image file to match. Note: image embeddings are not running on Hailo here.
  --texts-list TEXTS_LIST [TEXTS_LIST ...]
A list of texts to add to the matcher; the first one will be the searched text, and the others will be considered negative prompts. Example: --texts-list "cat" "dog" "yellow car".Some CPP code is used in this app for post-processing and cropping. This code should be compiled before running the example. It uses Hailo pkg-config to find the required libraries.
The compilation script is compile_postprocess.sh. You can run it manually, but it will be executed automatically when installing the package. The post-process .so files will be installed under the resources directory.