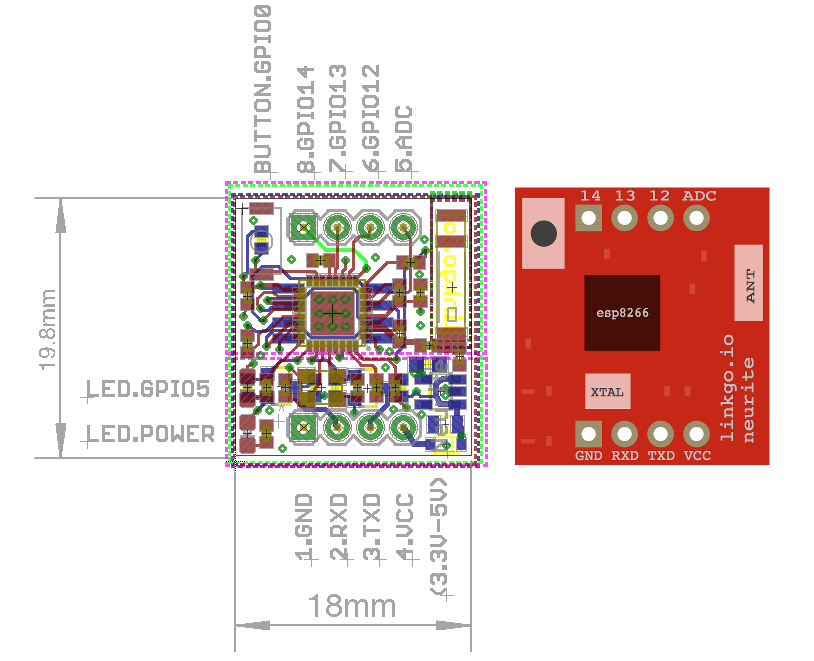
A serial to MQTT bridge, an easier way to build IoT product with esp8266 Arduino.
Neurite is named from the neural network, who takes charge of signal and information transmitting.
In the world of IoT, the amount of smart units may be explosively large.
Thus we are introducing Neurite, to simplify your next smart design.
- Neurite is an esp8266 Arduino.
- Neurite is a serial to MQTT bridge.
- Neurite is a WiFi module running corresponding firmware.
- Neurite is simply designed to be Plug-n-Play.
Neurite is great for you if:
- You just wish to connect existing hardware to the internet and publish/subscribe data.
- You just want an easy way for all your devices to communicate with each other.
Neurite can do a lot help if:
- You'd like to build some MQTT ready product quickly.
- You need a hardware to integrate into your web service without pain.
- You are looking for an easier IoT solution.
- You are neat hackers. ;)
Basic:
- Neurite natively supports MQTT.
- Neurite publishes data from serial port to the internet.
- Neurite subscribes internet data and transfers to serial port.
- Neurite can be dynamically configured over the internet.
- Neurite is OTA enabled, for both firmware and filesystem.
- Neurite will automatically reconnect once there's network issue.
Advanced:
- Neurite supports all kinds of sensors and peripherals interfaced with SPI/I2C or GPIO
- Neurite benefits from 3rd party libraries thanks to esp8266 Arduino.
- Neurite is fully customizable and hackable.
Neurite is powered by esp8266 Arduino, developed with PlatformIO.
Typical work flow:
- Get Neurite connected to local WiFi Access Point.
- Neurite connects to linkgo MQTT broker, and subscribes to a configurable topic.
- Neurite listens to serial port and MQTT, transparently bridges them two.
Advanced work flow besides above:
- Neurite loops user task within a configurable interval.
- MQTT message callbacks are registered to user logic.
-
First time setup.
Power on your Neurite. Switch to AP mode for the first time config, by pressing the button (over 5 seconds) until LED stops flashing.
-
Configure Neurite to connect to your local WiFi Access Point.
Connect your phone, pad or laptop to
neurite-*, navigate your browser tolinkgo.io, choose the WiFi AP should Neurite connect to. Then Neurite will automatically reboot. -
Wait until Neurite gets online.
Neurite LED flashes fast indicates trying hard to connect according to the WiFi ssid and psk you just provided. It turns to be breathing once connected.
-
All set.
Now you can send/receive messages through Neurite serial port.
And Neurite will automatically connect to the WiFi AP next time.
TODO
igrr and all the brilliant contributors for esp8266 Arduino.
The MIT License (MIT)
Copyright (c) 2015-2016 Linkgo LLC
Permission is hereby granted, free of charge, to any person obtaining a copy of this software and associated documentation files (the "Software"), to deal in the Software without restriction, including without limitation the rights to use, copy, modify, merge, publish, distribute, sublicense, and/or sell copies of the Software, and to permit persons to whom the Software is furnished to do so, subject to the following conditions:
The above copyright notice and this permission notice shall be included in all copies or substantial portions of the Software.
THE SOFTWARE IS PROVIDED "AS IS", WITHOUT WARRANTY OF ANY KIND, EXPRESS OR IMPLIED, INCLUDING BUT NOT LIMITED TO THE WARRANTIES OF MERCHANTABILITY, FITNESS FOR A PARTICULAR PURPOSE AND NONINFRINGEMENT. IN NO EVENT SHALL THE AUTHORS OR COPYRIGHT HOLDERS BE LIABLE FOR ANY CLAIM, DAMAGES OR OTHER LIABILITY, WHETHER IN AN ACTION OF CONTRACT, TORT OR OTHERWISE, ARISING FROM, OUT OF OR IN CONNECTION WITH THE SOFTWARE OR THE USE OR OTHER DEALINGS IN THE SOFTWARE.
