-
Notifications
You must be signed in to change notification settings - Fork 235
How to use WebDockablePane
Available since WebLaF v1.2.9 release, updated for WebLaF v1.2.12 release
Requires weblaf-ui module and Java 6 update 30 or any later to run
Dockable pane (or WebDockablePane) is a highly customized container that could hold single JComponent as main content element and multiple WebDockableFrames around it. It also provides flexible customization of all element sizes and positions, both for developer and user in runtime.
Dockable framework operates with two main types of components:
-
WebDockablePane- base dockable area container that can be placed where you want it to be within application -
WebDockableFrame- custom container with a title panel that can be moved and resized within pane
All dockable data is stored within DockablePaneModel implementation and described by a set of classes:
-
DockablePaneModel- model holdingWebDockablePanedata and custom layout -
WebDockablePaneModel- basic implementation ofDockablePaneModelused by default -
DockableElement- base interface for all structural data elements -
DockableContainer- base interface for all container data elements -
DockableContentElement- element representing dockable pane content within elements structure -
DockableFrameElement- element representing dockable frame within elements structure -
DockableListContainer- base layout representing either horizontal or vertical list of dockable elements
WebDockablePane uses hierarchical data to store its elements positions which heavily affects the way they can be moved around and how layout is functioning in general. For example it might be quite hard to position elements on the pane the way you want it to be initially from the code, but on the opposite side it offers flexible layout in which elements can be placed anywhere you want them to be in runtime and that position can then be saved and reused later on.
All implementations of DockableElement are serializable and are annotated for convenient serialization/deserialization through XStream. That is used to save and restore dockable pane model data (elements position, size, state).
First of all you need to create and configure an instance of WebDockablePane where you will add your custom frames and content:
final WebDockablePane dockablePane = new WebDockablePane ();
dockablePane.setSidebarButtonVisibility ( SidebarButtonVisibility.always );
dockablePane.setPreferredSize ( 500, 400 );
All configurations can also be applied later on, but it is more optimal to provide them first to avoid excessive UI updates on startup.
Here is the full list of WebDockablePane settings:
-
sidebarButtonVisibility- defines when sidebar buttons should be visible -
sidebarButtonAction- defines preferred sidebar button action -
resizeGripper- width of draggable resize gripper on the edge of frames -
minimumElementSize- minimum visible elements size -
occupyMinimumSizeForChildren- whether or not containers minimum size should include children minimum sizes -
model- usedDockablePaneModelimplementation
Next step is configuring dockable settings auto-save to avoid dockable frame and content positions reset after each application startup. This can be easily done using existing methods:
dockablePane.registerSettings ( new Configuration ( "MyDockablePane", "state" ) );
I will explain how this feature works a bit later so we don't get distracted right now.
Now it is time to put something into the dockable pane.
Let's start with a small frame with a common file tree as content:
final WebDockableFrame frame = new WebDockableFrame ( "filesystem", "File system" );
frame.setPosition ( CompassDirection.west );
frame.add ( new WebScrollPane ( new WebFileTree () ) );
The most important setting for WebDockableFrame is its id - it will be used to reference that frame in model and also save and restore its position data. That ID should be unique within single dockable pane instance.
Here is the full list of WebDockableFrame settings:
-
idof the frame unique within its dockable pane -
statewhich will affect the way it is displayed initially -
maximizedwhich defines whether or not frame is currently maximized -
positionwhich specifies initial position of the frame relative to dockable pane content -
draggableoption allowing or disabling frames drag and drop functionality -
floatableoption enabling or disabling switch to floatable state -
maximizableoption enabling or disabling switch to maximized state -
closableoption enabling or disabling possibility to close frame -
iconwhich will be visible in title and on the sidebar button -
titlewhich will be visible in title and on the sidebar button
More options will be added in future depending on what would be required/requested.
So, back to the track, we have our frame now - let's add it into the pane:
dockablePane.addFrame ( frame );This call will add our frame onto the dockable pane and ensure that dockable pane model will have position data on that frame.
Now we can put all parts together and run our mini-application:
public class SampleDockablePane
{
    public static void main ( final String[] args )
    {
        SwingUtilities.invokeLater ( new Runnable ()
        {
            @Override
            public void run ()
            {
                WebLookAndFeel.install ();

                final WebDockablePane dockablePane = new WebDockablePane ();
                dockablePane.setSidebarButtonVisibility ( SidebarButtonVisibility.always );
                dockablePane.setPreferredSize ( 500, 400 );
                dockablePane.registerSettings ( new Configuration ( "MyDockablePane", "state" ) );

                final WebDockableFrame frame = new WebDockableFrame ( "filesystem", "File system" );
                frame.setPosition ( CompassDirection.west );
                frame.add ( new WebScrollPane ( new WebFileTree () ) );
                dockablePane.addFrame ( frame );

                TestFrame.show ( dockablePane );
            }
        } );
    }
}
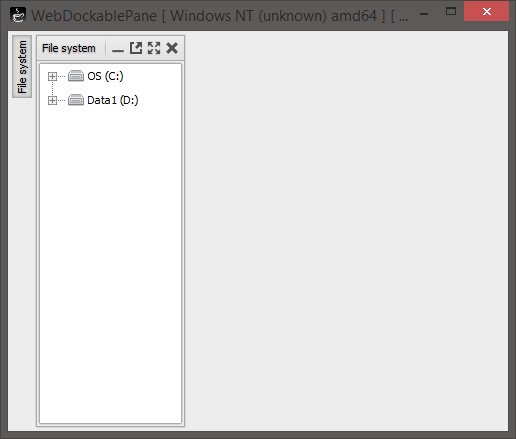
And here is the resulting WebDockablePane:
Last but not least - dockable pane content. You can provide any JComponent-based Swing component as dockable pane content. It will fill middle area of the dockable pane left free after all visible docked frames are placed.
We will use WebDocumentPane with three opened tabs as our example content:
final WebDocumentPane tabs = new WebDocumentPane ();
tabs.openDocument ( new DocumentData ( "1", WebLookAndFeel.getIcon ( 16 ), "Tab 1", new WebLabel ( "Sample tab" ) ) );
tabs.openDocument ( new DocumentData ( "2", WebLookAndFeel.getIcon ( 16 ), "Tab 2", new WebLabel ( "Sample tab" ) ) );
tabs.openDocument ( new DocumentData ( "3", WebLookAndFeel.getIcon ( 16 ), "Tab 3", new WebLabel ( "Sample tab" ) ) );
Now we just need to set it into dockable pane:
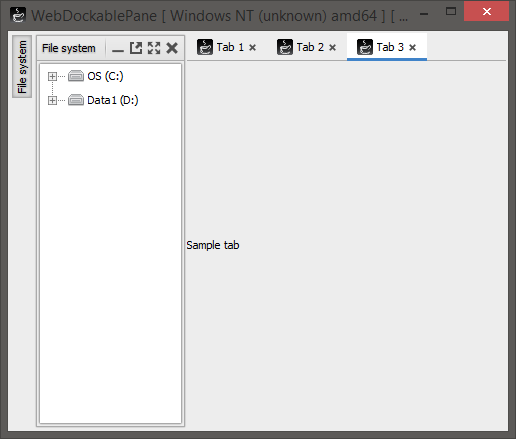
dockablePane.setContent ( tabs );And we've got our custom content added:
If you are new to WebLaF styling system - I recommend reading Styling Introduction wiki article first. It explains how styling works in WebLaF and has a bunch of code examples for you to try out.
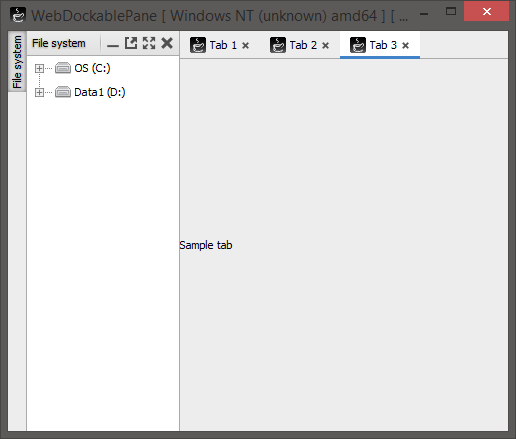
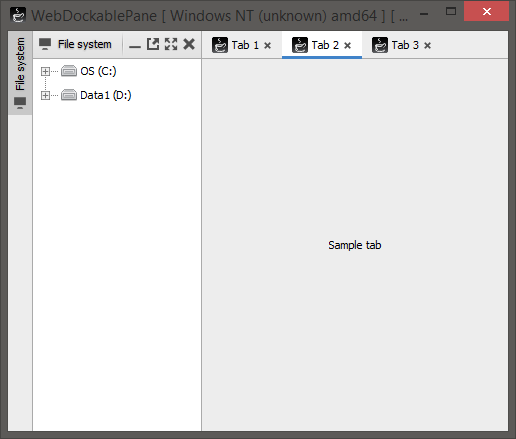
We've got the content we wanted to see in WebDockablePane, but it's not really visually appealing so let's fix that with the default styles available out-of-the-box. First of all we'll use StyleId.dockablepaneCompact for WebDockablePane and StyleId.scrollpaneTransparentHovering for WebScrollPane used for the WebFileTree. Here is the result:
Now there are two glaring issues left:
- Height of the
WebDockableFrameheader is not equal to the tabs height - Sidebar button of the
WebDockableFrameis tiny - Text in the tabs is not centered
We can somewhat solve 2nd and 3rd issues by adding icon to the frame and aligning text:
public class SampleDockablePane
{
    public static void main ( final String[] args )
    {
        SwingUtilities.invokeLater ( new Runnable ()
        {
            @Override
            public void run ()
            {
                WebLookAndFeel.install ();

                final WebDockablePane dockablePane = new WebDockablePane ( StyleId.dockablepaneCompact );
                dockablePane.setSidebarButtonVisibility ( SidebarButtonVisibility.always );
                dockablePane.setPreferredSize ( 500, 400 );
                dockablePane.registerSettings ( new Configuration ( "MyDockablePane", "state" ) );

                final WebDockableFrame frame = new WebDockableFrame ( "filesystem", Icons.computer, "File system" );
                frame.setPosition ( CompassDirection.west );
                frame.add ( new WebScrollPane ( StyleId.scrollpaneTransparentHovering, new WebFileTree () ) );
                dockablePane.addFrame ( frame );

                final WebDocumentPane tabs = new WebDocumentPane ();
                tabs.openDocument ( new DocumentData (
                        "1",
                        WebLookAndFeel.getIcon ( 16 ),
                        "Tab 1",
                        new WebLabel ( "Sample tab", WebLabel.CENTER )
                ) );
                tabs.openDocument ( new DocumentData (
                        "2",
                        WebLookAndFeel.getIcon ( 16 ),
                        "Tab 2",
                        new WebLabel ( "Sample tab", WebLabel.CENTER )
                ) );
                tabs.openDocument ( new DocumentData (
                        "3",
                        WebLookAndFeel.getIcon ( 16 ),
                        "Tab 3",
                        new WebLabel ( "Sample tab", WebLabel.CENTER )
                ) );
                dockablePane.setContent ( tabs );

                TestFrame.show ( dockablePane );
            }
        } );
    }
}
Result is better, but not perfect:
We still have to do something about the header & tab height - this is where it is time to resort to custom style for our WebDockableFrame. We don't need much though, all we want is to adjust header height. Best solution would be to slightly increase title padding (originally it was 3,3,3,5):
<style type="dockableframe" id="my-frame" extends="compact">
    <style type="panel" id="title">
        <style type="styledlabel" id="title" padding="4,3,5,5" />
    </style>
</style>
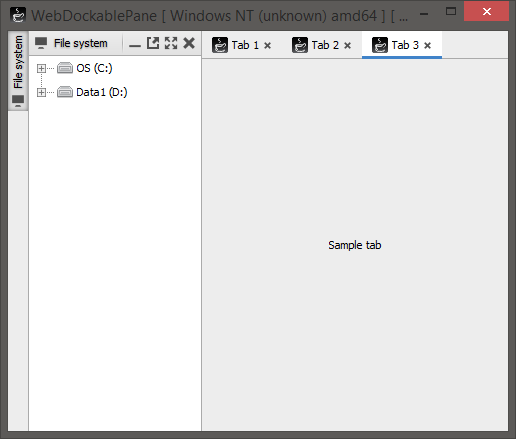
Once we add this style into our extension or custom skin and apply StyleId.of ( "my-frame" ) to our WebDockableFrame we will see the final result:
One of important things when you are working with docking framework is initial size of each element on the pane. When you are adding frame into the dockable pane first time its preferred size will affect its size on the pane and the way resize is performed.
There are two ways to handle frames and content sizes properly and each of those have its own pros and cons:
- Easiest way - simply set custom preferred size for your frame, frame content or dockable pane content. That will ensure that frame doesn't want too much space or isn't too small initially.
- pros: Simple, always works exactly as you imagine it would
- cons: Doesn't take actual content sizes into account
- Harder way - create frame and dockable pane content in such way that it will return preferred size you want it to have. This might be tricky with some components and will require good knowledge of components you are working with. For example some components might switch between static and dynamic preferred sizes depending on their configuration - like
JTextField- by default its preferred size depends on its text content, but if you provide specific amount of visible columns it will become static.
- pros: Content provides desired preferred size on its own which eventually minimizes chances to get issues
- cons: Harder to configure than simple preferred size
I personally always suggest the second option when it is possible as it is design-correct in terms of the Swing UI. Also having too many custom preferred sizes in components will eventually cause you a lot of headache as it completely denies actual component preferred size when set and might cause different layouts to place component incorrectly.
You can follow a simple rule - if component offers tools to configure its own preferred size - use them, if not - consider using some layout that might fit component into bounds you want it to take. If neither of those two options work for your specific case then you can actually use preferred size as your last resort.
Let's have a look at this code example:
public class SampleDockablePane
{
    public static void main ( final String[] args )
    {
        SwingUtilities.invokeLater ( new Runnable ()
        {
            @Override
            public void run ()
            {
                WebLookAndFeel.install ();

                final ImageIcon icon = WebLookAndFeel.getIcon ( 16 );

                final WebDockablePane dockablePane = new WebDockablePane ();
                dockablePane.setSidebarButtonVisibility ( SidebarButtonVisibility.minimized );
                dockablePane.setPreferredSize ( 800, 600 );

                final WebDockableFrame filesystem = new WebDockableFrame ( "filesystem", icon, "File system" );
                filesystem.setPosition ( CompassDirection.west );
                filesystem.setPreferredWidth ( 210 );
                filesystem.add ( new WebScrollPane ( StyleId.scrollpaneUndecorated, new WebFileTree () ) );
                dockablePane.addFrame ( filesystem );

                final WebDockableFrame textarea = new WebDockableFrame ( "textarea", icon, "Text area" );
                textarea.setPosition ( CompassDirection.east );
                textarea.setPreferredWidth ( 210 );
                textarea.add ( new WebScrollPane ( StyleId.scrollpaneUndecorated, new WebTextArea () ) );
                dockablePane.addFrame ( textarea );

                final WebDockableFrame labelframe = new WebDockableFrame ( "labe", icon, "Label frame" );
                labelframe.setPosition ( CompassDirection.south );
                labelframe.setPreferredHeight ( 150 );
                labelframe.add ( new WebScrollPane ( StyleId.scrollpaneUndecorated, new WebLabel ( "Content", WebLabel.CENTER ) ) );
                dockablePane.addFrame ( labelframe );

                final WebDocumentPane tabs = new WebDocumentPane ();
                tabs.openDocument ( new DocumentData ( "1", icon, "Tab 1", new WebLabel ( "Sample tab", WebLabel.CENTER ) ) );
                tabs.openDocument ( new DocumentData ( "2", icon, "Tab 2", new WebLabel ( "Sample tab", WebLabel.CENTER ) ) );
                tabs.openDocument ( new DocumentData ( "3", icon, "Tab 3", new WebLabel ( "Sample tab", WebLabel.CENTER ) ) );
                dockablePane.setContent ( new WebPanel ( StyleId.panelFocusable, tabs ) );

                TestFrame.show ( dockablePane );
            }
        } );
    }
}
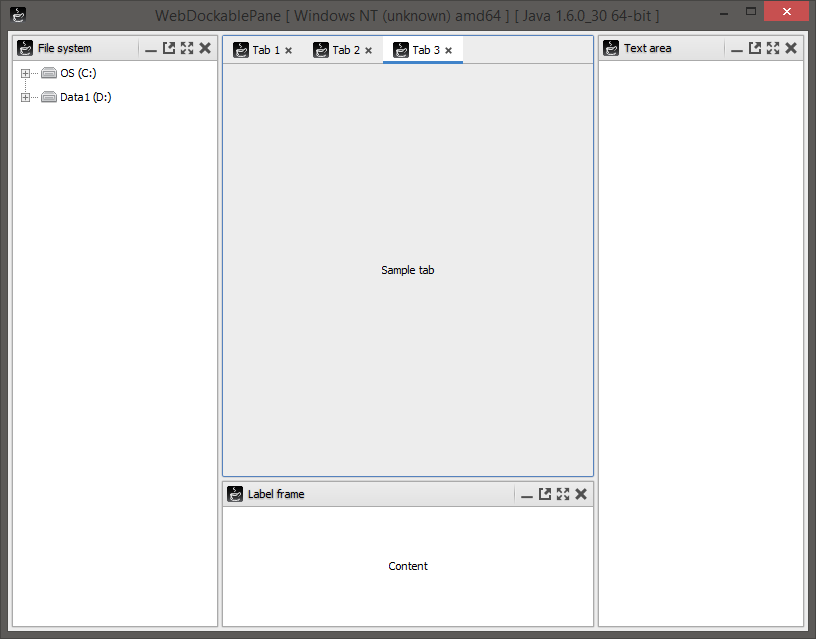
This is what you will see if you launch it:
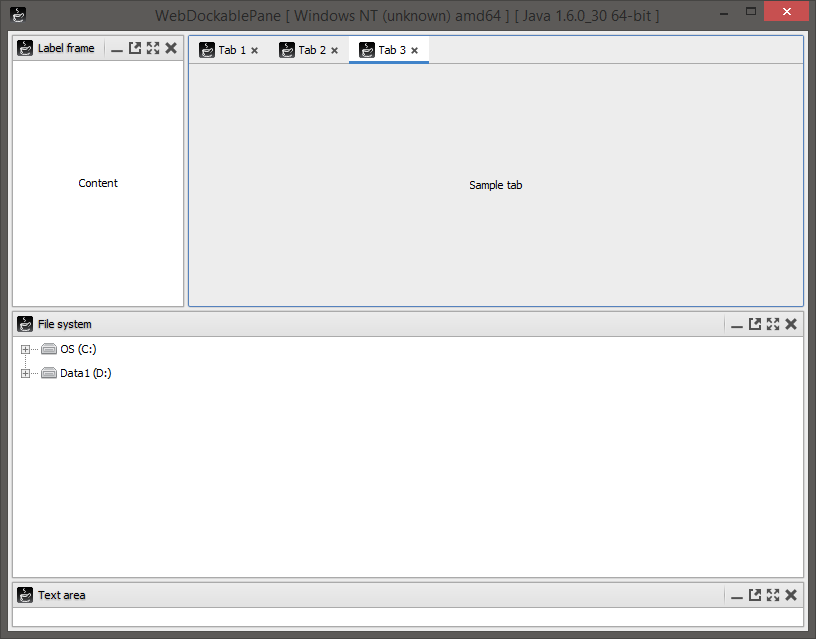
Seems good so far? Yes, but only until we will start dragging our frames around:
Label frame is still fine thanks to the title width, but two other frames got really weird sizes after drag. Why did that happen? Well, because they actually have those preferred heights. We only modified their preferred widths and left heights untouched in the code. Of course we can specify widths as well, but I would rather work a bit more with each frame to make give out preferred size I want.
Tree frame - it contains scroll pane with a tree. Scroll pane uses either its content preferred size or the one returned by Scrollable method implementation if component implements it. Tree does implement Scrollable and even offers additional method on top of that, we will use it:
tree.setVisibleRowCount ( 5 );This will fix frame height. Width will unfortunately always depend on tree width, so this is one of the cases where you might want to provide preferred width as I did from the start in this example.
Text area frame - it contains scroll pane with a text area which also implements Scrollable and on top of that allows you to specify visible rows and columns count:
textArea.setRows ( 5 );
textArea.setColumns ( 20 );
This will fix both - width and height, so we won't need frame preferred size anymore.
Label frame - it contains simple label as the only content. If you want this frame to take more than just that label size you will have to provide full preferred size for it or the frame:
labelframe.setPreferredSize ( 210, 150 );Now let's have a look at full example code again:
public class SampleDockablePane
{
    public static void main ( final String[] args )
    {
        SwingUtilities.invokeLater ( new Runnable ()
        {
            @Override
            public void run ()
            {
                WebLookAndFeel.install ();

                final ImageIcon icon = WebLookAndFeel.getIcon ( 16 );

                final WebDockablePane dockablePane = new WebDockablePane ();
                dockablePane.setSidebarButtonVisibility ( SidebarButtonVisibility.minimized );
                dockablePane.setPreferredSize ( 800, 600 );

                final WebDockableFrame filesystem = new WebDockableFrame ( "filesystem", icon, "File system" );
                filesystem.setPosition ( CompassDirection.west );
                filesystem.setPreferredWidth ( 210 );
                final WebFileTree tree = new WebFileTree ();
                tree.setVisibleRowCount ( 5 );
                filesystem.add ( new WebScrollPane ( StyleId.scrollpaneUndecorated, tree ) );
                dockablePane.addFrame ( filesystem );

                final WebDockableFrame textarea = new WebDockableFrame ( "textarea", icon, "Text area" );
                textarea.setPosition ( CompassDirection.east );
                final WebTextArea textArea = new WebTextArea ();
                textArea.setRows ( 5 );
                textArea.setColumns ( 20 );
                textarea.add ( new WebScrollPane ( StyleId.scrollpaneUndecorated, textArea ) );
                dockablePane.addFrame ( textarea );

                final WebDockableFrame labelframe = new WebDockableFrame ( "labe", icon, "Label frame" );
                labelframe.setPosition ( CompassDirection.south );
                labelframe.setPreferredSize ( 210, 150 );
                labelframe.add ( new WebScrollPane ( StyleId.scrollpaneUndecorated, new WebLabel ( "Content", WebLabel.CENTER ) ) );
                dockablePane.addFrame ( labelframe );

                final WebDocumentPane tabs = new WebDocumentPane ();
                tabs.openDocument ( new DocumentData ( "1", icon, "Tab 1", new WebLabel ( "Sample tab", WebLabel.CENTER ) ) );
                tabs.openDocument ( new DocumentData ( "2", icon, "Tab 2", new WebLabel ( "Sample tab", WebLabel.CENTER ) ) );
                tabs.openDocument ( new DocumentData ( "3", icon, "Tab 3", new WebLabel ( "Sample tab", WebLabel.CENTER ) ) );
                dockablePane.setContent ( new WebPanel ( StyleId.panelFocusable, tabs ) );

                TestFrame.show ( dockablePane );
            }
        } );
    }
}
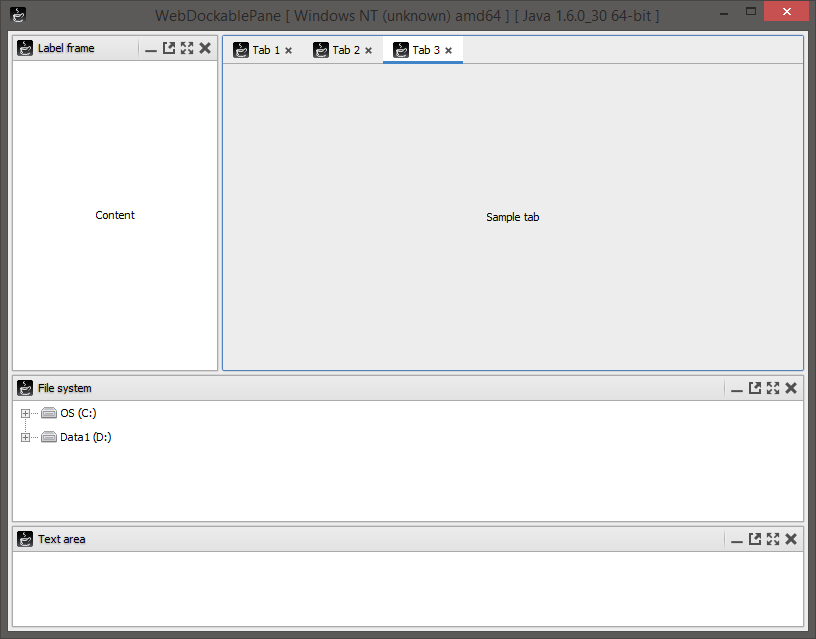
Now we have a healthy mix of components configurations and preferred sizes complementing some areas. Once we run this example and drag elements around once again - we will see a much better picture:
I have mentioned this piece of code at the start:
dockablePane.registerSettings ( new Configuration ( "MyDockablePane", "state" ) );So this basically asks WebLaF SettingsManager to store this dockable pane settings into separate MyDockablePane group under state key - practically this will be a separate MyDockablePane.xml file in file system which will contain serialized settings. Location of that file will is determined by SettingsManager configuration. You can check How to use SettingsManager wiki article for more information on how SettingsManager works.
You might also want to execute this line of code before adding any frames or displaying dockable pane, otherwise this might cause major UI updates which won't be visually appealing. Plus preloading settings before adding any frames or content will also improve initialization performance because WebDockablePane won't have to recalculate the whole layout twice.
Also, in case you ever need it - you can retrieve complete WebDockablePane state at any time:
DockableContainer state = dockablePane.getState ();This state object contains information about current dockable pane structure and it is also serializable and annotated for convenient usage in conjunction with XStream library.
State can also be restored for any specific dockable pane at any time:
dockablePane.setState ( state );You don't need to worry that restored data might not contain some of your frames (or contain ones that you don't have). If data for any specific frame is missing it will be created and properly added into the model the moment you load state.
If you found any mistakes or inconsistency in this article, feel that it is lacking explanation or simply want to request an additional wiki article covering some topic:
I will do my best to answer and provide assistance as soon as possible!
