Friction-less Node Development in Docker Compose
- Install
- Description
- Basic Usage
- DNV CLI commands
- DNV Init
- DNV UI
- Tutorial
- DNV?!
- Running DNV on Windows with WSL
- Thanks
$ npm install -g dnvDNV works behind the scenes to keep dependencies in your Docker container in-sync with your local project.
It also comes with a custom made, featureful ncurses-like UI designed for use when developing apps using Docker Compose.


While in a project directory (has a package.json file, at a minimum):
$ dnv init$ dnv ui Usage
$ dnv <command>
Commands
clear -- Remove containers, volumes, images and clear configuration for DNV projects
config -- Modify project / default configuration
info -- Display project configuration
init -- Initialize project in current directory
ui -- Start project using DNVs Multiplexing UI
up -- Start project using 'docker-compose up'
stop -- Run docker-compose stop for DNV projects
Example
$ dnv init (initialize DNV project in current directory)
$ dnv config (edit configuration of project in current directory)
$ dnv up -h (show help for 'up' command)
$ dnv ui (Run DNV UI for project in current directory) Usage: dnv clear [options]
Remove containers, volumes and config for DNV projects
Options:
-p --project Remove Docker objects and configuration for current directory project
-s --select Remove Docker objects and configuration for selected projects
-d --docker Remove containers, volumes and images created by DNV for selected projects
-r --reset Remove all DNV created Docker elements and clear configuration
-f --force bypass prompts
--dependencies Delete npm / yarn / yarn v2 lock files and dependency folders in the current directory. Usage: dnv config [options]
Set project configuration
Opens project associated with current directory when no options passed
Options:
-s --select Open configuration for selected project
-d --default Open Default configuration Usage: dnv info [options]
Output project configuration
Displays project configuration associated with current directory when no options passed
Options:
-a --all Output entire project config object, including internally used values
-d --default Output default configuration
-p --path Output config file path Usage: dnv init [options]
Initialize project
Options:
-h, --help display help for command Usage: dnv ui [options]
Run project with DNVs Multiplexing UI
Options:
--since <since> Load container logs from this time forward. Can be a duration string (i.e. 1h30m)
--scrollback <scrollback> The amount of scrollback for logs in DNV UI
--service <service...> Specify services to display in DNV UI
--nosync Do not synchronize docker-compose.yml and project configuration and do not re-generate docker-compose-dnv.gen.yml
-i --install re-generate docker-compose-dnv-gen.yml (if needed) and force run npm/yarn install in container
-f --file <filename...> Specify additional .yml files to be merged with generated DNV file
-q --quit Go through the startup process, but quit before running docker-compose up (or attaching to running containers).
This will update project configuration based on changes to Docker files, as well as re-generate docker-compose-dnv-gen.yml Usage: dnv up [options]
Run docker-compose up
Options:
--since <since> Load container logs from this time forward. Can be a duration string (i.e. 1h30m)
--scrollback <scrollback> The amount of scrollback for logs in DNV UI
--service <service...> Specify services to display in DNV UI
--nosync Do not synchronize docker-compose.yml and project configuration and do not re-generate docker-compose-dnv.gen.yml
-i --install Force run install in container
-f --file <filename...> Specify additional .yml files to be merged with generated DNV file
-d --detach Detached mode: Run containers in the background
-q --quit Go through the startup process, but quit before running docker-compose up (or attaching to running containers).
This will update project configuration based on changes to Docker files, as well as re-generate docker-compose-dnv-gen.ymlUsage: dnv stop [options]
Run docker-compose stop for current directory project(Useful when the 'External Volume' option is set during project initialization)
- If both a Dockerfile and docker-compose.yml are present, DNV will refer to those files when initializing the project.
- If neither file is present, DNV will generate a basic Dockerfile and docker-compose.yml
- If only one of either Dockerfile or docker-compose.yml is present, initialization will error out
? Package Manager (Use arrow keys)
❯ npm (default)
  yarn
yarn 2? Do you want DNV to manage project dependencies in an external volume? (Y/n)(See: External Volume option)
? Working directory (WORKDIR) (/usr/src/app)? Dockerfile Node Image (Use arrow keys)
❯ node:16.5 (default)
──────────────
node:16.5 (default)
node:15.5? Use Node User (instead of root)? (y/N)? Restart containers when source files change? Select services:
❯◯ service1(See: Restarting containers option)
? Enable metrics display for Node services in DNV UI. Select services:
❯◯ service1? Use alternate image for DNV-started Node Services? (y/N)If you choose 'yes' for the External Volume option during project initialization, DNV will do the following:
- Creates and manages an external volume containing the contents of
node_modules/.yarn - Monitors your project's lock files for changes and re-runs npm/yarn install in Docker containers when necessary
- Mounts your local dependency cache directory (yarn or NPM) during installation, for quick install of dependencies in Containers.
- Force installs dependencies that require
node-gyp, if necessary (additional dependencies can be added in the project config) - Generates a separate .yml file which is used when running
dnv uiordnv up(docker-compose-dnv-gen.yml)
Primarily, it means it's not necessary to build container images for your Node services. Instead, the container file system will just be the base Node image, the contents of your project directory (bind mounted), plus the dependency directory (mounted as an external volume over the bind mount). Consequently, changing dependencies for your project doesn't require rebuilding an image (re-downloading ALL dependencies), so that's quick and painless.
DNV monitors lock files for changes and selectively rebuilds container images, if needed, when running dnv ui or dnv up
If you're just starting development and don't have your Node dependencies nailed down yet, absolutely. It will make developing with Docker Compose much more pleasant. Otherwise, you probably won't get much benefit from it.
Note that the 'Metrics display' option is only available with the External Volume option enabled.
Also, when using the external volume option you should use dnv stop to stop a docker compose project originally started with dnv ui / dnv up, rather than through the Docker Desktop UI (since it doesn't remember that the project was started with a unique .yml file)
DNV generates a separate .yml file to use with docker-compose up when you're utilizing the external volume option. This simply copies your docker-compose.yml and adds in the necessary parts to define the external volume. Note that this is re-generated (when needed) from scratch every time changes are detected, so any modifications you make in docker-compose-dnv-gen.yml will be lost (the --nosync flag bypasses this, for testing purposes). In other words, edit your docker-compose.yml as usual, and those changes will get transferred to docker-compose-dnv-gen.yml the next time you run dnv ui / dnv up.
The recommended solution is to specify a numbered-version Node image to use with DNV, like node:16.5 (You can set this with the 'Use alternate node image when DNV starts service' if you're using an alpine image in your Dockerfile). Hopefully this covers most cases where you would need to install extra dependencies in the container (like you often need to do if you're using an alpine image).
If that doesn't cover you, you can create a custom Node image with those dependencies installed and select it for the 'Use alternate node image when DNV starts service' option. Alternately, just don't use the External Volume option.
If you choose 'yes' for Restart containers when source files change?, then DNV will...do exactly that: Restart containers when your project's source files change. If you're already using something like nodemon for your project then you should **not** use this feature.
(press F9 in the UI to see command list)
 General UI                                                                Filtering                                                  │
│  Exit UI                                      Ctrl + q                    Submit / Cancel            Enter / Escape                 │
│  Select Service Panel                         Ctrl + Shift + Direction    Clear prompt               Ctrl + x                       │
│  Select Service Sub-Panel                     Ctrl or Alt + Direction     Cycle prior filters        Ctrl + Up / Down               │
│  Close/Exit Sub-Panel                         Ctrl + z                    Clear filter               Ctrl + g                       │
│  Maximize Panel                               Alt + x                                                                               │
│  Display Log and Sub-Panels in a Grid         Alt + Shift + x             Exec / Scripts                                            │
│  Minimize Panel / Close Sub-Panel Grid        Alt + x                     Run selection              Enter                          │
│                                                                           Show arguments input       Space                          │

│  Select Services Page                         F1 -> F8                    Panel Actions (like Action, Search, Filter etc)           │
│  Scroll Up Log                                Up, Shift-Up, Page-Up       Run Action                 Ctrl + indicated letter        │
│  Scroll Down Log                              Down, Shift-Down, Page-Down                                                           │
│  Scroll to Start of Log                       Home                        REPL / Shell Scrolling                                    │
│  Scroll to End of Log                         End                         Scroll                     Page-Up, Page-Down             │
│                                                                           Faster Scroll              PgUp/PgDwn + Shift/Ctrl/Alt    │
│  Searching                                                                                                                          │
│  Submit / Cancel                              Enter / Escape              Mouse (on Linux)                                          │
│  Clear prompt                                 Ctrl + x                    Scroll with mousewheel                                    │
│  Cycle prior searches                         Ctrl + Up / Down            Drag-select text, copy to clipboard with Ctrl+C           │
│  Find next match                              Down                        Dbl Click                  Select Word                    │
│  Find previous match                          Up                          Triple Click               Select Line                    │
│  Find first match                             Ctrl + Home                 Incremental Select         Ctrl + Left Button             │
│  Find last match                              Ctrl + End                  Move Cursor (if visible)   Alt + Left Button	          |
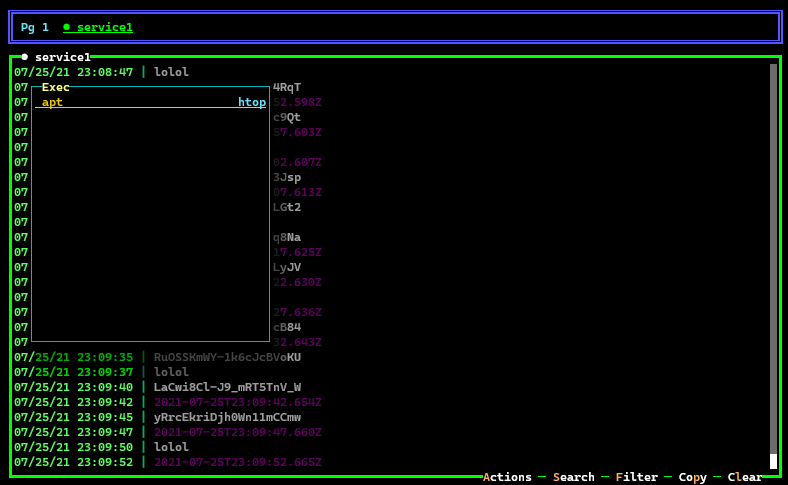
Opens a bash / sh shell in the container
Shows a list of installed programs (installed via apt/apk as well as npm globally installed packages). If you run, for example, apt update and then apt install htop in a bash/sh shell, then htop will appear in the exec menu.
Opens a repl session in your project directory
Shows a list of options comprising
- Scripts defined in your project's package.json
- Any .sh files found in your project directory
Pressing space (as opposed to enter) shows a prompt to enter arguments (in the case of .sh scripts) or modify the executed command (for package.json script entries)

Shows a 'metrics' display for the node process. Shows graphs for
- CPU usage
- Memory usage
- Event loop time
- Active handles

Lets you open the README.md for your project's dependencies.

Pressing Ctrl + e opens a sections menu for quick navigation.

Restarts the container
dnv ui and dnv up will stop containers on exit if it is responsible for starting ALL containers for a project (they weren't already running). Otherwise, it doesn't stop any project-associated container.
Here's a simple project you can make to test DNV:
- First, pull a number-versioned Node image for docker (i.e.
docker pull node:16.5) - Create a new folder and run
npm init - Run
npm install express - Create an index.js file with the following contents:
const express = require('express');
const app = express();

app.listen(80, () => {
    console.log('Express listening');
});- Add a 'start' entry to 'scripts' in the package.json file:
"start": "node index.js"- Run
dnv initand pick the default values for the provided prompts, except for the 'Metrics' and 'Restart containers' prompts, where you'll need to pressspaceto select a service and thenEnter - Run
dnv ui
DNV stands for Docker Node Volume. Originally, the CLI program just created the external volume containing node_modules and ran docker-compose up. It does way more now, but I stuck with the original name.
The ideal setup to run DNV on Windows employs the following:
- Docker Desktop (required, obviously)
- Windows Terminal Preview
- Windows Subsystem for Linux v2
- Working in the Linux directory-space, not the mounted Windows directory
Regarding the last point, Yarn/NPM/Node are EXTREMELY SLOW if your project is in the mounted Windows directory (/mnt/c/...).
The sticking point in this setup is that if Docker Desktop is running in Administrator mode, it means the WSL2 distribution you're using must also be running in Admin to see docker, which in turn means Windows Terminal Preview must be in Admin mode to run the WSL2 distribution.
(Note that all this headache can be avoided by adding your User Account to the docker-users group. See item #5 here)
- Open PowerShell
- Navigate to the directory where you want to download the distro installation (.appx) file, and run the following command
Invoke-WebRequest -Uri https://aka.ms/wsl-debian-gnulinux -OutFile Debian.appx -UseBasicParsing- If you get an error, try renewing DNS by running the following commands in order
- ipconfig /release
- ipconfig /flushdns
- ipconfig /renew
- In the download directory, change
Debian.appxtoDebian.zip, and extract the archive to a folder. - In the folder with the extracted archive contents, change
DistroLauncher-Appx_1.3.0.0_x64.appxtoDistroLauncher-Appx_1.3.0.0_x64.zip, and extract the archive. - Copy the contents of the newly-created folder to C:\debian (or wherever you want the distro executable to reside)
- Open C:\debian, right-click on debian.exe, choose 'Run as administrator' and follow the installation prompts.
Step 2 - Install gsudo
- Open PowerShell
- Run the following command
PowerShell -Command "Set-ExecutionPolicy RemoteSigned -scope Process; iwr -useb https://raw.githubusercontent.com/gerardog/gsudo/master/installgsudo.ps1 | iex"- Install Windows Terminal Preview from the Microsoft Store
- Open Windows Terminal Preview, then open Settings
- In the left side-bar menu, scroll down and click
Add a new profile - Name this profile whatever you like ("Debian Admin" or some-such). In the Command line text area, paste the following
%SystemRoot%\System32\WindowsPowerShell\v1.0\powershell.exe gsudo wsl -d DebianBy default, WSL will open to a directory like /mnt/c/WINDOWS/system32, which is inconvenient. The following steps will alter .bashrc so your HOME directory is opened on startup, instead.
- In Windows Terminal Preview, start a command line using the profile you just created and do the following commands:
sudo apt updatesudo apt install nanocd ~nano .bashrc
- In the nano editor, scroll to the very bottom of the .bashrc file and add the following line:
cd ~
- Press
Ctrl + Oand thenEnterto save, and thenCtrl + Xto quit.
Also, be sure to take a look at NodeJS on WSL.
I'm indebted to the work done on the Blessed Terminal widget by RSE - Blessed Xterm and astefanutti - Kubebox.
The updates to Blessed color-handling make use of code from robey - antsy, the XTerm source, and VSCode. The VSCode source is a great resource.
The 'metrics' display for the UI is based on code from FormidableLabs - nodejs-dashboard
Additional box borders are from cancerberoSgx - flor
cancerberoSgx - cli-driver is used in the integration tests and is awesome.
I think DNV has 10 dependencies created by sindresorhus. Maybe more. Thank you.
Of course, the underlying tech that drives the extensively modified Blessed Terminal widget used by the DNV UI is XTerm, which is amazing, in my opinion. Displaying multiple logs with 1000+ line scrollback performantly simply wasn't feasible with the Log widget that comes with Blessed.