PhaxMachine is a lightweight, easily customizable faxing application that makes it easy for service providers to quickly provide and manage permission-based email-to-fax and fax-to-email services to their customers. Users are linked to a fax number by an Admin or a Manager into groups that are emailed whenever a fax received on that number, or when the user sends a fax using that number confirming the success or failure of the fax. The application allows an Admin to create an Organization, invite a Manager to manage the organization (optional), assign fax numbers to that organization, and link users to each fax number. Users are registered on an invite-only basis via email.
The application utilizes the Phaxio API for faxing, the Mailgun API for emailing, and Devise for user authentication. This application is built using Ruby v2.5.1 and Rails v5.2.1.
You'll notice a number of fields that need to be populated (e.g. App Name and the Config Variables). Choose an App name, and populate the API credentials fields with your production API credentials from Phaxio.
Skip to section 2 below.
- Install and configure the Heroku CLI. Create an account if you do not already have one.
- Clone this repository:
git clone https://github.com/phaxio/new_phax_machine.git && cd new_phax_machine - Create the app on Heroku:
heroku create - Set the required environment variables:
heroku config:set ADMIN_EMAIL=Email address for the administratorheroku config:set DOMAIN_URL=The domain this application will be deployed to. If you're not using a custom domain this will be 'https://YOURAPPNAMEHERE.herokuapp.com'.heroku config:set FROM_EMAIL=The 'from' address attached to outgoing emails sent from the application.heroku config:set SMTP_PASSWORD=Mailgun's SMTP password for outgoing email.heroku config:set SMTP_USER=Mailgun's SMTP username for outgoing email.heroku config:set PHAXIO_API_KEY=your_api_keyheroku config:set PHAXIO_API_SECRET=your_api_secretheroku config:set PHAXIO_CALLBACK_TOKEN=your_callback_token
- Deploy:
git push heroku master
- Sign up for a Mailgun account.
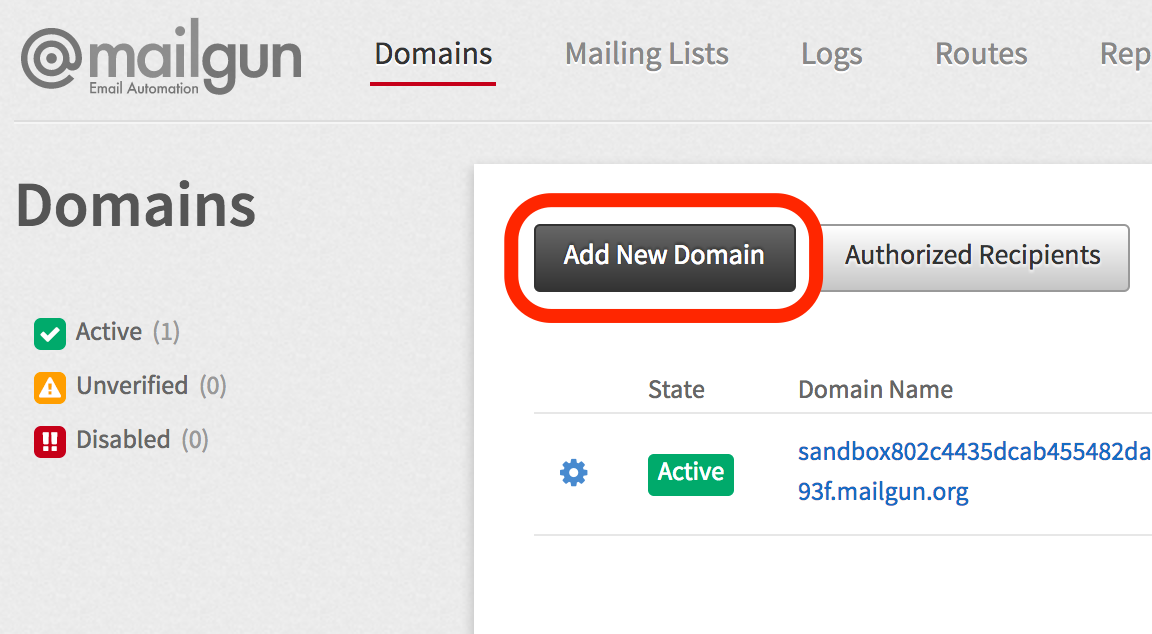
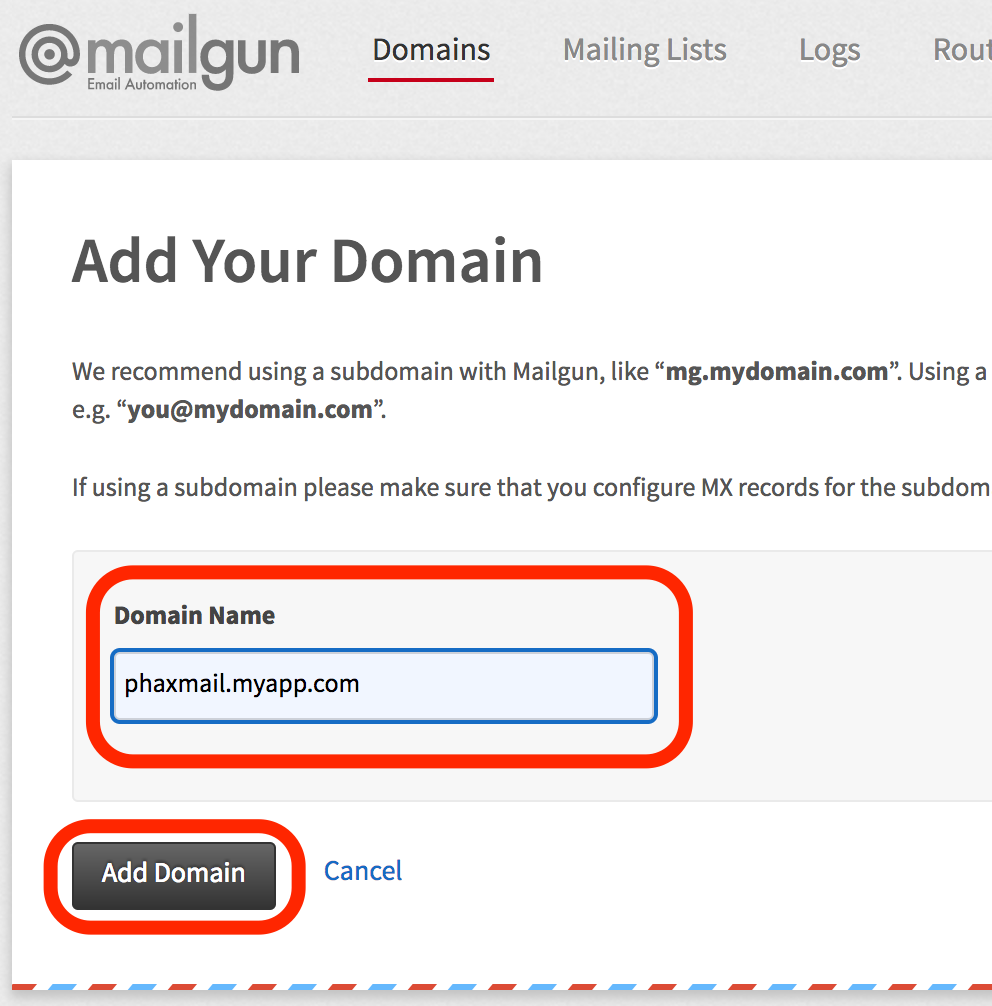
- In the Mailgun console, choose the "Domains" tab, then click the "Add New Domain" button, and enter the subdomain where you want to receive fax emails. In these examples, I'm using
phaxmail.myapp.com. If you don't want to configure your own domain, you can use the sandbox domain already in your Mailgun account, but you'll have to manually add permitted user emails for the domain on Mailgun. If you're using the sandbox domain, you can skip to step 4 below.

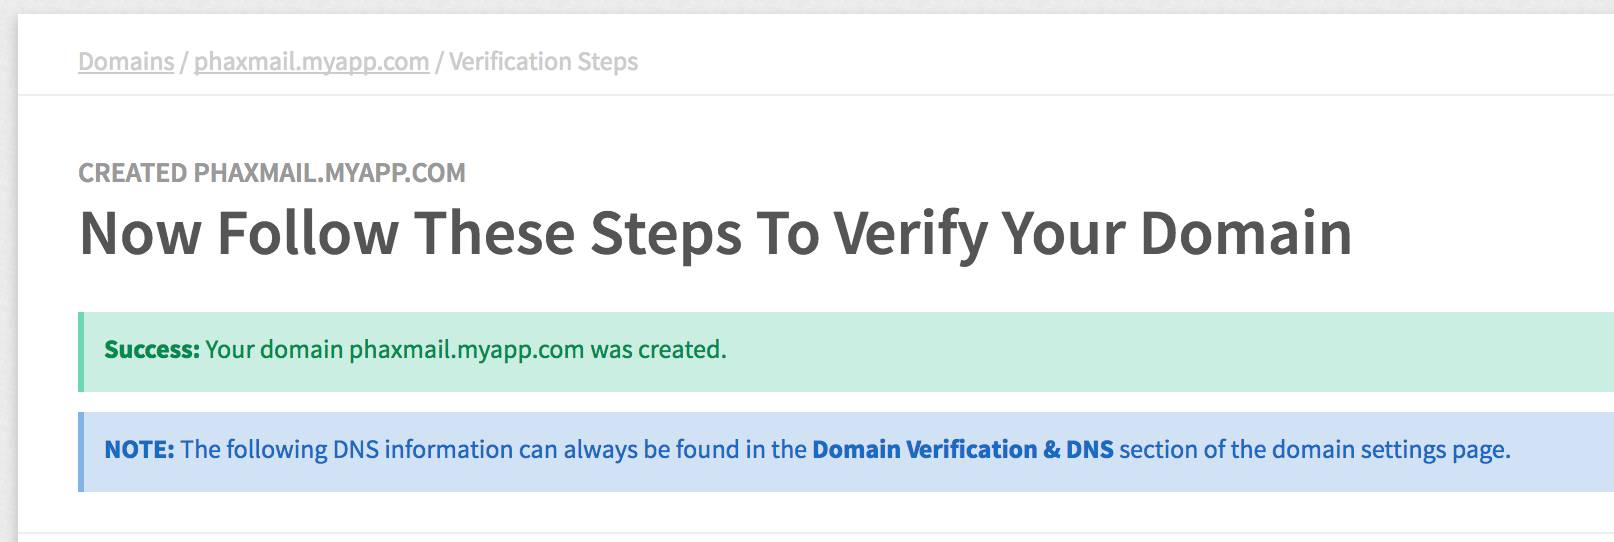
- Verify your domain. Mailgun will provide you with straight-forward guides on how to do this with most common providers. This step may take some time.

- On the domains page, select the domain that you'll be using. (This can be the sandbox domain in your account which ends mailgun.org.)
- In the Domain Information section, copy and paste the SMTP Hostname into the SMTP_HOST field on Heroku.
- Next copy and past the Default SMTP Login from Mailgun into the SMTP_USER field on Heroku.
- Copy and paste the Default Password from Mailgun into the SMTP_PASSWORD field on Heroku.
- Use port 587 as the SMTP port, mark SMTP_TLS as true, and enter the email address you'd like the emails to come from in the SMTP_FROM field.
- Click Deploy!
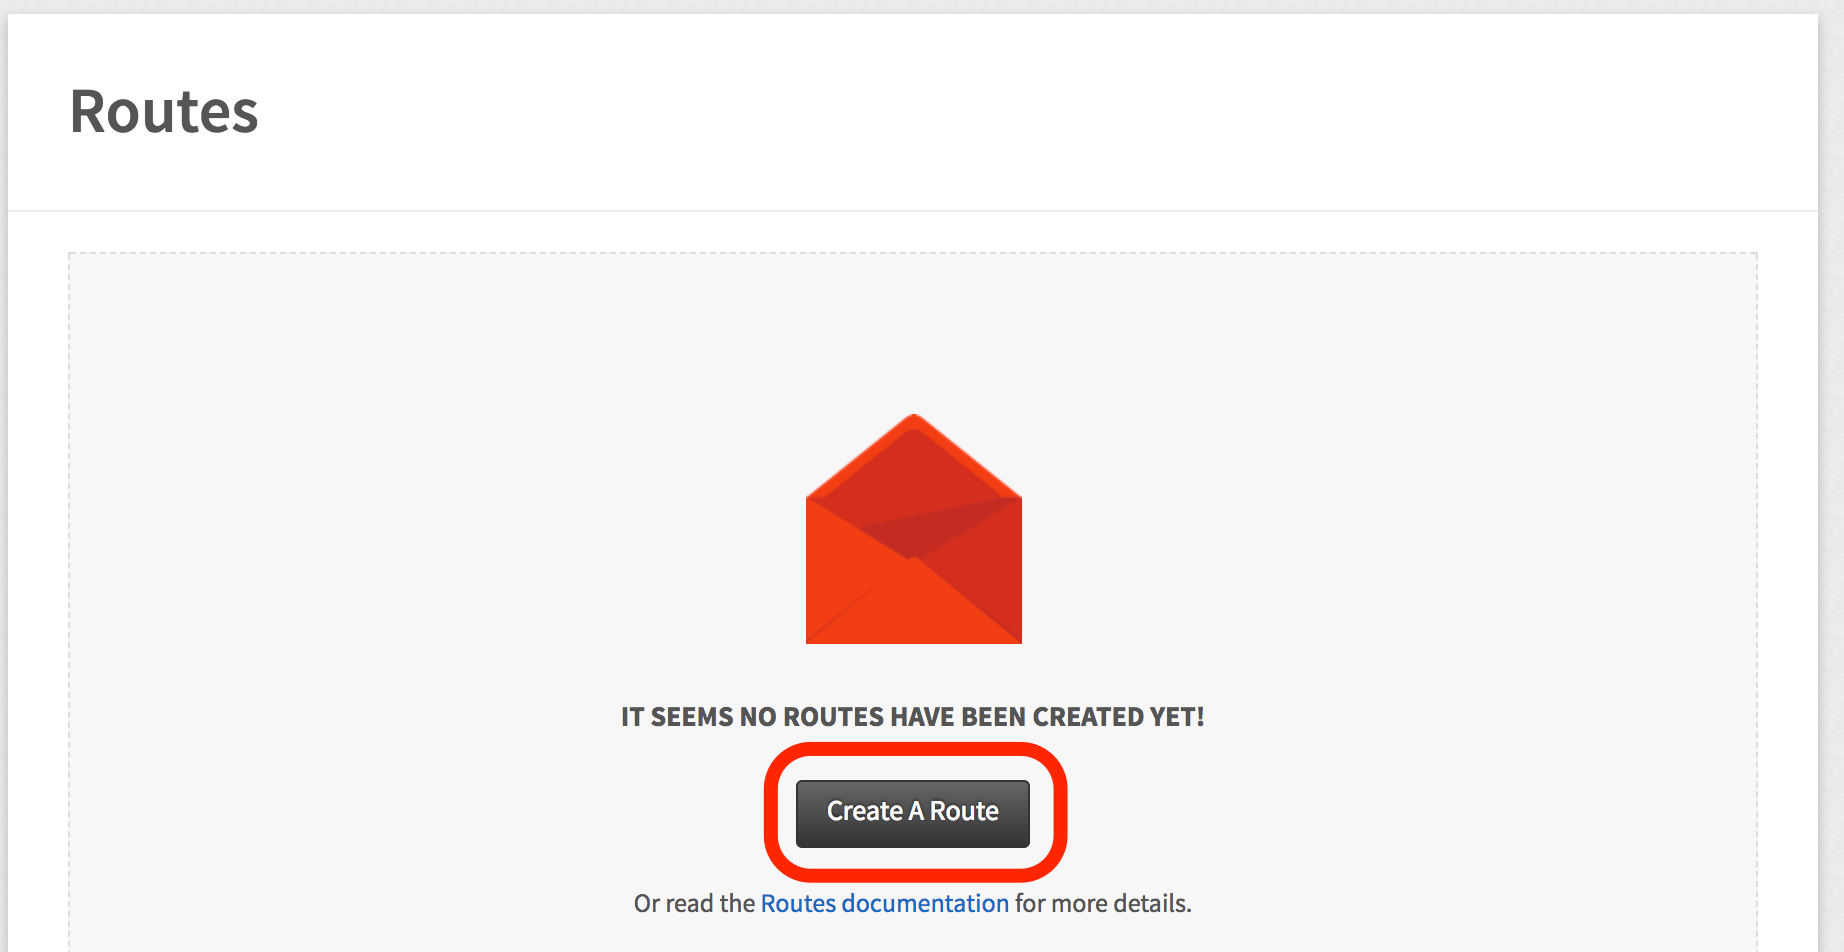
- Once your domain at Mailgun has been verified, choose the "Routes" tab, then click the "Create a Route" button


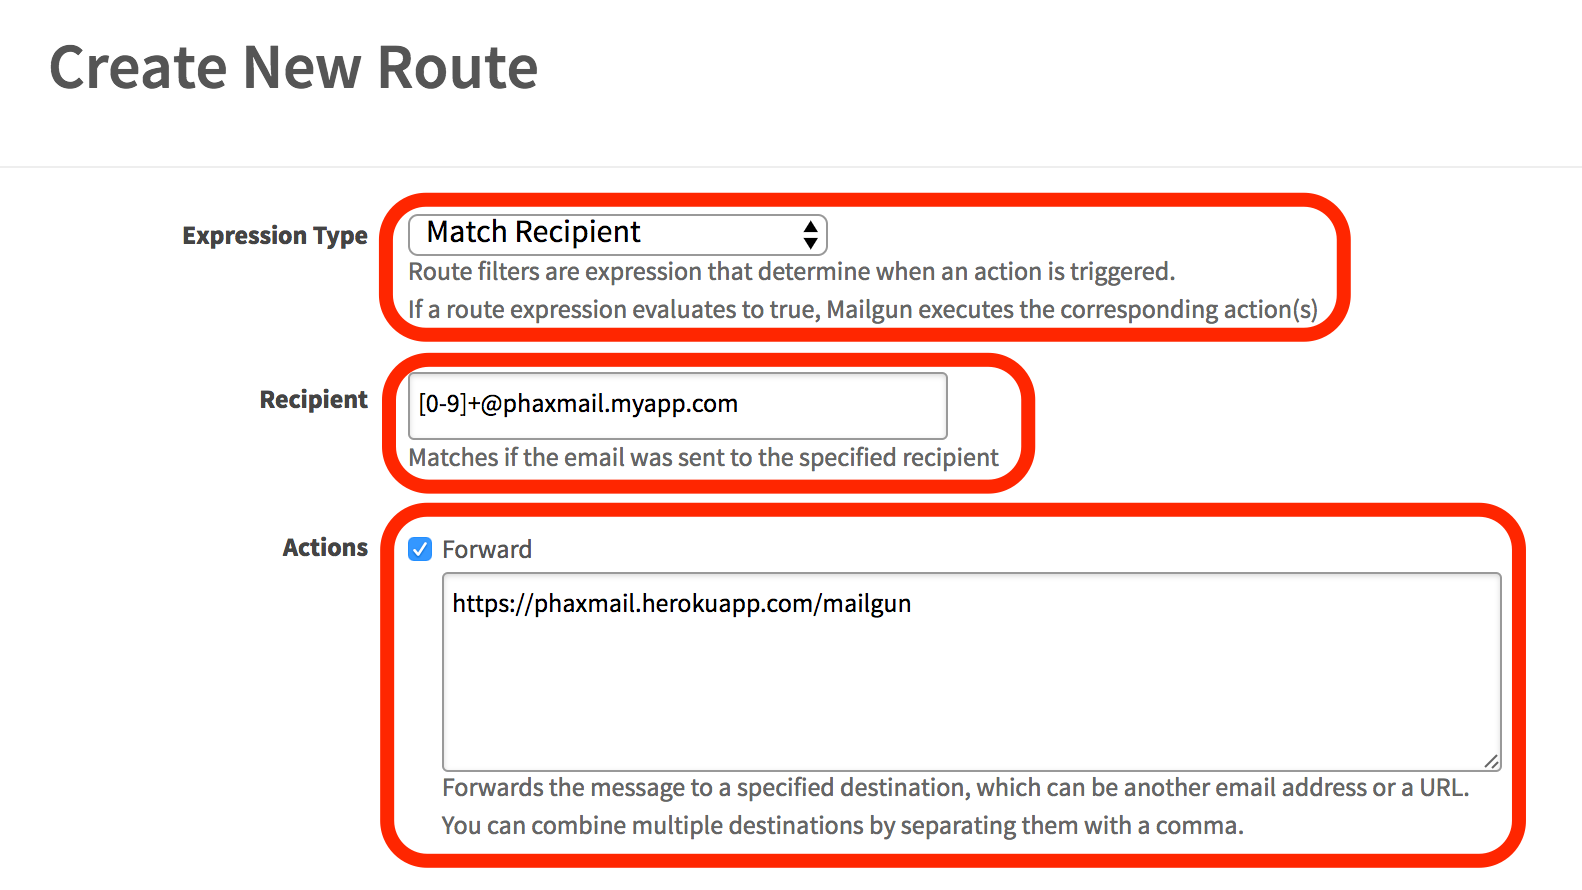
- On the "Create New Route" page, choose "Match Recipient" for the Expression Type, and in the Recepient field enter the following pattern (substituting the domain you previously configured):
[0-9][email protected]. Then, under "Actions", tick the "Forward" box and enter the URL for your instance of PhaxMachine, followed by/mailgun(e.g. If you're using a quick and dirty Heroku installation, this url might look something like https://WHATYOUNAMEDYOURAPP.herokuapp.com/mailgun.) The other fields should be left alone, and once you're finished click the "Create Route" button.


- (Optional, only needed if you want to test that fax-to-email and email-to-fax are working) Open your instance of PhaxMachine, click on the "Manage Users" link at the top, and add create a user with your email and phaxio fax number.
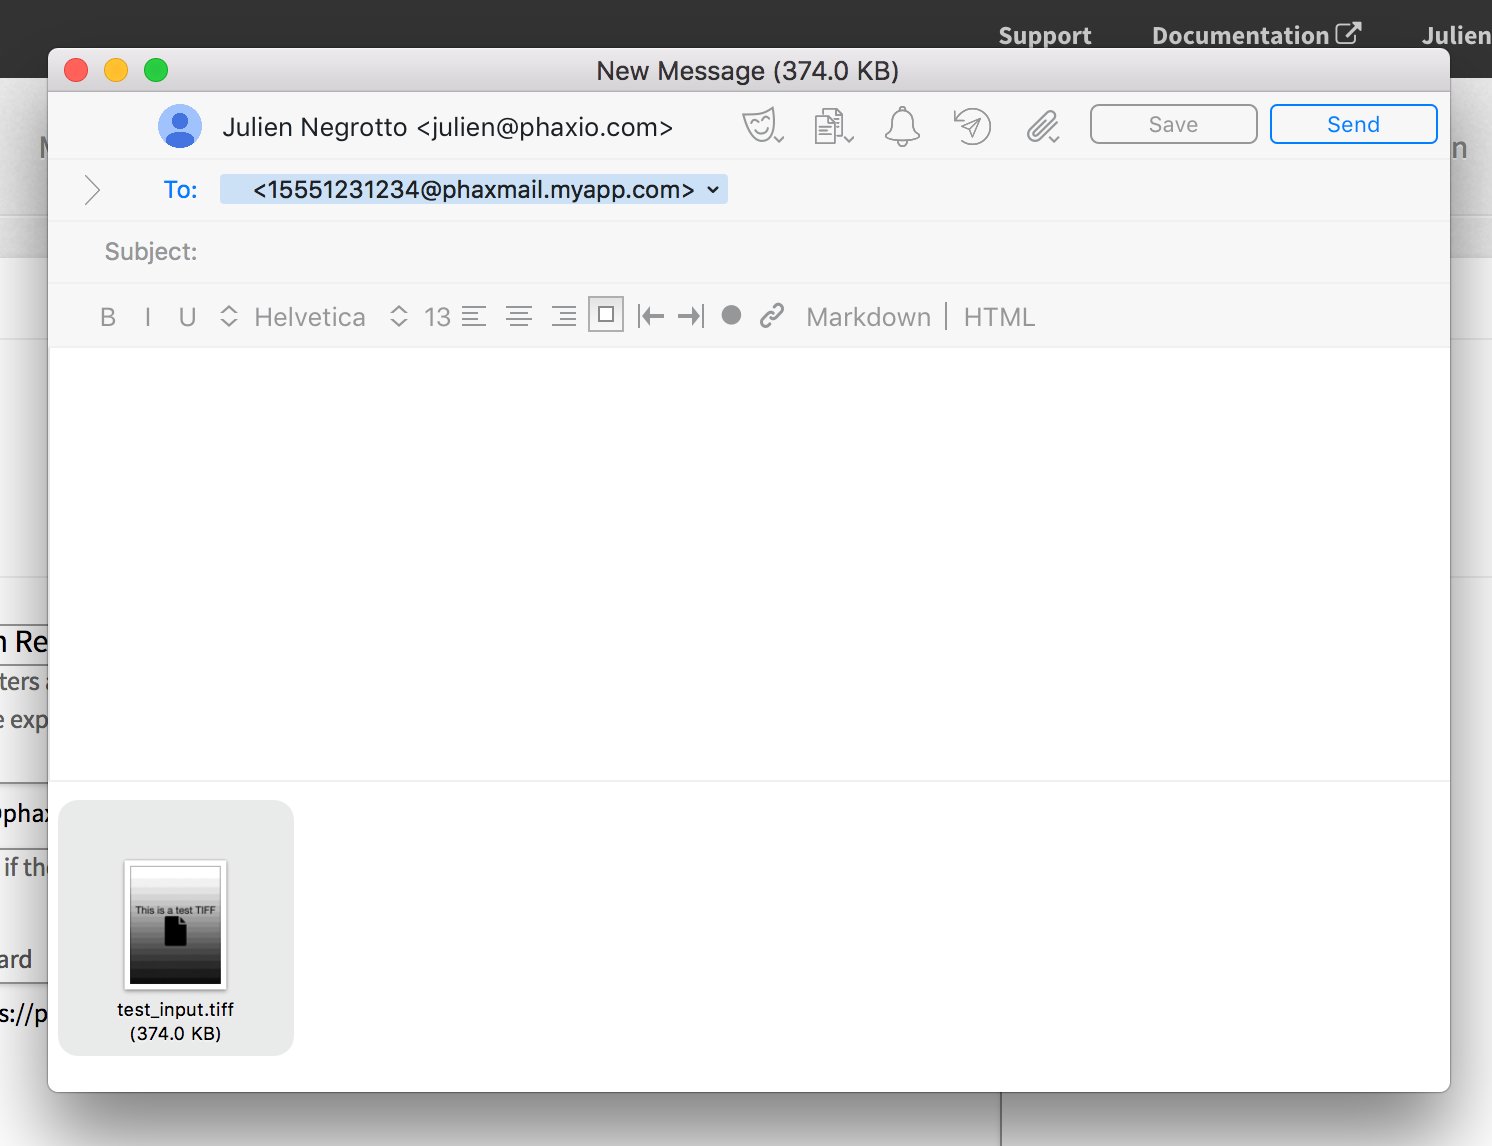
- (Optional) Test that everything is working correctly by sending an email with an attachment in the following format:
[email protected](substituting the phone number and domain). Phone Numbers should not contain any special characters. If everything is set up correctly, you should have just sent a fax.
- Head to the Callback URL's page in Phaxio.
- In the second field which says "POST (or send email) to the above URL when a fax has been received," enter your application url followed by '/fax_received' (e.g. If you're using a quick and dirty Heroku installation, this url might look something like https://WHATYOUNAMEDYOURAPP.herokuapp.com/fax_received. Note: if you're using the quick and dirty setup, your faxing emails might be in your spam folder! )
- Ensure your account's Webhook version is set to "Version 1".
- (Optional) Test the everything is working correctly by sending a fax to your Phaxio number and and seeing if it shows up in your email inbox! Note: make sure to check your spam folder!
If you want to merge the latest code from this repository into a PhaxMachine instance deployed with the button above, you'll need to follow these instructions:
- Clone this repository:
git clone https://github.com/phaxio/phax_machine.git - Add the heroku repository as well:
git remote add heroku https://git.heroku.com/HEROKU-APP-NAME.git(SubstitutingHEROKU-APP-NAMEwith the name of your Heroku app) - Push the latest changes to Heroku:
git push heroku master
After initial setup is complete, an email will be sent to the address in the "ADMIN_EMAIL" field inviting the admin to set their password and finish setting up their account. The admin will then be redirected to the fax numbers page.
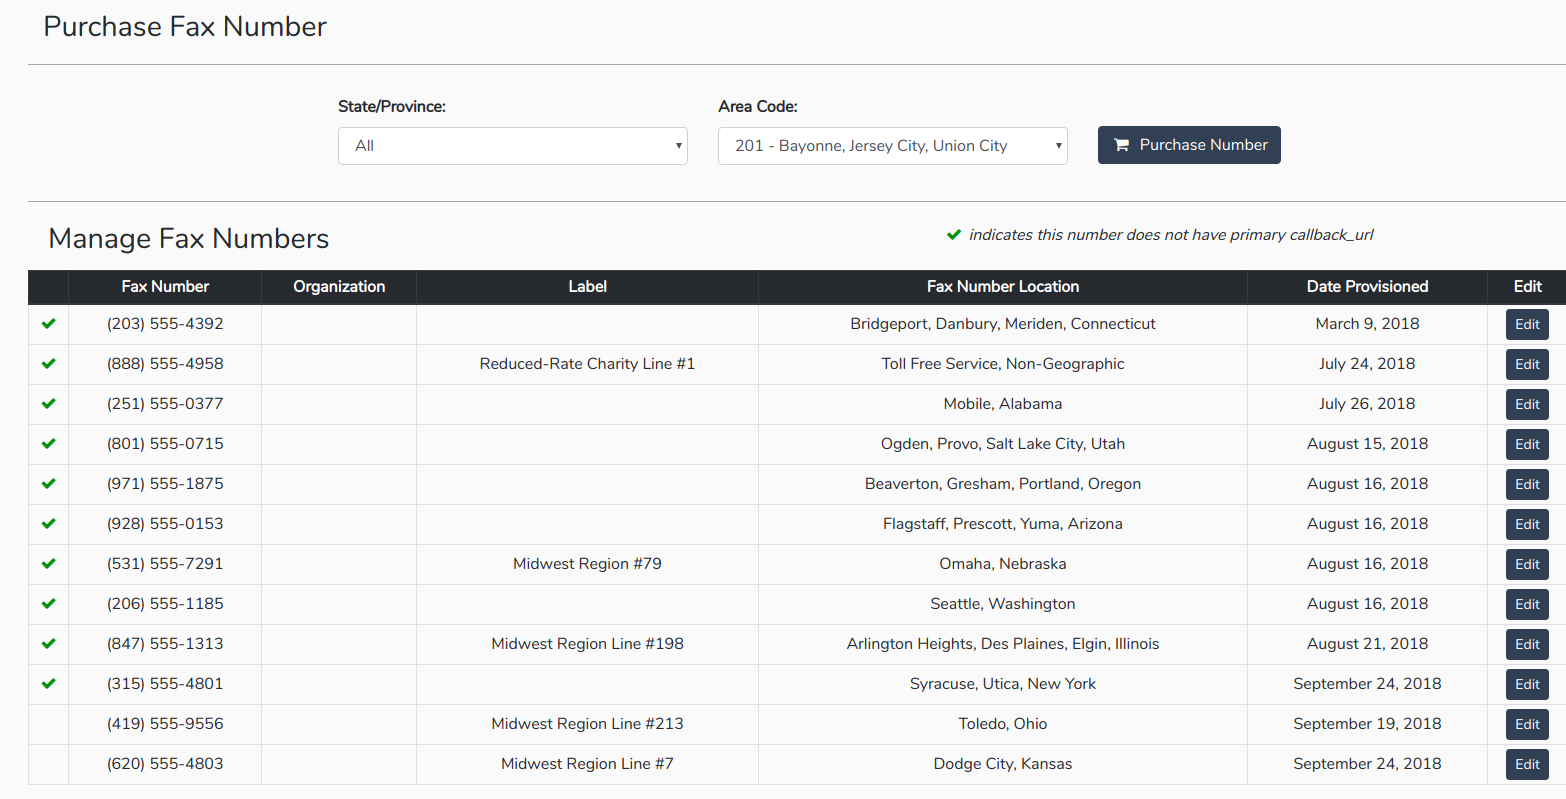
The Fax Numbers page displays a table of all fax numbers in the Admin's Phaxio account, the organization that the fax number is linked to, an optional label, the date the fax number was provisioned, the location of the fax number(city/state/province), and whether or not the fax number has a 'callback_url' assigned to it. Fax numbers with an assigned callback_url will not work with Phax Machine. To manage callback_url's assigned to your fax numbers, head over to your phone numbers page in your Phaxio account, and then reload the Fax Numbers page when you're done editing your changes. Fax numbers with an assigned callback_url will be at the bottom of the fax numbers table. Fax numbers that already have a callback_url will be available to add to organizations, however this is not recommended as they will not be functional. In the example below, several fax numbers have already been labeled, and the bottom two numbers have a callback_url.
The top of the Fax Numbers page also allows the Admin to provision a new fax number. The Area Code dropdown menu dynamically changes based on the selected State/Province in the menu to the left. Toll-Free numbers are listed as "Non-Geographic" in State/Province.
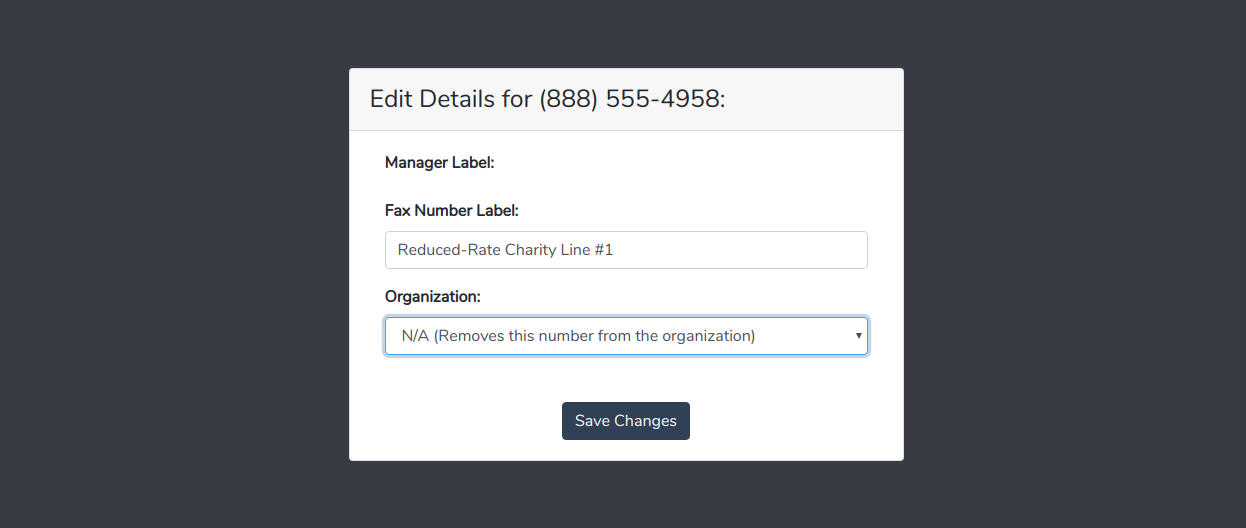
If the Admin desires, they may add a label to any fax number that can only be viewed by the Admin by clicking one of the edit buttons on the right of the table. The Admin can also move the fax number into a different organization by selecting it from the dropdown menu (this will remove all user data linked to the number in its previous organization, and is not recommended), or remove the fax number from its organization.
Organizations are groups of users and fax numbers set by the Admin. To create an organization, navigate to the Organizations Page ("Organizations" on the navbar) and click the "Add New Organization" button in the top right corner of the screen.
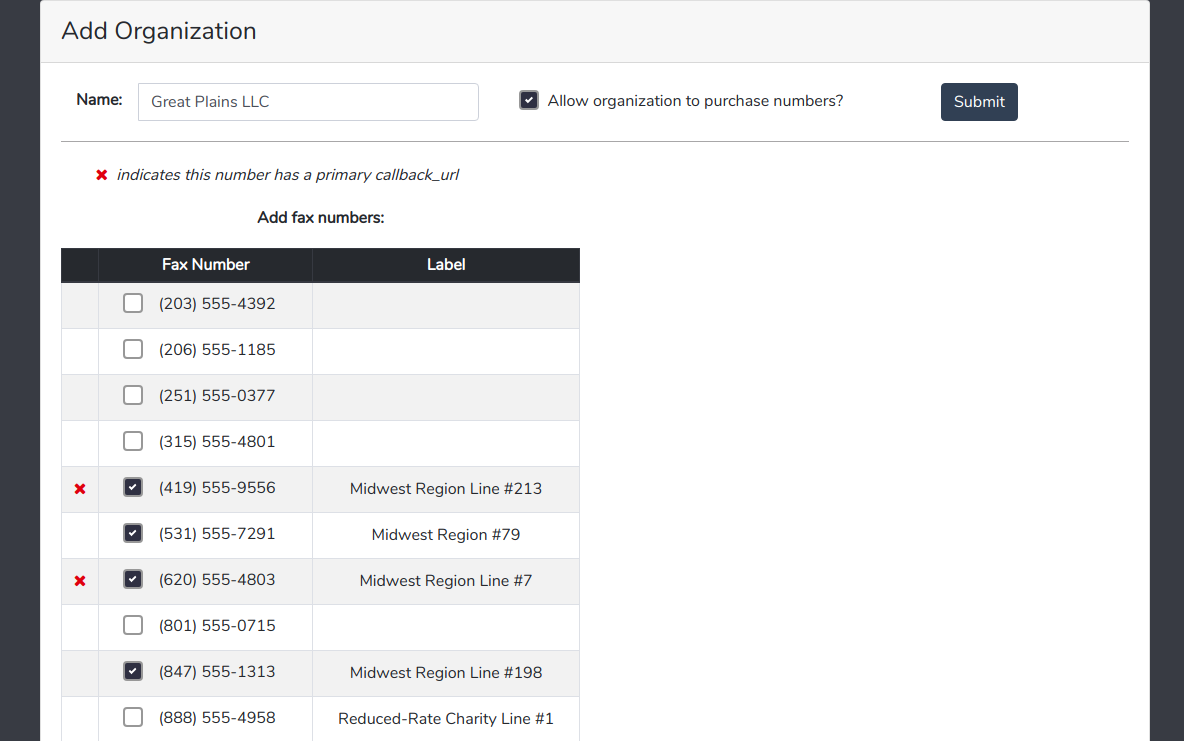
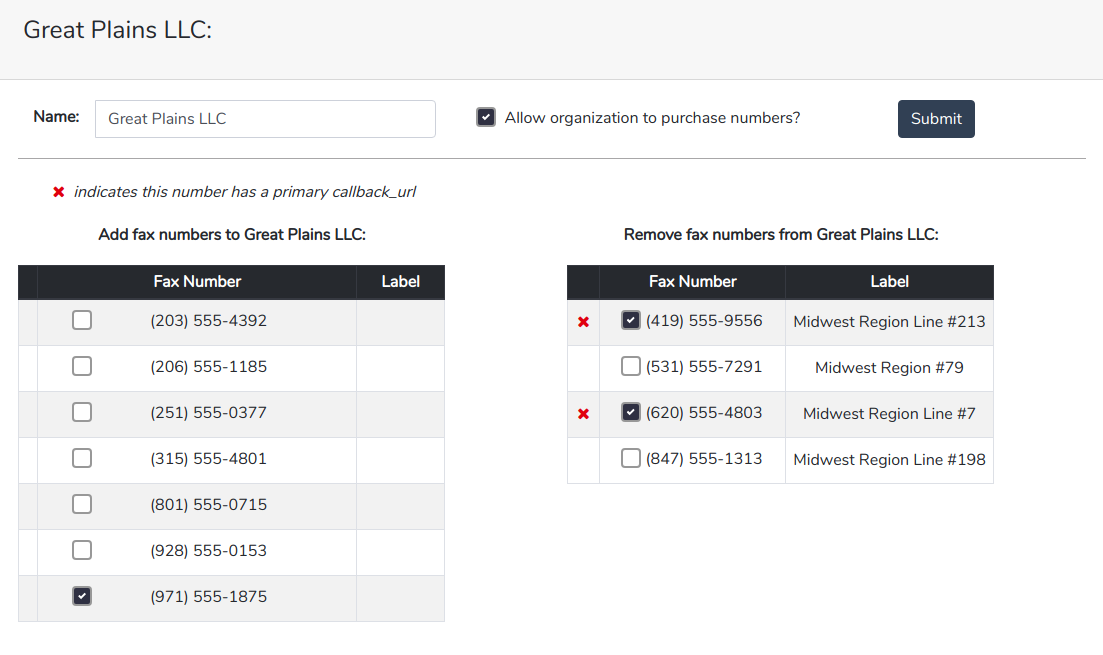
This page displays all fax numbers that are not assigned to a organization in the "Add fax numbers" table. Please note that fax numbers with a red X next to them already have a primary callback_url will not have fax-to-email capabilities until the callback_url is removed.
When creating an organization, the Admin checks the box of fax numbers they would like to assign to the organization, gives the organization a name (this name will be seen by the organization's manager), and decides if the Manager of the organization will be allowed to purchase additional fax numbers. In this example we're creating the "Great Plains LLC" organization, adding all of the fax numbers that are already labeled, and allowing fax numbers to be purchased by the organization. Please note that if an organization is allowed to provision fax numbers, each provisioned fax number will be charged to the Admin's Phaxio account.
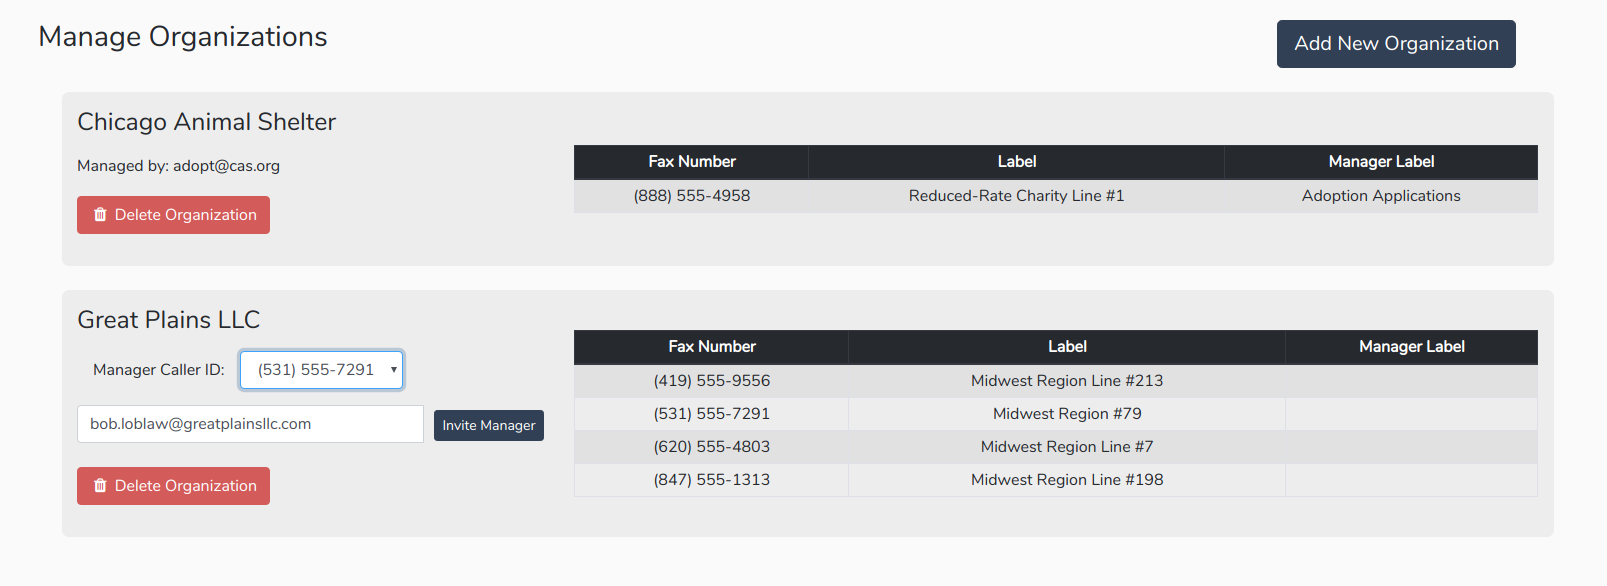
Once an organization has been created, it will appear in the organization page. Each organization's fax numbers and manager (if it has one) are shown. If an organization does not have a manager, a field will be present for inviting a manager, with an additional dropdown menu of fax numbers to set as the manager's caller ID number. In this example we'll invite [email protected] to manage Great Plains LLC.
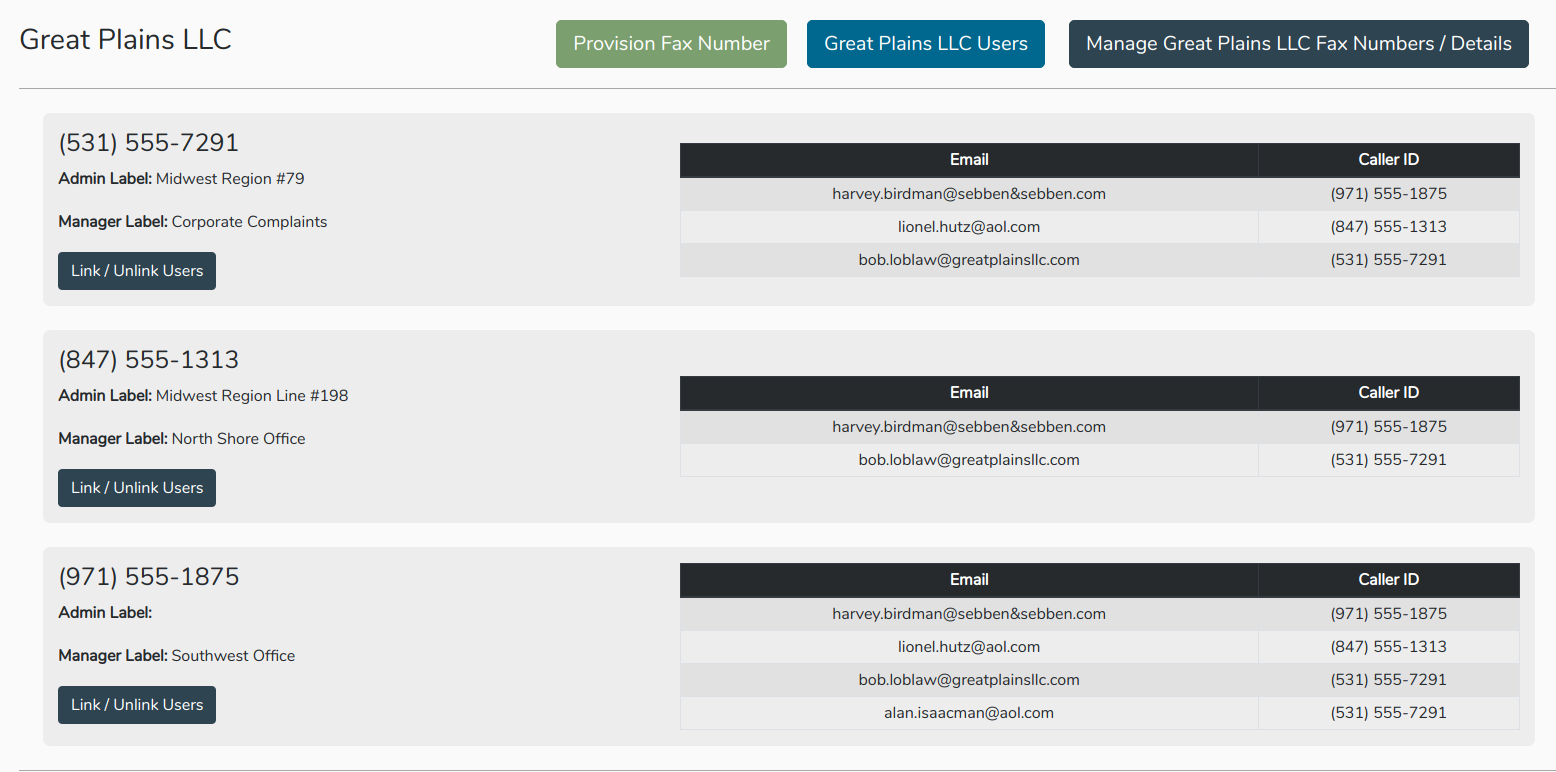
If an admin would like to edit an organization, they can click on the organization's name, which takes them to a page displaying all of the users linked to a particular fax number. Users may be linked to multiple fax numbers or just one, depending on the use case. When a fax number receives a fax, every person linked to that number will be emailed. To edit the organization, click on the "Manage Great Plains LLC Fax Numbers/Details" in the upper right corner.
In this case we'll simultaneously remove the two fax numbers that have a different callback_url and add the fax number with the 971 area code to this organization.
The Admin may change the site logo (the Voyant logo in all examples) by clicking "Edit Profile" in the navigation menu on the left. To change the logo, simply link to the location of the desired logo, and Phax Machine will add and resize the logo. Logos must be an image, and look best when a transparent background is used. Your current password is required to edit the logo. The logo is viewed by all users of Phax Machine and is included at the top of all emails.
Managers are invited by the Admin via email to manage an organization. Each organization may only have one manager. Managers (and the admin if they want to) link users to fax numbers and assign them caller ID numbers. A user/manager's caller ID number will be the caller ID number used on all faxes sent out by that user, regardless of what numbers they are linked to. If the admin allows it, a manager can also provision additional fax numbers to the organization they control. Managers should first invite users and then link them to fax numbers. Users who are not linked to a fax number by the manager will be able to log in, however they will be unable to send or receive faxes by email nor will they be able to send a fax using the fax portal.
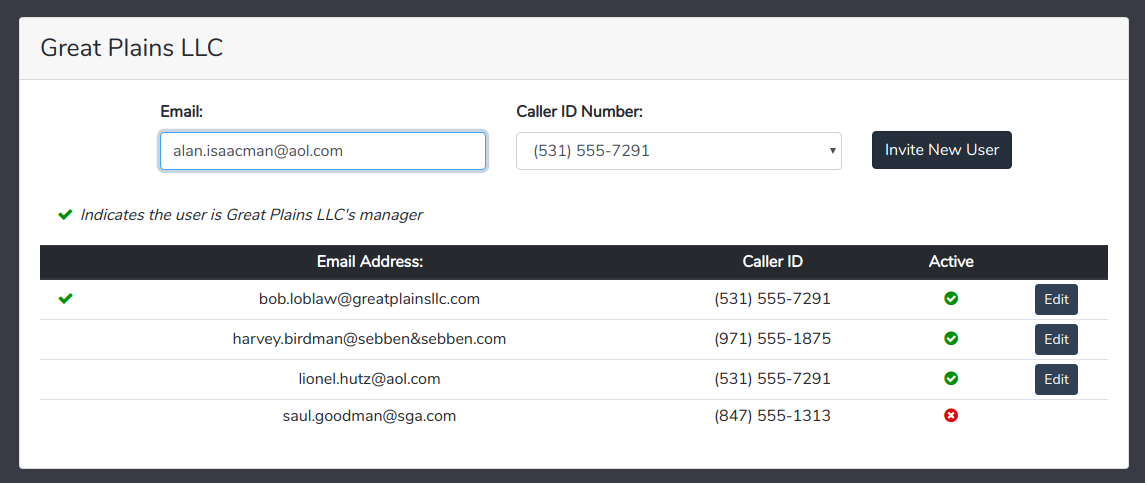
Managers may invite users to Phax Machine and revoke user access in their Users portal. When a manager invites a user, they select one of the fax numbers within their organization from the dropdown menu. Managers may also edit an existing user's email address or caller ID number at a later time, or deactivate a user by by clicking the 'Edit' button in the user table.
In this example, Saul Goodman hasn't shown his face around the office for a year, so his access has been revoked by the manager. Users with revoked access cannot send/receive faxes by email and cannot log in to use the portal. They will not receive a notification indicating their access has been revoked. When a user's access is revoked, the user is not notified.
When a user's access is revoked, they're unlinked from fax numbers. This will remove them from the "received" data in fax logs. The manager will still be able to see the faxes that were sent by the revoked user, but not any received by the user.
To reactivate a user, simply re-invite them with the same email address they used previously. A user whose access has been reinstated will not be notified they have been granted access once again. After reinstating access to a user, the manager will have to go back and link them to fax numbers once again. If a user's access is revoked and then reinstated, they will be unable to view faxes they have sent prior to being restored. While it is possible to restore a user, it is not recommended.
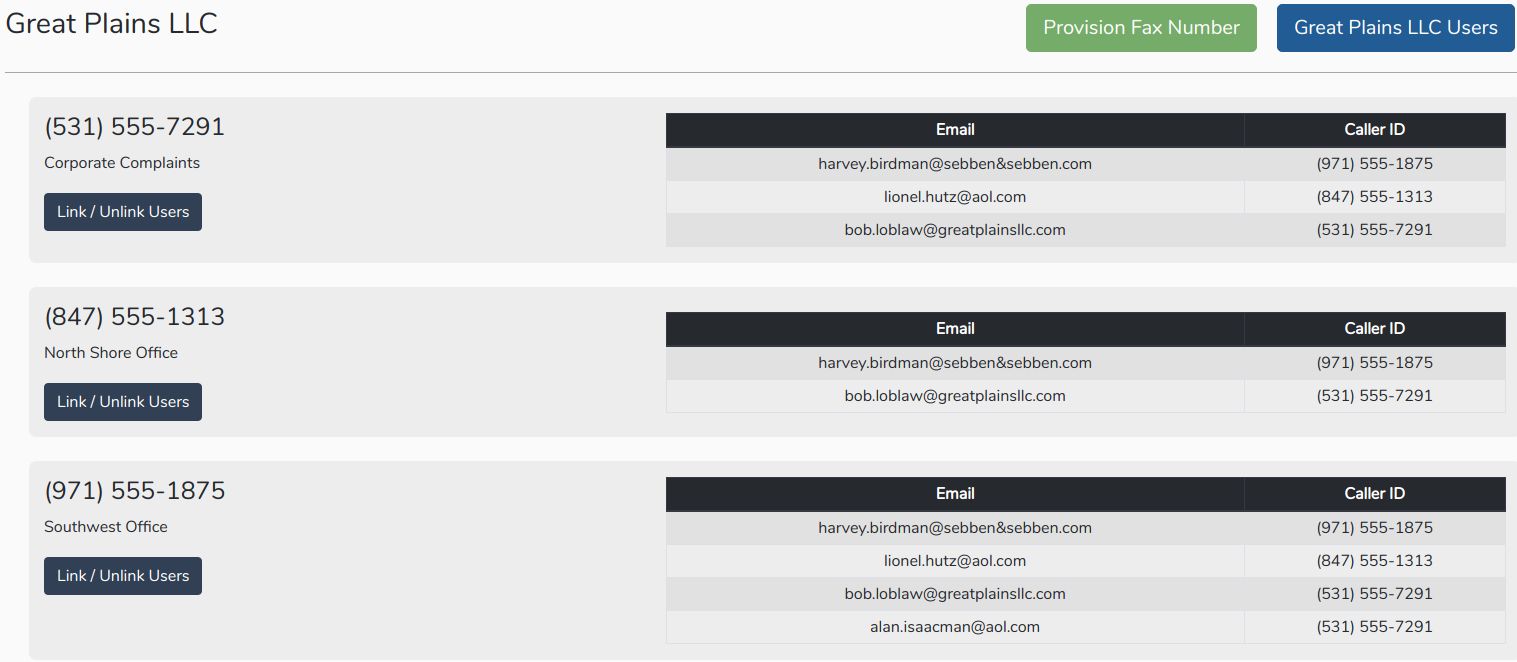
The Dashboard provides the manager with a summary of all fax numbers and their linked users. Managers link/unlink users to fax numbers by clicking on the "Link/Unlink Users" button under each fax number. This step is very important. If it is not completed, then fax to email will not be possible. A table of all users currently linked to a fax number is shown next to each fax number. Managers may also add a label to their fax numbers by clicking on the fax number and entering a label. Below is the manager's view of Great Plains LLC.
If the manager is not allowed to provision fax numbers (default when an admin creates an organization), the button to provision fax numbers will not be present.
Phax Machine's email templates are simple and easily customized. All templates and their locations are listed below for easy customization if desired:
- Password reset --> app/views/devise/mailer/password_reset_instructions.html.erb
- Admin Invitation --> app/views/phax_machine_mailer/admin_welcome_invite.html.erb
- Manager Invitation --> app/views/phax_machine_mailer/manager_welcome_invite.html.erb
- User Invitation --> app/views/phax_machine_mailer/user_welcome_invite.html.erb
- Sent/Received Fax Notification --> app/views/mailgun_mailer/fax_email.html.erb (notification of a successful/failed fax)
- Email-to-Fax Failure Notification --> app/views/mailgun_mailer/fax_email.html.erb (notification that Phax Machine was unable to complete email-to-fax conversion, not that a fax itself has failed)
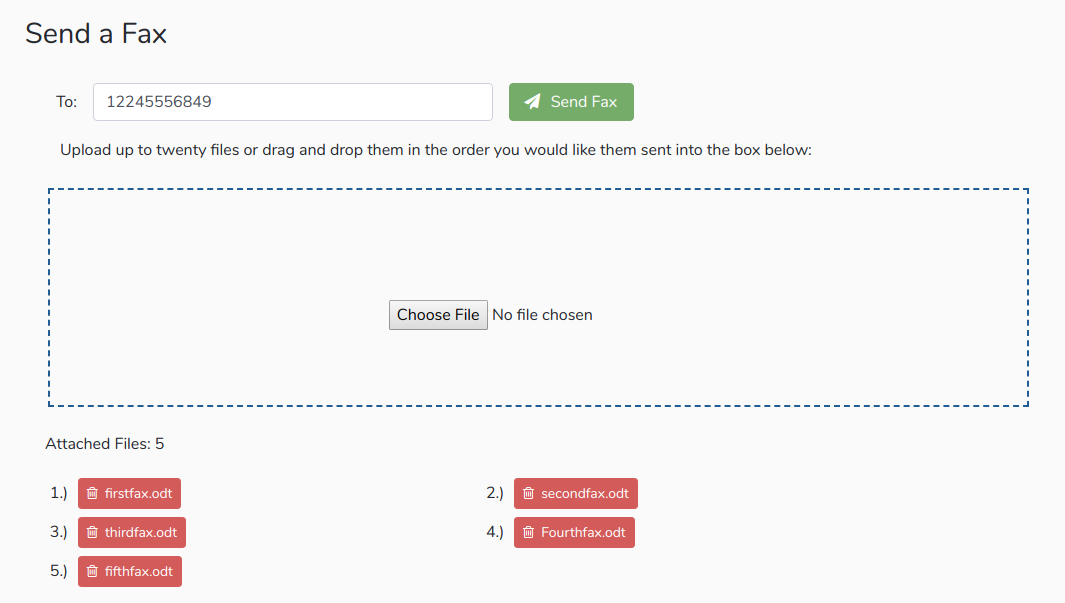
The fax portal allows users to send a fax from within Phax Machine. Simply enter the number you'd like to send a fax to in E.164 format (12225554444), and attach up to twenty files. Files will be attached in the order they're uploaded. In the example below, 'firstfax.odt' will be the first file, 'secondfax.odt', the second file, and so on. Users may remove a file by clicking the red trashcan icon. A maximum of 20 files per fax may be attached totaling 200 pages maximum.
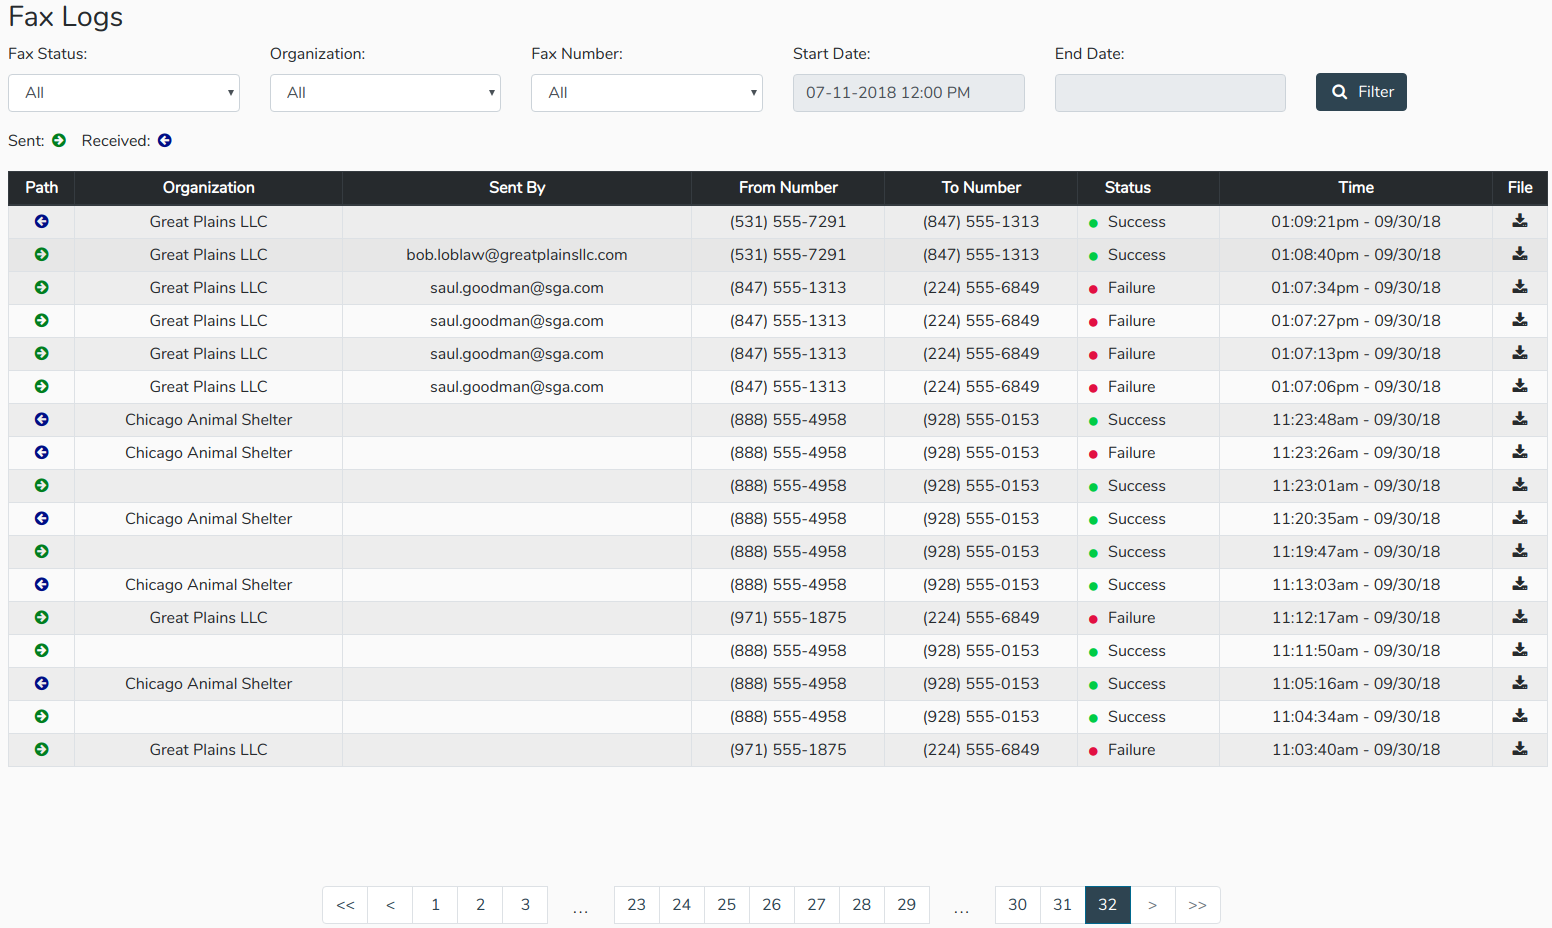
Fax Logs display different information depending on the user's permission level. All permission levels may filter faxes by status and within a time range. If the "Start Time" field is left empty, it defaults to one week ago. If the "End Time" field is left empty, it defaults to the moment in time the "Filter" button is clicked. Please note that both Start Time and end time calendars have a time that defaults to noon of the current day, which will need to be adjusted. All fax results regardless of permission level are limited to a maximum of 1000 results. Results are paginated with 20 results per page, starting at the beginning of the time range. For example, if a user searches for November 1st to December 1st, page 1 will be the November 1st faxes, and the last page will be fax data from December 1st.
Phax Machine will attempt to download the fax as a PDF file if the file exists (it was converted properly and the user has not disabled storage). If the file cannot be found, the user will be notified in message at the top of the page.
When searching Fax Logs as a Manager, the 'Start Time' is automatically limited to when the organization was created. When searching as a user, the Start Time is automatically limited to when the user was invited. For example, if a user registered on March 11th, 2018 and tries to search for faxes from January of 2018, Phax Machine will automatically adjust the Start Time to March 11th, 2018.
Fax Logs will only sort data based on the current relationships between users and fax numbers. The faxes previously sent by a user with revoked access still be displayed in fax logs, however the faxes received by the user will not be labeled with that user's email address. Revoking a user removes the link between the user and the fax number, and thus it cannot be reported on. Reinstating access for a user will not make the information "come back".
The same applies to deleted organizations, as an organization will delete its users and thus their relationships with the fax numbers. Deleted organizations will still appear in the Admin's Fax Logs, however only the faxes sent by the organization will appear.
If a fax number is transferred from one organization to another, all linkages between its users and its previous organization are wiped out, thus it will have no fax logs from its previous life in its prior organization.
When the page loads, the first 20 faxes within the past week are loaded. Admins may search for faxes over any time period, and may search by organization, an individual fax number, or a combination of the two. Clicking "All" in either the Fax Number or Organization dropdown menus will reset both menus to include everything. If they can be found, Phax Machine will display the user that sent a fax and the organization the fax was sent from or to. Unfortunately on the received end, it is not currently possible to narrow down exactly what user received a fax, as each fax number may have multiple users linked to it, and because the same caller ID number may be assigned to multiple users.
Managers may only search for faxes within their organization. Managers may search by fax number, user, or a combination of both. Please note that when viewing received faxes in fax logs, if a fax number has multiple users linked to it, it will only show up once in the fax logs, not once for each user linked to the number.
For example the following users are linked to the fax number with an 847 area code:
The 847 number received a fax on September 30th, 2018 (fax at the top of the logs). The received fax shows up only once in the fax logs. If the manager searches individually by each of the two users shown above, it will show up once for each user.
Users may only search for their own faxes by indivual fax number or all of the fax numbers they're linked to. If a user is unlinked from a fax number, they will be unable to search for faxes linked to that previous fax number.
Any user may change their password by clicking on the "Profile" link in the navigation bar on the left of the screen. Password resets and forgotten logins are handled via email using Devise. A user is required to enter their current password to change their password. If a user forgets their password, a password reset option via email is available from Phax Machine's login screen.
