Throughout the programming practice assignments in this course we'll be working on various parts of a single application. As the course progresses, we'll code increasingly complex portions of this application with the goal of communicating various topics about Objective-C, tools (Xcode, Interface Builder, Git), application architecture, etc.
The application we create throughout class will be a basic city guide for all of our favorite restaurants in New York. Each student will contribute his or her favorite restaurant along with some various details we'd like to display in the app, and the app we create will list out those restaurants, display their details, and display them on the map.
Using the Interface Builder tool built into Xcode, create a basic view that will be used to display information about a restaurant. This will be the screen the user arrives at after choosing a restaurant.
- Xcode Installed. (Setting up Xcode)
- Pulled the "Assignment 1" assignment to your computer using GitHub for Mac. (Setting up Git, Assignment 1)
- Interface Builder
- Static Tables
- Designipling views
We've set up "Assignment 1" on GitHub for you in order to make it easy for you to quickly get started with a project that is already attached to version control. However, the base code that you'll be downloading for this assignment can easily be made from scratch using the following settings:


Guess what? We've already got a runnable application, just from the template code in the "Master Detail Application" template we used to create or project.
- Build and run the application
To do this, tap the "Run" button. It should launch the iPhone Simulator and display your app.
Aside: What are all these crazy files? See here for more.
You've just run your first iPhone app! Well, technically Apple's app, but that's semantics. Pretty cool, but the app is kind of useless at this point. Let's add some tasty bits to it by adding our favorite restaurant to the app.
- Change the title where it says "Detail" to your favorite restaurant name. Do this for both the table and the detail view.
(Hint: Take a look inside the .storyboard file)
For the rest of the assignment, let's set up a restaurant detail. I'll leave the details up to you, but at minimum, add:
- Name
- Address
- Total number of reviews
- A button that says "Tips (12)"
You can find all the tools you need in the bottom right corner of your Xcode window, in the object library. Reference: Interface Builder Elements
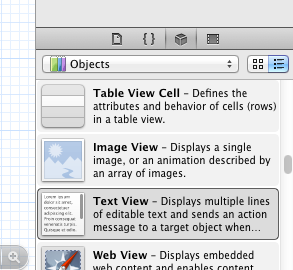
Finally, let's add an image to this view. Grab an image from the web that represents the restaurant, and drag the file into your sidebar where the files are located. (You should tick the box to copy to the destination group's folder, so that the file gets tracked in Git and you can keep track of it).
Now, add an image view from the object library. In the Properties tab of the Utilities sidebar, set the image to the newly added image file. Also, set the content mode so that the image looks correct. (Aspect Fit is usually a good choice)

Run your application again to see the changes that you made.
Before we move on, it's probably a good idea at this point to commit your work back into Git. This way, if at any point in the future your code stops working, you'll always be able to jump back into it.
Commit and push to GitHub.
Go to the GitHub for Mac app, and click to see the details on your repository. On the sidebar you should see history, changes, branches, and settings. Tap "changes" and you should see that your storyboard has changed, a file added for the image, and some changes to your xcodeproject (telling the project that you added the image). Add a short message about the work you did, and tap "commit".
You'll now see that the changes you made are listed below, in the "Unsynced commits" section. In the upper right corner, tap "Sync Branch" to push your changes up to the GitHub server.
(Tip: next to the commit button is a 
Now we'll add a new view to the app to show the tips.
To make a new view, find the View Controller item in the Object Library, and drag it to the canvas grid. This will create a new view controller in your storyboard.
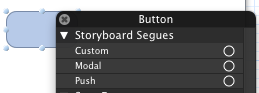
Add a segue from the tips button to the new view.
To do this, simply right-click on the tips button, then click and drag from the little circle next to "Push" to your new view.
Great! We now have some of the basic views we'll need for the various class assignments.
And one last thing, don't forget to Commit and Sync with GitHub!
Now it's time to do some actual coding. On to Part 2!