-
Notifications
You must be signed in to change notification settings - Fork 1
Home
- Example
- Installation
- Integrate and Initialize the Trackier SDK
- Retrieve your SDK key
- Events Tracking
- SDK Signing
- Deep Link Setup
We have created a example app for the Ios sdk integration.
Please check the Example directory for know to how the Trackier IOS SDK can be integrated.
To run the example project, clone the repo, and run pod install from the Example directory first. If you're new to CocoaPods, see their official documentation for info on how to create and use Pod Files.
trackier-ios-sdk is available through CocoaPods. To install it, simply add the following line to your Podfile:
pod 'trackier-ios-sdk'For initialising the Trackier SDk. First, We need to generate the SDK key from the Trackier MMP panel.
Following below are the steps to retrieve the development key:-
- Login your Trackier Panel
- Select your application and click on Action button and login as
- In the Dashboard, Click on the
SDK Integrationoption on the left side of panel. - under on the SDK Integration, You will be get the SDK Key.
After follow all steps, Your SDK key look like the below screenshot
Screenshot[1]

We recommend initializing the SDK inside the AppDelegate.swift. This allows the SDK to initialize in all scenarios, including deep linking. The steps listed below take place inside the AppDelegate.swift .
Note - It is crucial to use the correct dev key when initializing the SDK. Using the wrong dev key or an incorrect dev key impacts all traffic sent from the SDK and causes attribution and reporting issues.
@UIApplicationMain
class AppDelegate: UIResponder, UIApplicationDelegate {

    var window: UIWindow?

    func application(_ application: UIApplication, didFinishLaunchingWithOptions launchOptions: [UIApplication.LaunchOptionsKey: Any]?) -> Bool {
        // Override point for customization after application launch.

       /* While Initializing the SDK, You need to pass the two arguments in the TrackierSDKConfig.
        * In First argument, you need to pass the Trackier SDK api key
        * In second argument, you need to pass the environment which can be either "development", "production" or "testing". */

        let config = TrackierSDKConfig(appToken: "xxxx-xx-xxx-xxx", env: TrackierSDKConfig.ENV_DEVELOPMENT) //Pass your Trackier sdk api key
        TrackierSDK.initialize(config: config)
        return true
    }
}
Below are the screenshot of the code:-
Screenshot[2]

Trackier events trackings enable to provides the insights into how to user interacts with your app. Trackier SDK easily get that insights data from the app. Just follow with the simple events integration process
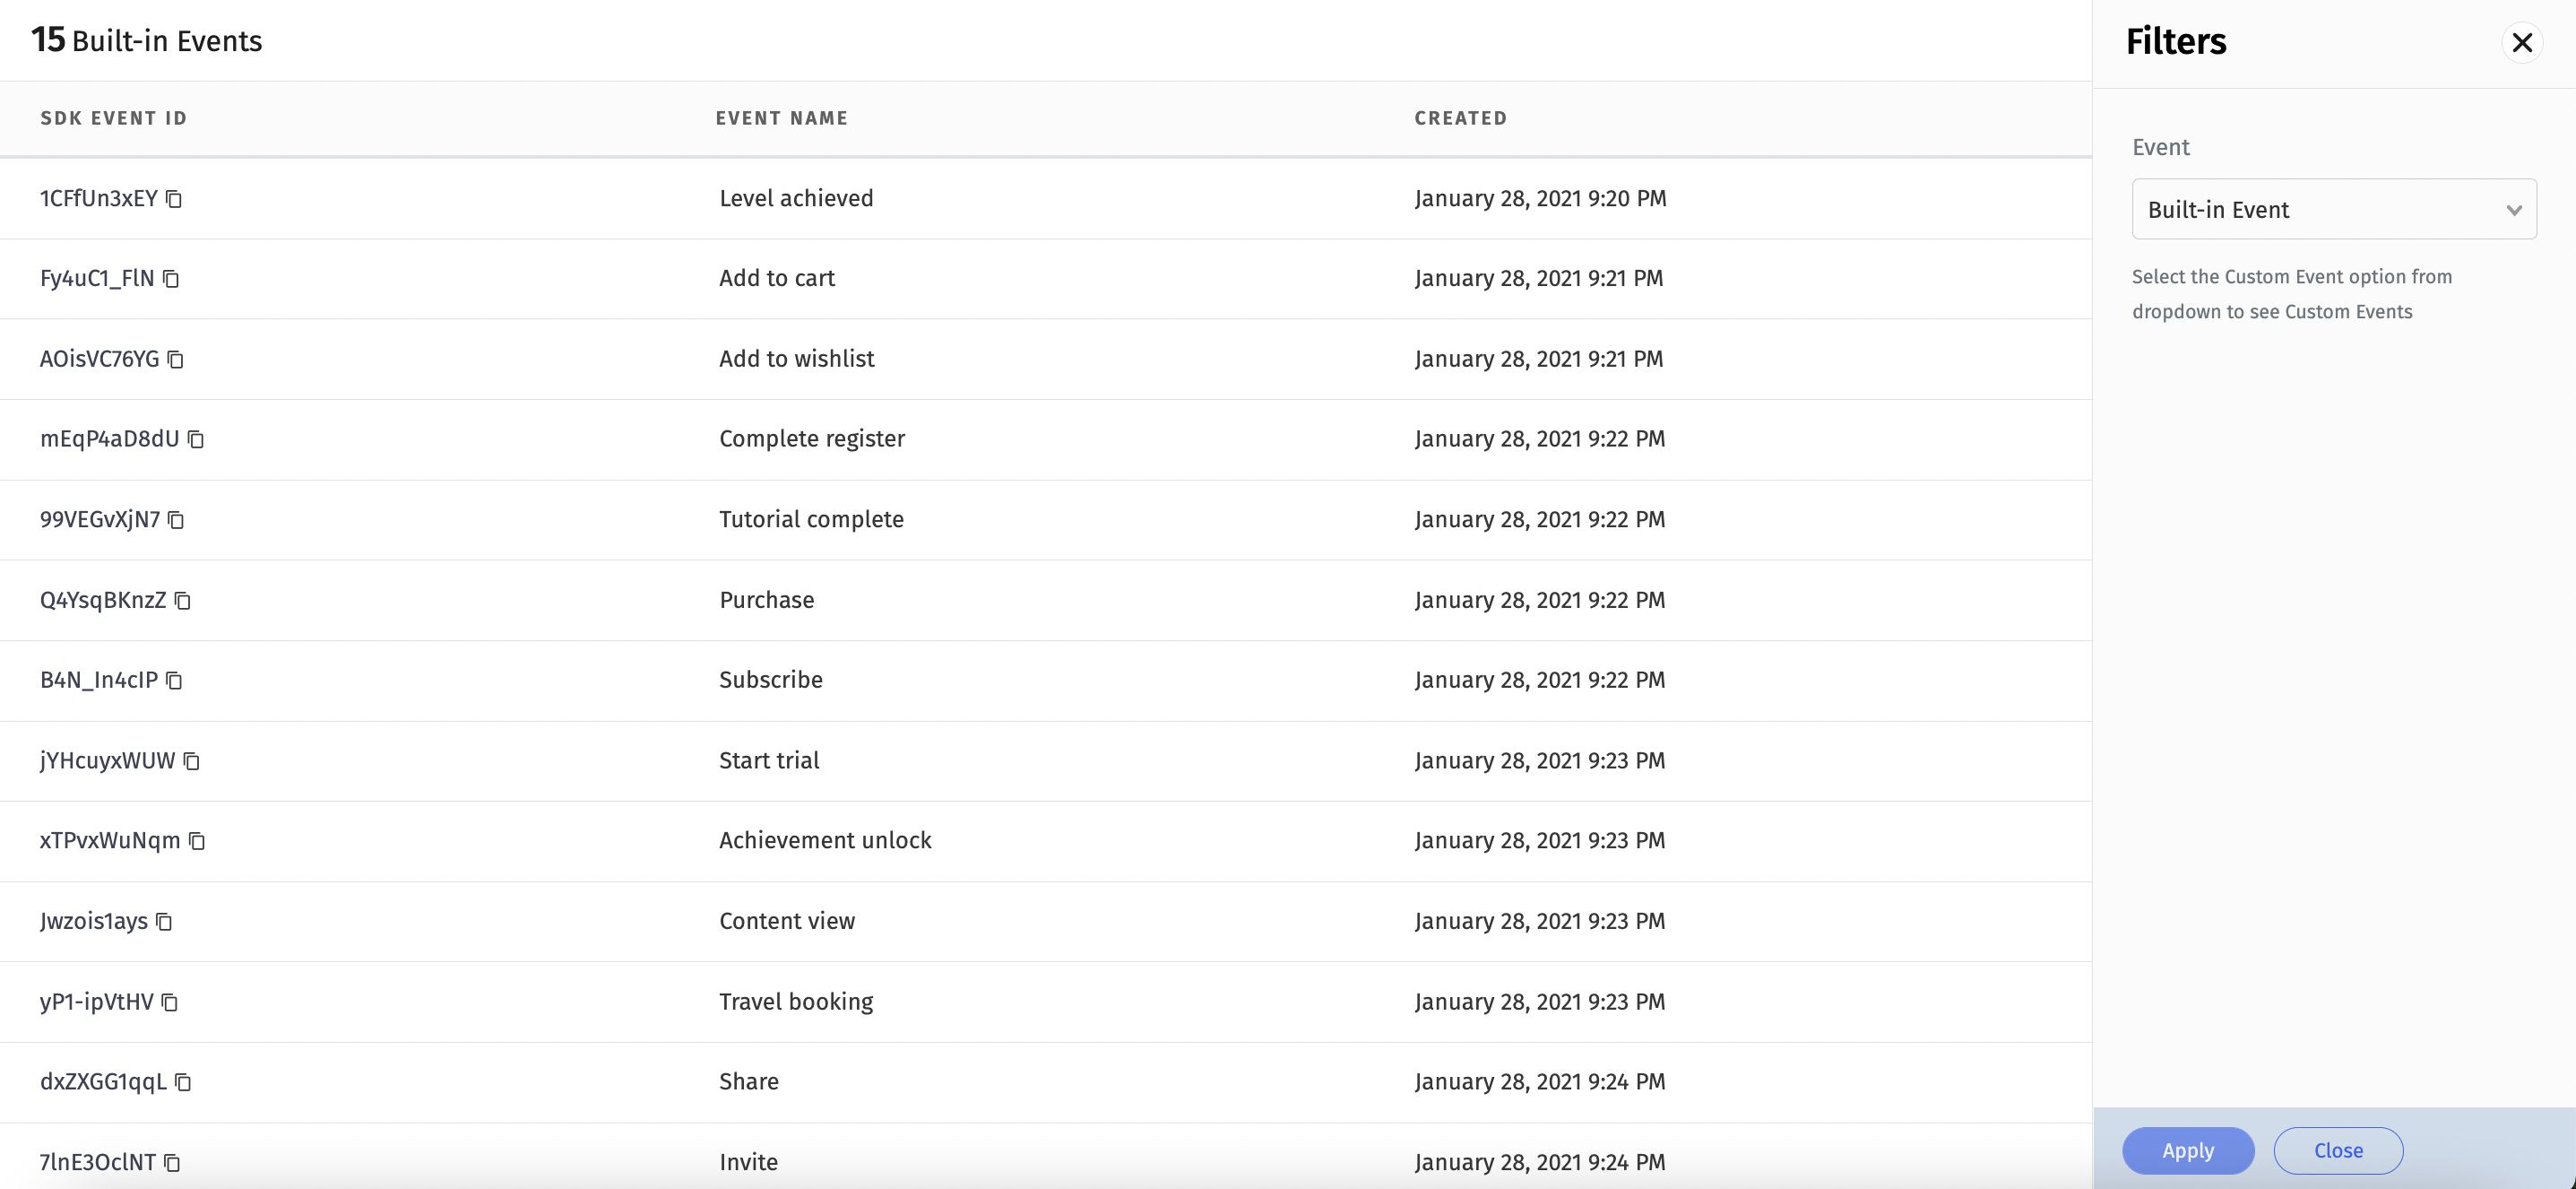
Trackier provides the Built-in events and Customs events on the Trackier panel.
Predefined events are the list of constants events which already been created on the dashboard.
You can use directly to track those events. Just need to implements events in the app projects.
Screenshot[3]

/*
 * Event Tracking
  <------------->
 * The below code is the example to pass a event to the Trackier SDK.
 * This event requires only 1 Parameter which is the Event ID.
 * Below are the example of built-in events function calling
 * The arguments - "TrackierEvent.LOGIN" passed in the Trackier event class is Events id
 *
 */


func eventsTracking(){

    let event = TrackierEvent(id: TrackierEvent.LOGIN)

   /* Below are the function for the adding the extra data,
      You can add the extra data like login details of user or anything you need.
      We have 10 params to add data, Below 5 are mentioned */

    event.param1 = "this is a param1 value"
    event.param2 = "this is a param2 value"
    event.param3 = "this is a param3 value"
    event.param4 = "this is a param4 value"
    event.param5 = "this is a param5 value"
    DispatchQueue.global().async {
        sleep(1)
        TrackierSDK.trackEvent(event: event)
}

}
Note:- Argument in Trackier event class is event Id.
You can integrate inbuilt params with the event. In-built param list are mentioned below:-
orderId, revenue, currency, param1, param2, param3 ,param4, param5, param6, param7, param8, param9, param10.
Below are the screenshot of following example:-
Screenshot[4]

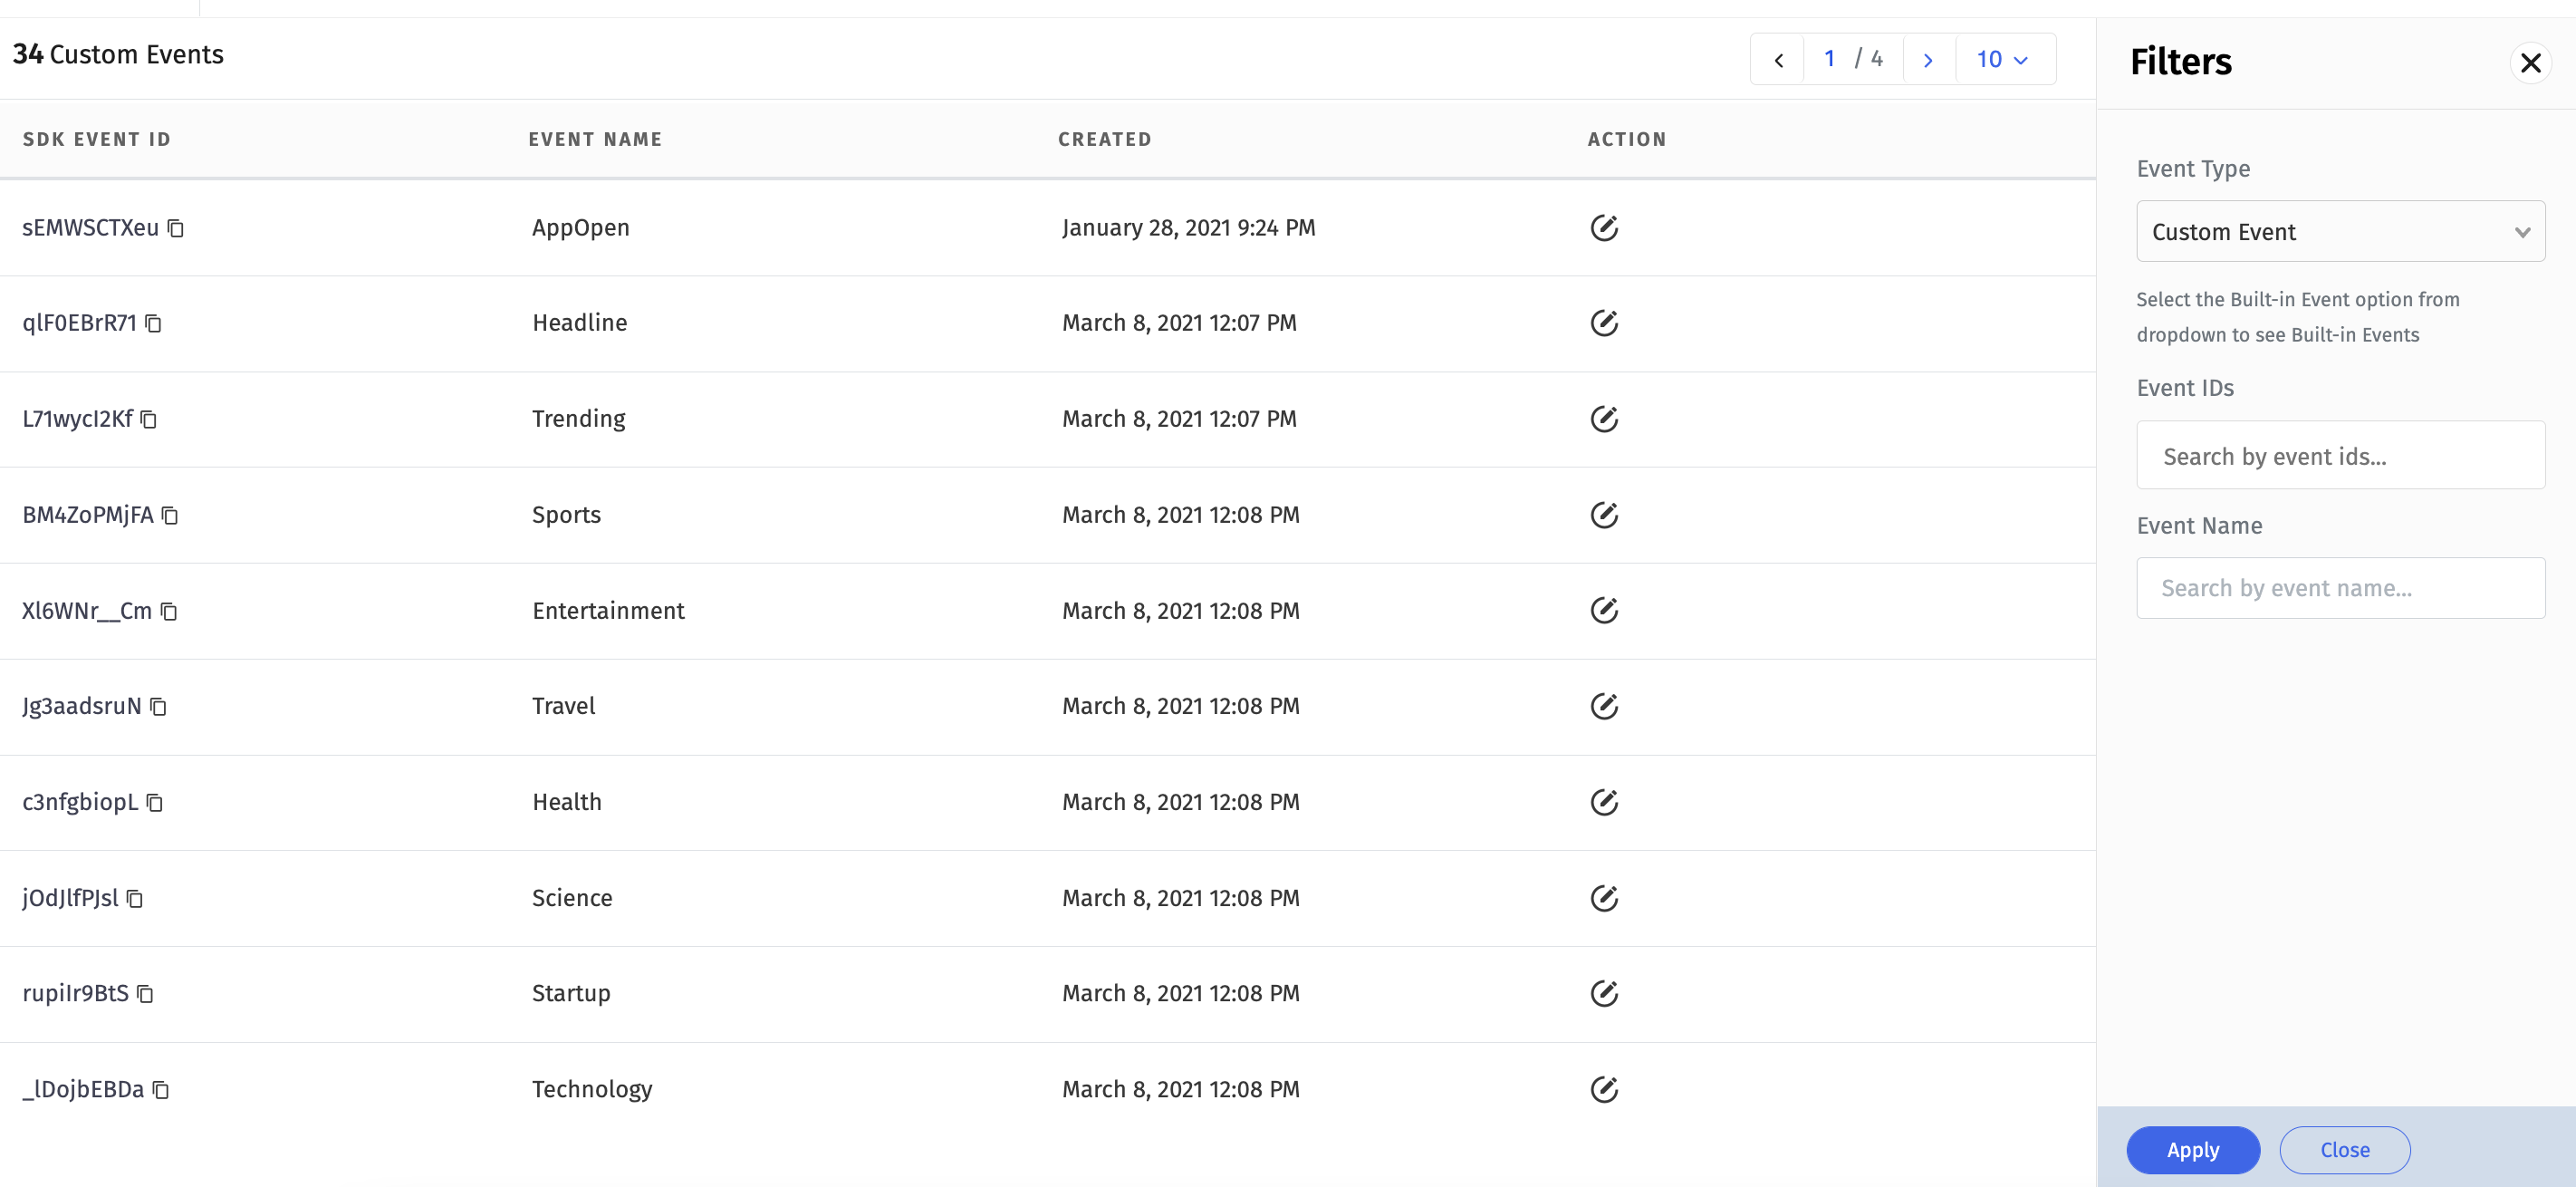
Customs events are created by user as per their required business logic.
You can create the events in the Trackier dashboard and integrate those events in the app project.
Screenshot[5]

  /*
 * Event Tracking
  <------------->
 * The below code is the example to pass a event to the Trackier SDK.
 * This event requires only 1 Parameter which is the Event ID.
 * Below are the example of customs events function calling for `AppOpen` event name.
 * The arguments - "sEMWSCTXeu" passed in the Trackier event class is Events id
 *
 */

  func eventsTracking(){
    let event = TrackierEvent(id: "sEMWSCTXeu")

   /* Below are the function for the adding the extra data,
      You can add the extra data like login details of user or anything you need.
      We have 10 params to add data, Below 5 are mentioned */

    event.param1 = "this is a param1 value"
    event.param2 = "this is a param2 value"
    event.param3 = "this is a param3 value"
    event.param4 = "this is a param4 value"
    event.param5 = "this is a param5 value"
    DispatchQueue.global().async {
        sleep(1)
        TrackierSDK.trackEvent(event: event)
   }

}
Also check the screenshots of the above code.
Screenshot[6]

Trackier allow user to pass the revenue data which is generated from the app through Revenue events. It is mainly used to keeping record of generating revenue from the app and also you can pass currency as well.
  func eventsRevenueTracking(){

    let event = TrackierEvent(id: TrackierEvent.LOGIN)

    //Passing the revenue events be like below example
    event.revenue = 10.0; //Pass your generated revenue here.
    event.currency = "INR";  //Pass your currency here.
    event.orderId = "orderID";
    event.param1 = "param1";
    event.param2 = "param2";
    event.setEventValue("ev1", "eventValue1");
    event.setEventValue("ev2", 1);
    DispatchQueue.global().async {
        sleep(1)
        TrackierSDK.trackEvent(event: event)
}

}
Below are the screenshot of the above code
Screenshot[7]

   func userDetails(){

    let event = TrackierEvent(id: TrackierEvent.LOGIN)

    /*Passing the UserId and User EmailId Data */
    event.setUserId("XXXXXXXX"); //Pass the UserId values here
    event.setUserEmail("[email protected]"); //Pass the user email id in the argument.

    /*Passing the custom value in the events */
    event.addEventValue("customeValue1","XXXXX");
    event.addEventValue("customeValue2","XXXXX");


    DispatchQueue.global().async {
        sleep(1)
        TrackierSDK.trackEvent(event: event)
}
}Trackier allows to pass additional data like Userid, Email to SDK so that same can be correlated to the Trackier Data and logs.
Just need to pass the data of User Id, Email Id and other additional data to Trackier SDK function which is mentioned below:-
func userDetails(){

    let event = TrackierEvent(id: TrackierEvent.LOGIN)

    /* Passing the UserId and User EmailId Data */
    event.setUserId("XXXXXXXX"); //Pass the UserId values here
    event.setUserEmail("[email protected]"); //Pass the user email id in the argument.
    DispatchQueue.global().async {
        sleep(1)
        TrackierSDK.trackEvent(event: event)
}
  }
Below are the screenshots of the above example of Passing custom data and User data to SDK.
Screenshot[8]

To assosiate Customer Id , Customer Email and Customer additional params during initializing sdk
    // Override point for customization after application launch.
    let config = TrackierSDKConfig(appToken: "xxxx-xx-xxx-xxx", env: TrackierSDKConfig.ENV_DEVELOPMENT)
    TrackierSDK.setUserId(XXXXXXXX)
    TrackierSDK.setUserEmail("[email protected]")
TrackierSDK.initialize(config: config)For additional user details , make a dictonary and pass it in setUserAdditionalDetails function
    val userAdditionalDetails = Dictionary <String,AnyObject>()
    userAdditionalDetails.["userMobile",99XXXXXXXX]
TrackierSDK.setUserAdditionalDetails(userAdditionalDetails) let config = TrackierSDKConfig(appToken: "xx-182a-4584-aca3-xx", env: TrackierSDKConfig.ENVIRONMENT_PRODUCTION)
config.setAppSecret(secretId: "xxxx", secretKey: "xxx-xx")There is a Universal Links iOS app opening method which needs to be implemented for deeplink to work. This method directly opens the mobile app at default activity. Universal links take the format of normal web links for example. https://yourbrand.com or https://yourbrand.u9ilnk.me
Follow the steps for configuring Universal Links
a. Getting the app bundle ID and prefix ID
- Log into your Apple Developer Account.
- On the left-hand menu, select Certificates, IDs & Profiles.
- Under Identifiers, select App IDs.
- Click the relevant app.
- Copy the prefix ID and app bundle ID and insert in app settings page in Trackier MMP.
Screenshot[9]

b. Adding the prefix ID and app bundle ID in the Trackier MMP.
- Login your Trackier Panel
- Select your application and click on Action button and login as
- In the Dashboard, Click on the
UniLinkoption on the left side of panel. - On the Unilink page, create template by click on Action button which is located on the right side header of the page.
- After creating template, Edit that template by click on the edit button.
- On the edit template page, Add the prefix ID and app bundle ID in the Link Behaviour (When application is installed)
Please check the screenshot for the reference
Screenshot[10]

c. Configure mobile apps to register associated domains
Configuring mobile apps to register approved domains takes place inside Xcode. It requires the unilink subdomain that you can get from app setting page in Trackier MMP.
- Follow this iOS instructions
- Get the unilink subdomain from app settings page in Trackier MMP.
- In Xcode, click on your project. Click on the project target.
- Switch to Capabilities tab.
- Turn on Associated Domain.
- Add the unilink subdomain that you got from Trackier MMP.
- The format is applinks:subdomain.unilink.me. Add applinks: before the domain as like
applinks:subdomain.unilink.me
Screenshot[11]

To associate a domain with your app, you need to have the associated domain file on your domain and the appropriate entitlement in your app. Once the unilink is created, Trackier hosts the apple-app-site-association file. When a user installs your app, the system attempts to download the associated domain file and verify the domains in your Associated Domains Entitlement.


