React Training
On October 3, 2016, we are holding a live demonstration of coding with React.
Here is a link to the Demo.
During the demo, Ryan Collins and Andreas Daimainger will be talking about React and all of the details of the setup of our projects. Ryan will be live coding one of the Udacity Alumni Web App's components to demonstrate how powerful and easy React and the tooling is.
React is a declarative library made by the folks at Facebook that makes building complex web and mobile user interfaces a breeze. React is not an MVC library, as it is only concerned with the view. It allows you to describe your UI declaratively in a tree-like structure and makes it possible to build highly reusable UI components. React exists only to do one thing and do it really well, which is to render HTML to the DOM (or UIViews in the case of React Native). Speaking of React Native, you can build fully functional cross-platform mobile apps using the same code you write for the web. Amazing 😎!
React abstracts away all of the tricky and expensive DOM operations with what's known as the Virtual DOM. The Virtual DOM is an in memory representation of the real DOM and React takes care of all the complexity of updating the DOM when things change.
Facebook has an article called Thinking in React that talks about the process of building UI with React.
The general idea is that you break down your User Interface into components:
The first thing you'll want to do is to draw boxes around every component (and subcomponent) in the mock and give them all names. If you're working with a designer, they may have already done this, so go talk to them! Their Photoshop layer names may end up being the names of your React components!
When we get into the demonstration, we will talk about the process of breaking down our mockup into components and containers. This article is a must read.
JSX is a fantastic syntax that makes writing React very fun and easy. Just like with HTML, JSX lets you describe the structure of your UI as a Tree or Graph of connected nodes. It is yet another abstraction that takes you further away from the metal, so to speak, and lets you declaratively describe your UI.
Each JSX component must have only one parent DOM Node.


// Good
const Component = () => (
  <div>
    <h1>Hello World</h1>
  </div>
);
// Bad
const Component = () => (
  <div><h1>Hello World</h1></div>
  <span>Oops, no parent node</span>
);
JSX gets compiled into regular JavaScript objects that React can understand and render HTML from. For example
// JSX
const App = () => (
  <Form>
    <Form.Row>
      <Form.Label />
      <Form.Input />
    </Form.Row>
  </Form>
);
// Gets compiled into:
const App = (
  React.createElement(Form, null,
    React.createElement(Form.Row, null,
      React.createElement(Form.Label, null),
      React.createElement(Form.Input, null)
    )
  )
);
A few things to note. Almost all html is valid React JSX. However, you cannot use the class keyword, so you will see people using className, which React converts into class.
<h1 className="my-class">Hello World</h1>
className is referred to as a property, and as a React developer, you can use the built in properties and even define your own. A property is any JavaScript value, i.e. String, Object, Array, etc.
<h1 className="my-class" fooBar={myObject} style={{ display: 'none' }}>Hello World</h1>
JSX gets really fun to write. For more, I definitely recommend the AirBnb React Styleguide. In fact, with our ESLint setup, we have this very same style guide enabled.
More Resources on JSX
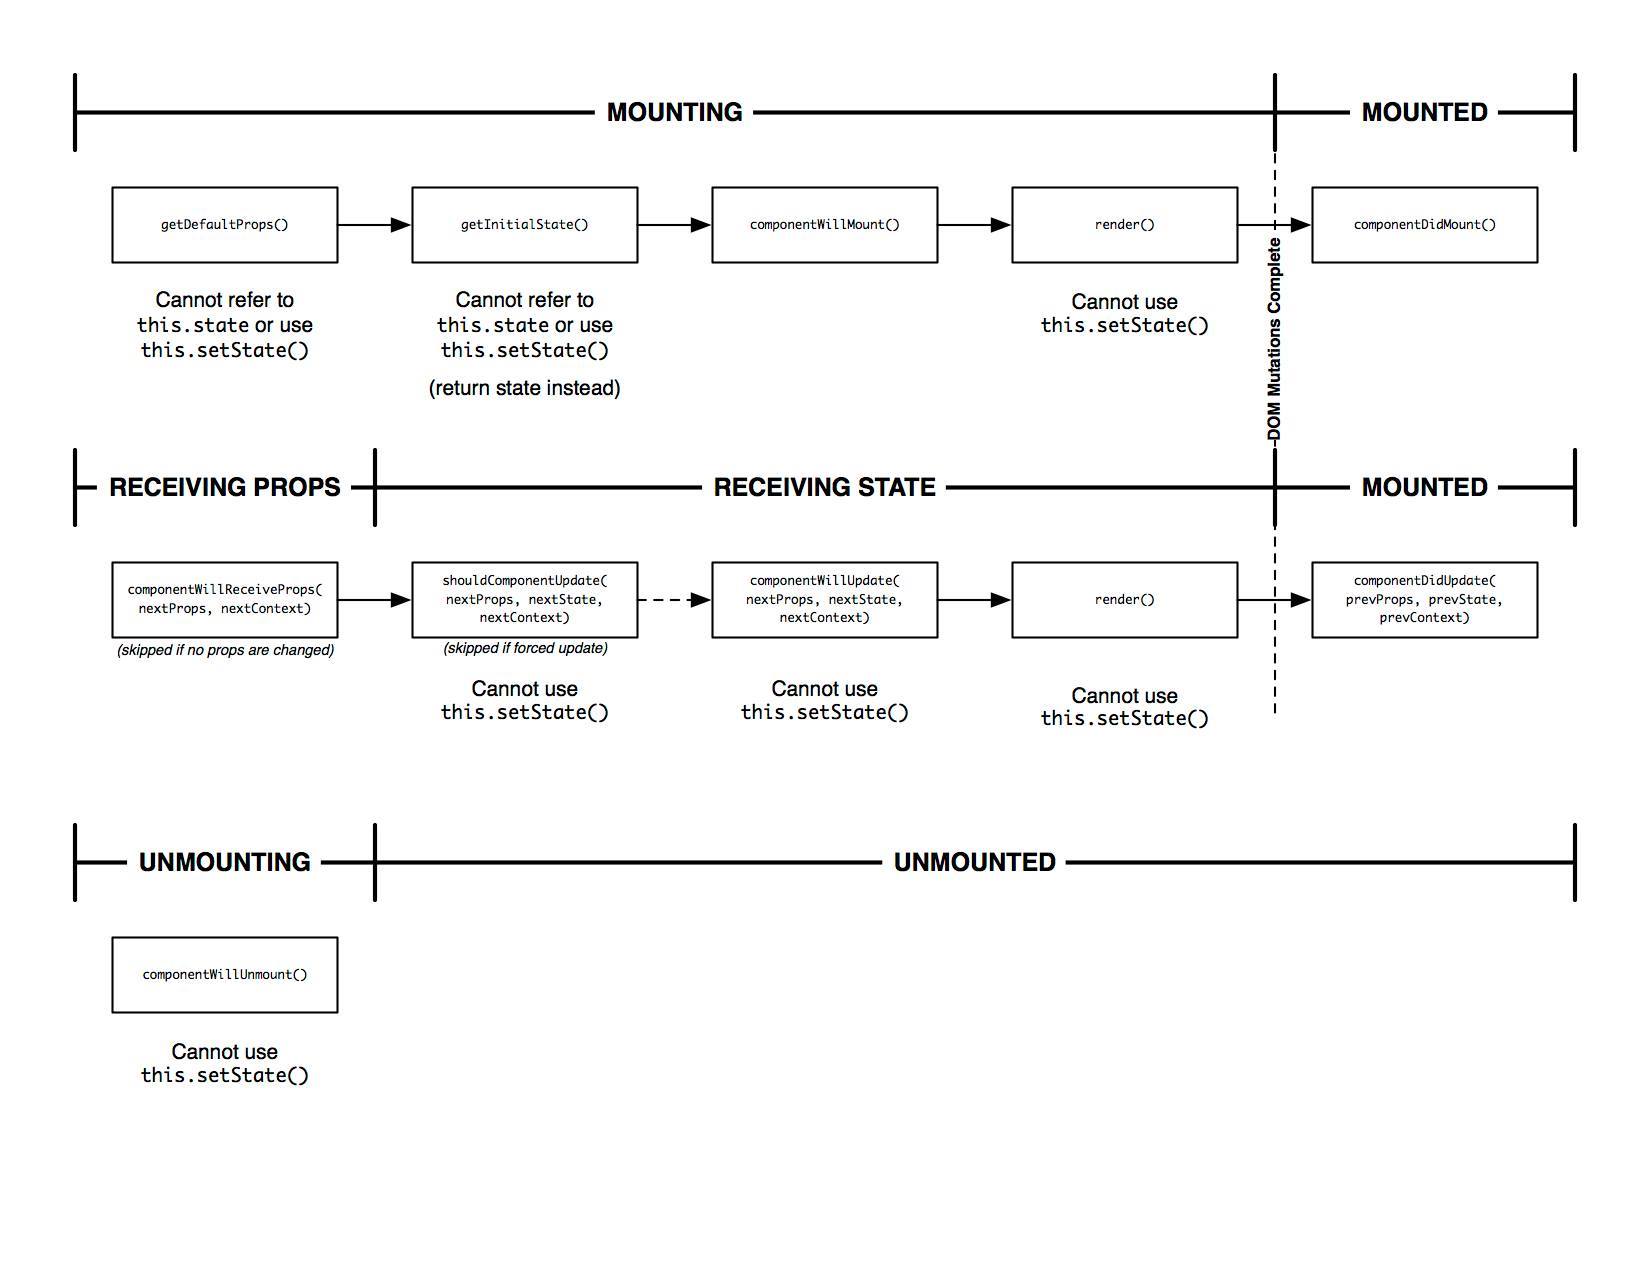
Containers sit on top of other components and take care of managing state for their children components. Containers have a component lifecycle, which you can access when you create a class that extends React.Component.
This is a detailed overview of the container component lifecycle. You can see more examples later on.
Components are the bits and pieces of your application. They are reusable bits of UI that take properties and render HTML. They are literally just JavaScript functions. Let me say that again. React components are literally just JavaScript functions! Within a component, you can write anything that is a JavaScript expression. If you can type it into the node REPL, you can write it within your JSX.
It is recommended that when you create a component, the component is Stateless meaning that it does not handle any of its internal state. These components are called stateless functional components
Stateless Functional Components:
Take props and render UI. They are pure functions, meaning given the same input, they will always return the same output. They use JSX and the Virtual DOM to make building UI very declarative and composable. Take a look at this article on Pure Functions and this one on stateless functional components
// An example loading indicator component
// Renders UI (html) as a pure function of props.
const LoadingIndicator = ({
  isLoading,
  message,
}) => (
  <Box
    align="center"
    justify="center"
    className={styles.loadingIndicator}
  >
    {isLoading &&
      <Box
        align="center"
        justify="center"
      >
        <Heading tag="h2" align="center">{message}</Heading>
        <Spinning />
      </Box>
    }
  </Box>
);

LoadingIndicator.propTypes = {
  isLoading: PropTypes.bool.isRequired,
  message: PropTypes.string.isRequired,
};
If you need to have internal state, you can also use a Class Component. With ES6, arrow functions do not create Lexical Scope, so you would never reference this within one, but with a Class Component, you need to be wary of this. That is outside the purview of this demo, but check below for more resources.
class LoadingIndicator extends Component {
  constructor() {
    super();
    this.handleFooBar = this.handleFooBar.bind(this);
    this.state = {
       foobar: "bazfuzz",
    };
  }
  handleFooBar() {
    // In Containers, you sometimes have state.
    // state is just like properties, as in it's any
    // type of JavaScript data, except the main difference
    // is you can change values using this.setState({});
    // Redux takes away internal state, but we will get into that later.
    this.setState({
      foobar: "footang",
    })
  }
  render() {
    const {
      isLoading,
      message,
    } = this.props;
    return (
      <Box>
        {... same as above}
        {this.state.foobar}
      </Box>
    );
  }
}
Behind the scenes back in the Virtual Dom, React has a very complex and powerful Event System. It allows you to attach functions to events right in your JSX. The convention is that you pass in a function from your container into a component. This is how you communicate between your components in the component hierarchy.
import Box from 'grommet-udacity/components/Box';
import Heading from 'grommet-udacity/components/Heading';
import Section from 'grommet-udacity/components/Section';
import Footer from 'grommet-udacity/components/Footer';
import { UdacityLogo } from 'components';
// Some stateless functional component
const MyButton = ({ onClick }) => (
  <button id="my-button" onClick={onClick}>
    Click me!
  </button>
);

// Another stateless functional component
const MyInput = ({ value, onChange }) => (
  <span>
    <label htmlFor="my-input">My Input</label>
    <input id="my-input" onChange={onChange} value={value} />
  </span>
);

class Foobar extends Component {
  constructor() {
    super();
    // In class containers, you need to bind functions to your lexical `this`
    this.handleClick = this.handleClick.bind(this);
    this.handleInput = this.handleInput.bind(this);
    this.state = {
      inputValue: '',
    }
  }
  handleClick() {
    // We can refer to the this.state.value
    // As just value by using ES6 Destructuring
    // https://developer.mozilla.org/en-US/docs/Web/JavaScript/Reference/Operators/Destructuring_assignment
    const { value } = this.state;
    alert(`Woohoo! You entered: ${value}`);
  }
  handleInput(event) {
    const value = event.target.value;
    // React will re-render the component
    // When you call setState.
    // This will show the value of your input.
    this.setState({ inputValue: value });
  }
  render() {
    return (
      <Section>
        <Heading>
          Udacity Rulz!
        </Heading>
        <UdacityLogo />
        <Box>
          <MyInput onChange={this.handleInput} value={this.state.inputValue} />
        </Box>
        <Footer>
          <Button onClick={this.handleClick}>
            Click Me!
          </Button>
        </Footer>
      </Section>
    );
  }
}
- Pages / Routes:
Pages map directly to routes. They exist only to make the organization of large applications easier. Most of the time, a Page will have a child container and that's all. When using React Router, a library that makes it possible to have client-side routing with React apps, you will point your routes to a Page.
<Route path="/create-event" component={Pages.CreateEventPage} />
The main purpose of Redux is to predictably manage state in your application. We are using it extensively because we believe that it simplifies the process of building web applications and because it eliminates runtime exceptions almost completely when done correctly.
Redux itself is a tiny JavaScript library that literally only has 6 functions in the entire API. Redux differs from traditional MVC in a few big ways. It combines Functional Reactive Programming, immutable data and the Elm Architecture into a powerhouse of a library.
Unidirectional Data Flow, called Flux by Facebook, or Elm Architecture, is just brilliant. It makes your apps so darn predictable. After you learn the terminology and start using Redux, the recommended Flux implementation, you will wonder how you ever did things beforehand. If you're anything like me, you will want to use it in every domain.

The three principles of Redux are..
- The state (data) of your whole application lives in a single JavaScript Object within a single Store.
- The data in your application is immutable, i.e. once set to a value cannot be changed.
- To change your state, you use dispatch actions that describe the mutation.
- The only way to change your data is through a Pure Function known as a Reducer function.
As the requirements for JavaScript single-page applications have become increasingly complicated, our code must manage more state than ever before. This state can include server responses and cached data, as well as locally created data that has not yet been persisted to the server. UI state is also increasing in complexity, as we need to manage the active route, the selected tab, whether to show a spinner or not, should pagination controls be displayed, and so on.
Managing this ever-changing state is hard. If a model can update another model, then a view can update a model, which updates another model, and this, in turn, might cause another view to update. At some point, you no longer understand what happens in your app as you have lost control over the when, why, and how of its state. When a system is opaque and non-deterministic, it's hard to reproduce bugs or add new features.
As if this wasn't bad enough, consider the new requirements becoming common in front-end product development. As developers, we are expected to handle optimistic updates, server-side rendering, fetching data before performing route transitions, and so on. We find ourselves trying to manage a complexity that we have never had to deal with before, and we inevitably ask the question: is it time to give up? The answer is no.
This complexity is difficult to handle as we're mixing two concepts that are very hard for the human mind to reason about: mutation and asynchronicity. I call them Mentos and Coke. Both can be great in separation, but together they create a mess. Libraries like React attempt to solve this problem in the view layer by removing both asynchrony and direct DOM manipulation. However, managing the state of your data is left up to you. This is where Redux enters.
Following in the steps of Flux, CQRS, and Event Sourcing, Redux attempts to make state mutations predictable by imposing certain restrictions on how and when updates can happen. These restrictions are reflected in the three principles of Redux.
Actions are payloads of information that send data from your application to your store. They are the only source of information for the store. You send them to the store using store.dispatch().
Actions are plain JavaScript objects. Actions must have a type property that indicates the type of action being performed. Types should typically be defined as string constants. Once your app is large enough, you may want to move them into a separate module.
import { ADD_FOO_BAR, REMOVE_FOO_BAR, HANDLE_ERRORS } from '../constants'Action creators are functions that take data and return actions.
// An example using ES5 functions
function handleErrors(errors) {
  return {
    type: HANDLE_ERRORS,
    errors,
  }
}
// An example using ES6 fat arrow functions
// And Object Literal Expressions
const handleErrors = (errors) => ({
  type: HANDLE_ERRORS,
  errors,
});
- Reducer Functions The job of the reducer function is to take your current state, an action and return your next state. You can think of this a lot like how the JavaScript Array.prototype.reduce works. The main principle of the reducer is that the functions must be pure, i.e. they must not have observable side effects or mutations.
const landingReducer = (state = initialState, action) => {
    switch (action.type) {
      case types.HANDLE_ERRORS:
        return update(state, {
          errors: {
            $set: action.errors,
          },
        });
   }
NOTE: here we are using the React Addons Update function to ensure that our state mutation is immutable. You will also see people use Immutable.js and also Object.assign which all accomplish the same thing.
The Redux Documentation about Reducers.
Grommet is a UX library built on top of React. It is the library I have been yearning for for a very long time. It provides infinitely composable UI components that can be used to construct accessible user interfaces with React. For example, the grommet library contains the following components: Section, Box (i.e. flexbox), Anchor, Button, etc. as well as some more higher level components like: Carousel, Form & FormFields, etc.
All of this comes styled out of the box and allows us to create our own custom components by fitting the Grommet components together like legos.
We've created our own custom Fork of the grommet library, called grommet-udacity, which contains all of the grommet components, plus some customized style sheets and others. We use this so that we can customize it as we go. The grommet-udacity library is included with the project and is available on NPM as grommet-udacity.
I highly suggest leaving the Grommet documentation website open while you are working. That's what I do!
We won't go too much into Webpack. You likely will not have to touch the webpack config. What you do need to know is why we use Webpack.
One of the problems that has plagued JavaScript for an eternity is that it did not have a built in module system. Other languages, such as Python and Ruby has modules built into them, so that you can store common functionality for reuse at a later time. The web has been sorely lacking in this area.
Using webpack, we have the power to bundle our JavaScript, CSS, Images and any other files into reusable modules.
- Loaders Loaders allow you to load modules, both your own and modules on NPM. We have a lot of loaders setup for this project to enable us to use React CSS Modules, load SVG and PNGs into JavaScript variables that you can interact with, etc. There are also loaders that work to load React JSX and babel. Most of this stuff is hidden away behind the scenes of the webpack configuration and will seem like magic when you start using it.
Import / Export ES6 introduced a new module pattern into the JavaScript language. Every single JavaScript file now can export one or more functions. Each module has a default export that can be exported / imported like so
const Component = () => (...React);

export default Component;

// From the file where you want to use the module
import Whatever from '../path-to/file.js';
ES6 also gives us multiple exports. Within a file, to export an function, just prefix it with export
export const Foo = () => (...React...);

export const myUtil = () => {..util..};

export function bazBar() {
  ...
}

// All of these can be imported in a number of ways:
import * as myFunctions from './path-to/module/';
// Or with destructuring
import { Foo, myUtil } from './path-to/module/';
Foo();
//or with JSX
<Foo />
- Babel
Babel is a transpiler that turns new JavaScript (ES6) into old JavaScript that the browsers can understand. I would suggest taking a course on ES6. The project is already setup to use Babel, so you don't need to know too much about the configuration.
- ES6 - Never write the word var or function again.
ES2015, sometimes referred to as ES6 is the latest JavaScript specification. It is jampacked with some very useful features and totally transforms how you write JavaScript nowadays. I would suggest that everyone who writes JavaScript should learn ES6 and have provided resources here to learn it.
- React Devtools
- Redux Devtools
- ESLint (You can also set this up in your editor to show you errors)
- React Editor Plugins: Most editors have plenty of great packages for React and JSX. We can send you a list of the ones we use, if you'd like.
Paid and Free Courses
- React Docs
- Survive JS Learn React, ES6 and Webpack in one place. Highly recommended
- Learn Redux
- ES6.io
- React for Beginners
- React JS Program
Redux
Ecosystem & JS
- React How-to How to navigate the React Ecosystem.
- Advanced Javascript
- You Don't Know JS Literally the most comprehensive JavaScript book series available.
- Web Tooling and Automation
Articles About Functional Programming
- Lessons learned from Functional Reactive Programming -Embracing Immutable Architecture
- Three Principles of Redux
For the demonstration, we will be creating a part of the actual Alumni application. The part that we are going to be working on is the Single Article View, for viewing the content of one of the articles posted on the site.
The goal of the demonstration is to show how you go about creating UI with React and the tooling. We will also be discussing the basics of React and the React ecosystem as a whole.
So here is the mockup of our beautiful single article page

Here is the code from the demo
The first thing we did was generate a page, which routes directly to the /articles/1 route
import React from 'react';
import cssModules from 'react-css-modules';
import styles from './index.module.scss';
import { SingleArticleContainer } from 'containers';

// Pages map directly to Routes, i.e. one page equals on Route
const SingleArticlePage = () => (
  <div className={styles.container}>
    <SingleArticleContainer />
  </div>
);

export default cssModules(SingleArticlePage, styles);
Here is our container, with some JSON for rendering the article. Note for the sake of the demo, we did not access the API. We can go over that when we do a Redux demo.
import React, { Component } from 'react';
import Heading from 'grommet-udacity/components/Heading';
import { SingleArticle as SingleArticleComponent } from 'components';

const article = {
    id: 1,
    title: "Creditable coverage Hcfa common procedure coding system Group health plan",
    "featured": false,
    "spotlighted": true,
    "content": "Care plan eligible dependent free-look period waiting period incurral date board certified health care provider HCPCS. Agent of record PCP limited policy morbidity me...",
    "feature_image": "https://robohash.org/magnietnon.png?size=300x300",
    "status": "published",
    "slug": "creditable-coverage-hcfa-common-procedure-coding-system-group-health-plan",
    "user": {
      "id": 3,
      "email": "[email protected]",
      "created_at": "2016-09-30T02:39:57.297Z",
      "updated_at": "2016-10-03T18:49:42.965Z",
      "name": "Andreas Daimainger",
      "avatar": "https://avatars3.githubusercontent.com/u/13679375?v=3&s=466",
      "role": "user"
    },
    "created_at": "2016-09-30T02:39:57.333Z",
    "updated_at": "2016-09-30T02:42:00.487Z",
    "tags": [
      'Open Source',
      'Demonstration',
      'Accomplishments',
      'Collaboration',
    ],
};

class SingleArticle extends Component {
  constructor() {
    super();
    this.handleClick = this.handleClick.bind(this);
    this.state = {
      isLoading: true,
    },
  }
  componentDidMount() {
    // Example lifecycle method
    // You will use this to change state, or whatever
    // and it will be called as soon as this component hits the real DOM.
    // We can fake loading with a setTimeout.
    setTimeout(() => {
      this.state = {
        isLoading: false,
      }
    }, 3000);
  }
  handleClick() {
    alert(`Hello!`);
  }
  render() {
    return (
      <div className={styles.singleArticle}>
        {this.state.isLoading && <h1>Loading</h1>}
        <SingleArticleComponent
          onClickButton={this.handleClick}
          article={article}
        />
      </div>
    );
  }
}

export default SingleArticle;
And finally, our Stateless functional component, which renders the Article
import React, { PropTypes } from 'react';
import styles from './index.module.scss';
import cssModules from 'react-css-modules';
import Heading from 'grommet-udacity/components/Heading';
import Box from 'grommet-udacity/components/Box';
import Article from 'grommet-udacity/components/Article';
import Image from 'grommet-udacity/components/Image';
import Paragraph from 'grommet-udacity/components/Paragraph';
import Button from 'grommet-udacity/components/Button';

const Tag = ({
  label,
}) => (
  <span>
    <Button>
      {label}
    </Button>
  </span>
);

const SingleArticle = ({
  article,
  onClickButton,
  name,
}) => (
  <div className={styles.singleArticle}>
    <Heading className={styles.heading} align="center" tag="h1">
      {article.title}
    </Heading>
    <Image src={article.feature_image} />
    <Box align="center" justify="center" size="large" pad={{ horizontal: 'small' }}>
      <Article align="center">
        <Paragraph>
          {article.content}
        </Paragraph>
      </Article>
    </Box>
    <Box
      align="center"
      justify="center"
    >
      {article.tags.map((tag, i) =>
        <Tag key={i} label={tag} />
      )}
    </Box>
    <Button onClick={() => onClickButton(name)} label="Button" />
  </div>
);

SingleArticle.propTypes = {
  article: PropTypes.object.isRequired,
  onClickButton: PropTypes.func.isRequired,
};

export default cssModules(SingleArticle, styles);
NOTE: the cssModules function is what applies the selector transformation for the CSS. If that was not there, it would just export it normally with: export default SingleArticle.
React Router takes care of updating the UI when you go to /articles/1 in the browser. It starts at the Page component and renders down the component hierarchy.
Here is what the route looks like:
<Route path="/articles/:articleId" component={Pages.SingleArticlePage} />
Although the code produced during the demo is not quite production quality, it might serve as a good reference. Take a look at this branch to check it out!