Update from feeds: https://galaxyproject.org/news/2024-09-20-esg-byos-im/ #121
Conversation
|
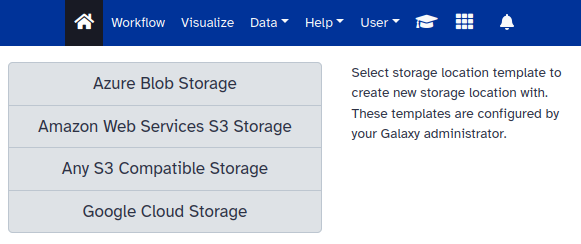
👋 Hello! I'm your friendly social media assistant. Below are the previews of this post: linkedin-galaxyproject📝 New blog post Released! Introduction The EuroScienceGateway Project: https://galaxyproject.org/projects/esg/ is streamlining the way that users Bring their Own Storage (BYOS) to Galaxy. This post covers a specific case in which a user has access to storage resources in the EGI Federated Cloud: https://www.egi.eu/service/cloud-compute/ and wants to connect it to the EU Galaxy instance: https://usegalaxy.eu/. However, similar steps can be followed to connect a different Galaxy instance with storage capacity using Azure Blob Storage: https://azure.microsoft.com/en-us/products/storage/blobs, Amazon Web Services S3 Storage: https://aws.amazon.com/s3/, and Google Cloud Storage: https://cloud.google.com/storage. In order to connect Galaxy: https://usegalaxy.eu/ with external cloud storage, the user needs to click on the User drop-down menu, select Preferences and then Manage Your Storage Locations. This will display a list of the cloud storage services already connected to Galaxy. The first time it will be empty and the user can connect to a new cloud storage service clicking on Create. The following options are given to the user: (1/19) Generally speaking the user needs the following information to connect Galaxy with cloud storage:
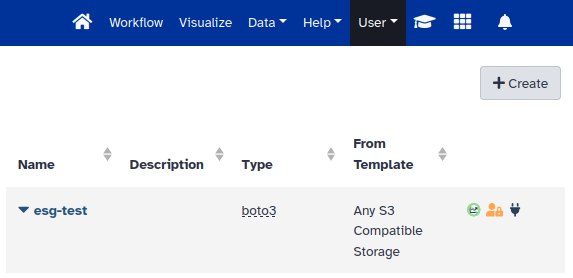
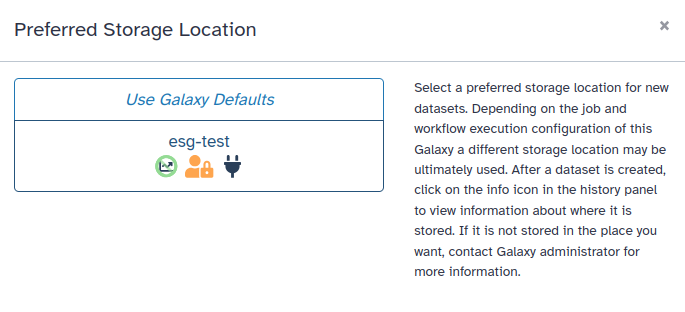
For Any S3 Compatible Storage the user also needs to provide the URL to the API endpoint. Once filled out correctly the external cloud storage is connected to Galaxy: (2/19) Now one interesting option for the user is to select the external cloud storage as the default storage location in Galaxy. For that, the user needs to click on the User drop-down menu, select Preferences, Preferred Storage Location and then select the newly added connection. (3/19) Instead of using a default storage location it is also possible to select it at different levels: per History, per Tool, and Workflow. Getting S3 storage from EGI Users with access to cloud resources in the EGI Federated Cloud: https://www.egi.eu/service/cloud-compute/ can benefit from the available TOSCA template: https://github.com/grycap/tosca/blob/f8cf9f2b11ba1de4d8639ad04728de23d25d0299/templates/minio_compose.yaml in Infrastructure Manager (or IM): https://im.egi.eu/ for the automated deployment of MinIO: https://min.io/. Below are the steps that a user needs to follow to make use of computing resources in the EGI Federated Cloud:
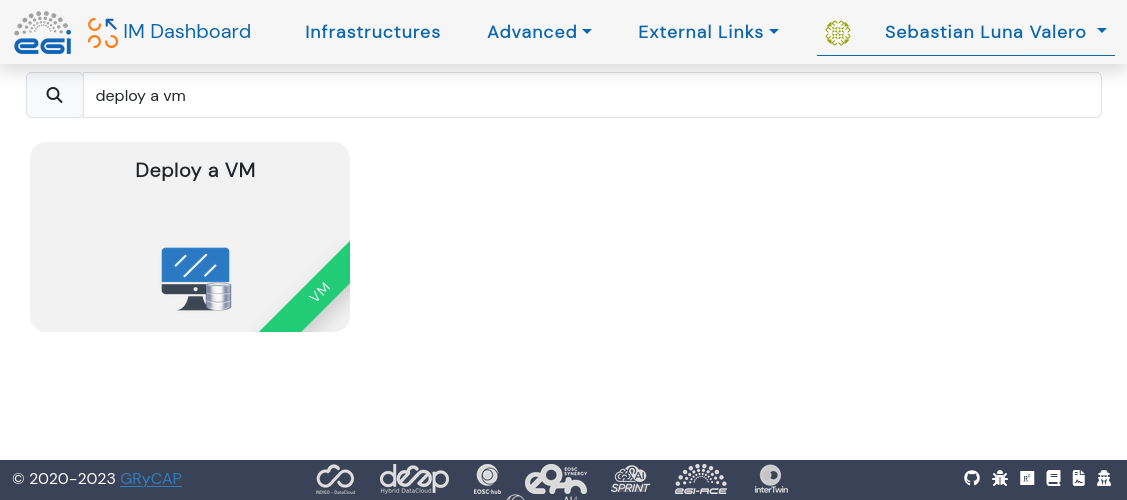
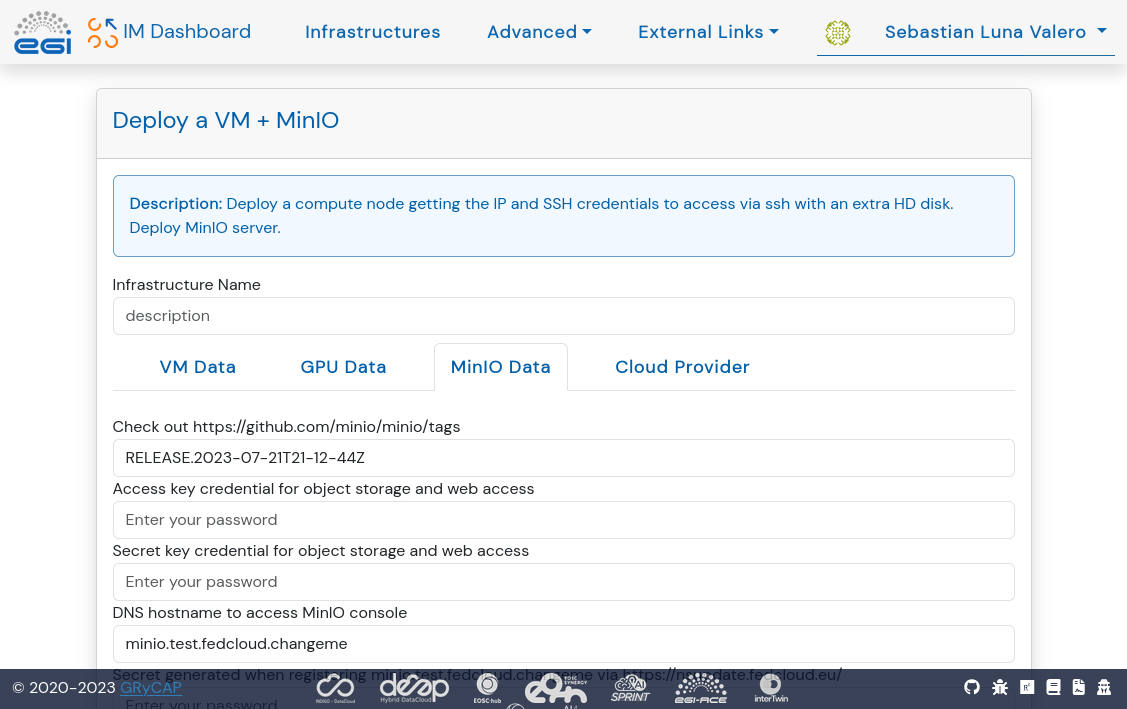
A prerequisite for the deployment of MinIO with IM is the use of some sort of Dynamic DNS service. EGI also offers a Dynamic DNS service: https://docs.egi.eu/users/compute/cloud-compute/dynamic-dns/ for free for users with an EGI Check-in account (see a tutorial: https://youtu.be/waylAJ4p-LA for further help). Using a Dynamic DNS service the user needs to register two DNS hostnames: one DNS hostname for the MinIO Console, and another one for the MinIO API endpoint. IM will deploy a Virtual Machine with Docker and MinIO as a containerised service. Therefore, the first step for the user is to select Deploy a VM in IM: (4/19) After selecting the option Deploy a VM in IM the user is presented with several options to deploy services on top of a Virtual Machine. The Figure below shows the filtered output when looking for MinIO. The user needs to click on Add and then Configure: (5/19) In the configuration page for the deployment in IM (see Figure below) the user needs to enter:
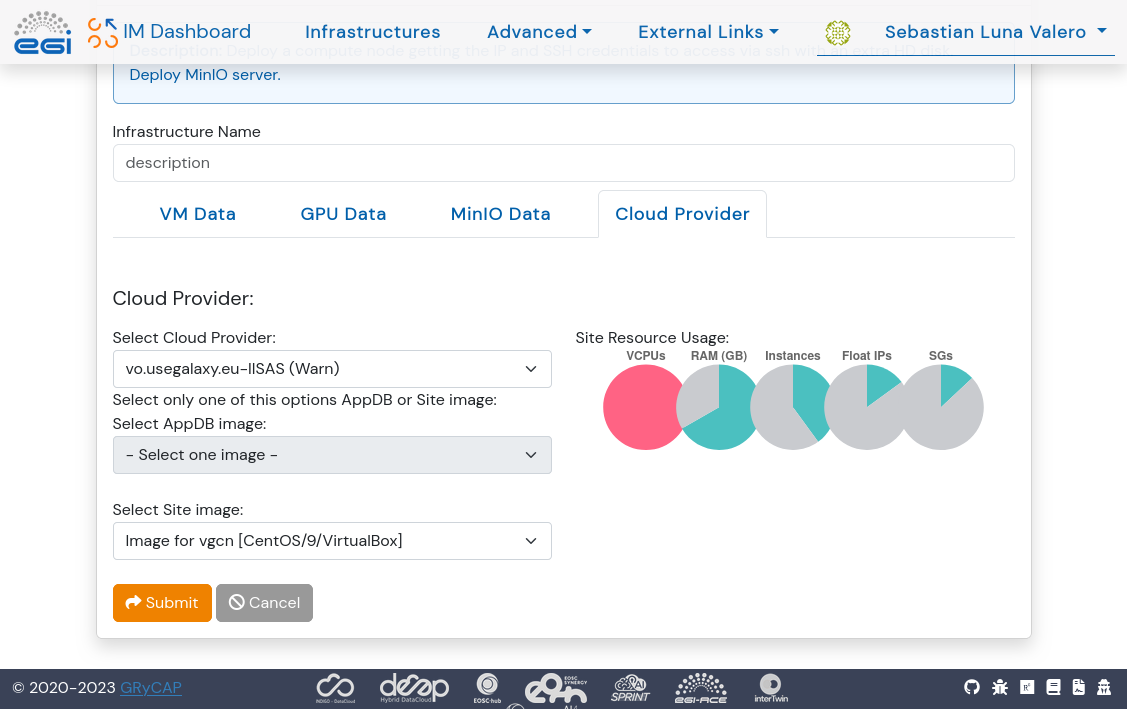
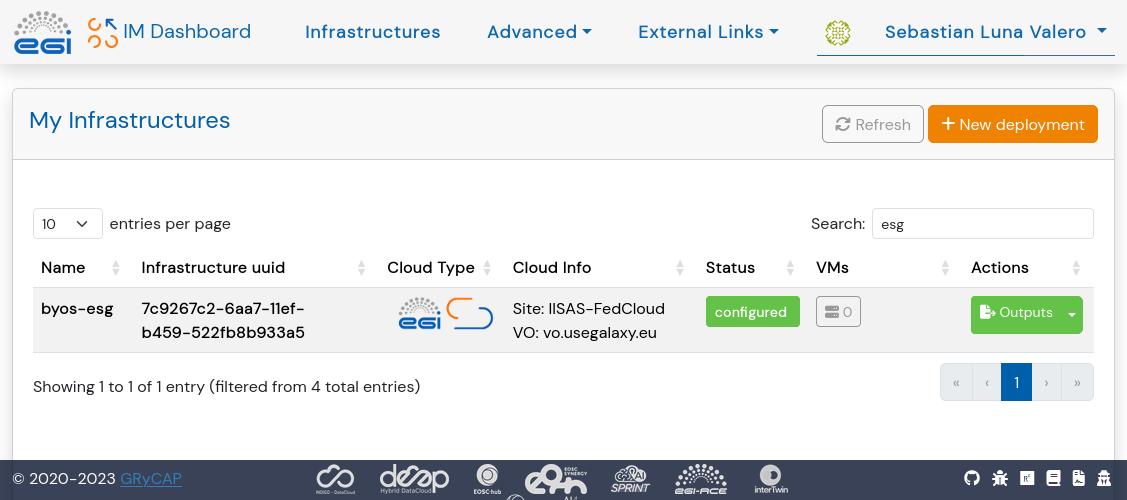
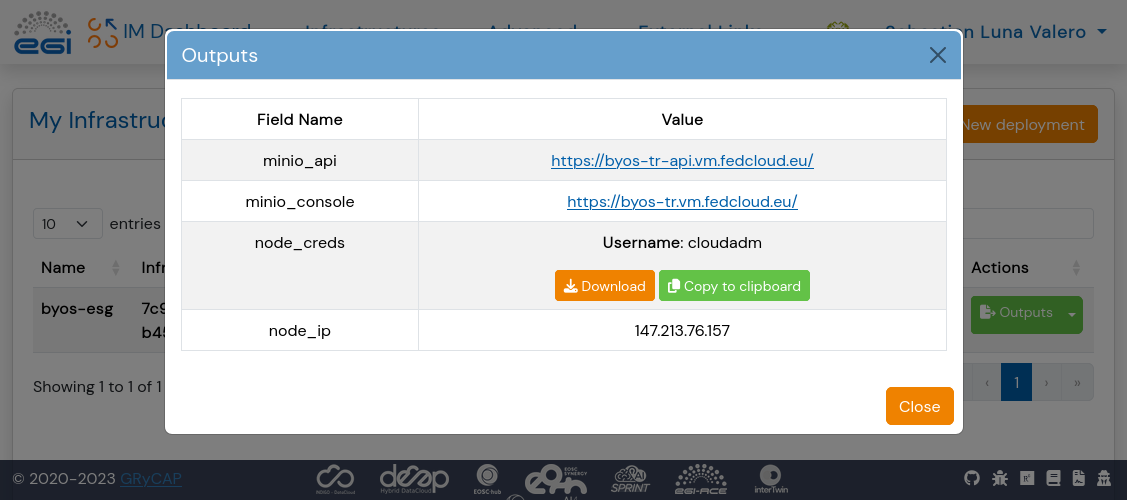
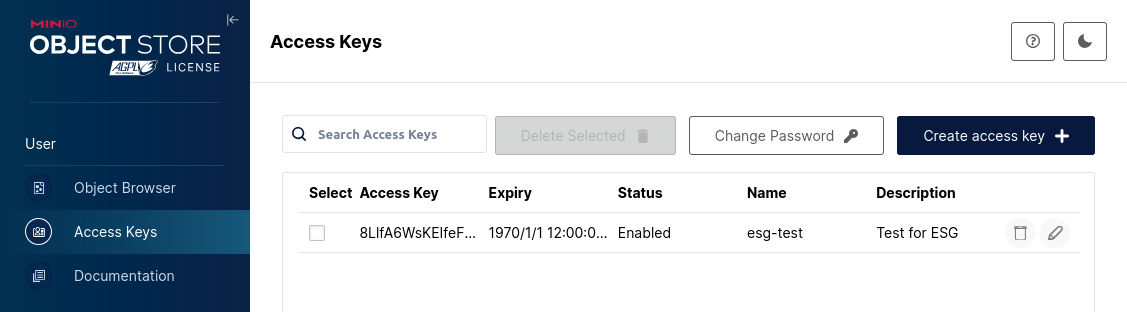
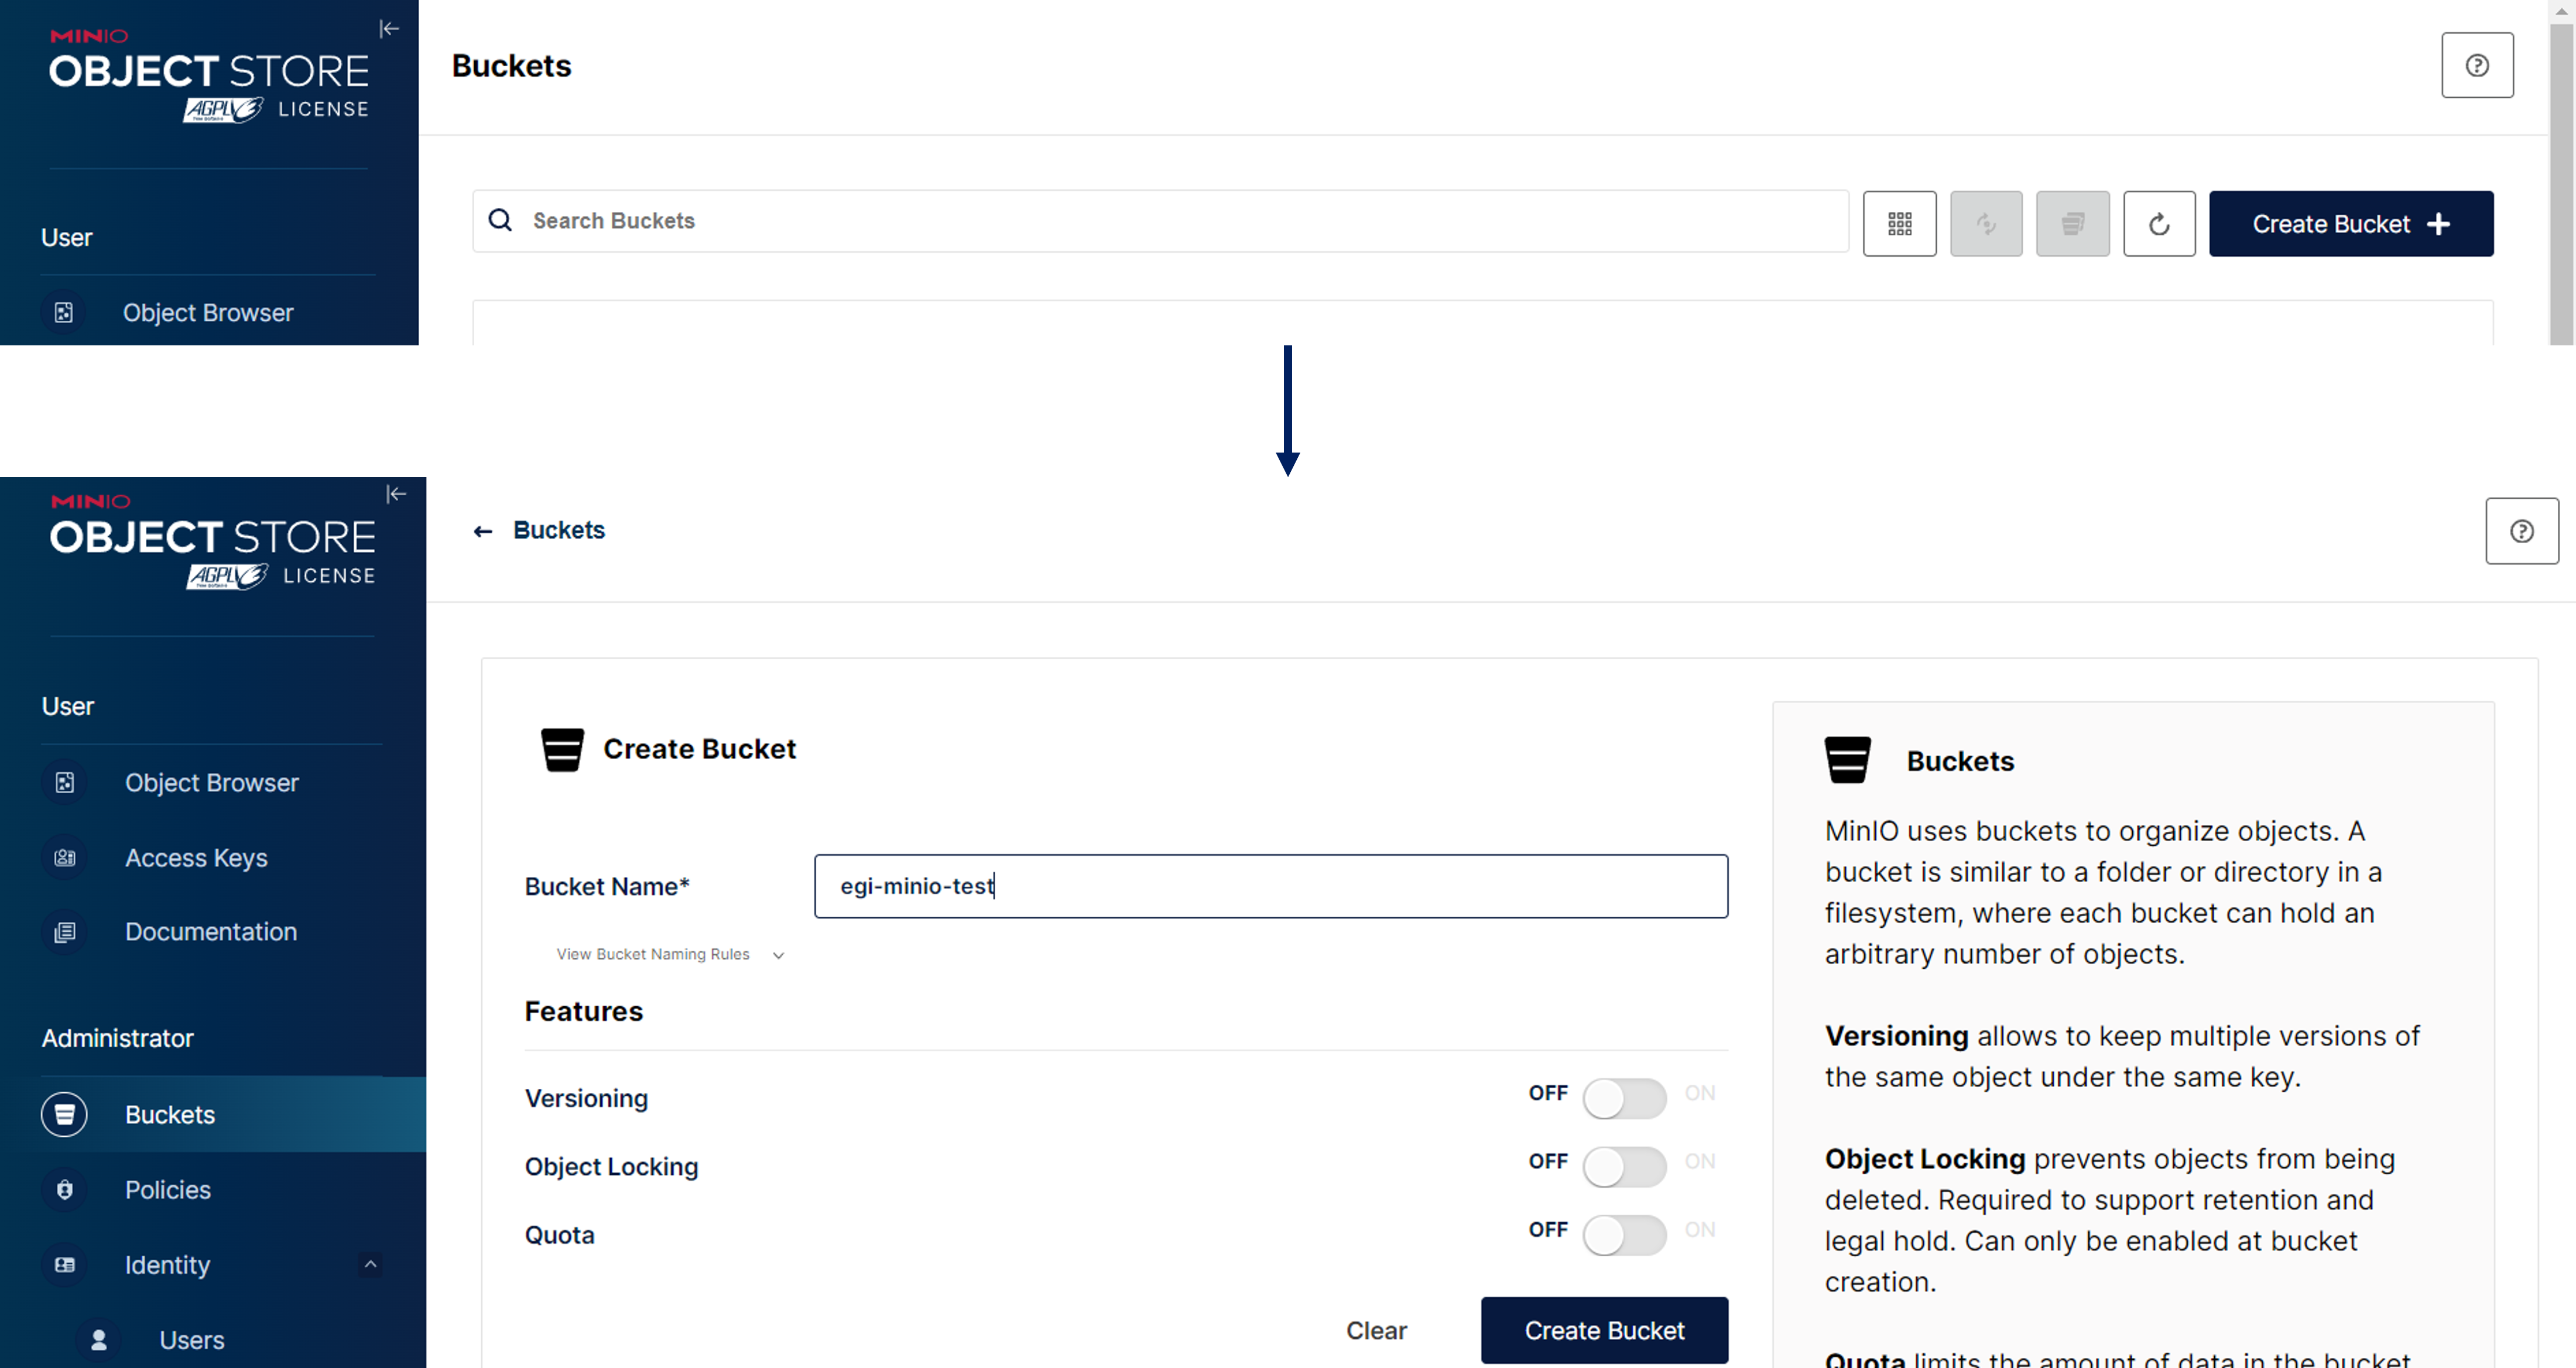
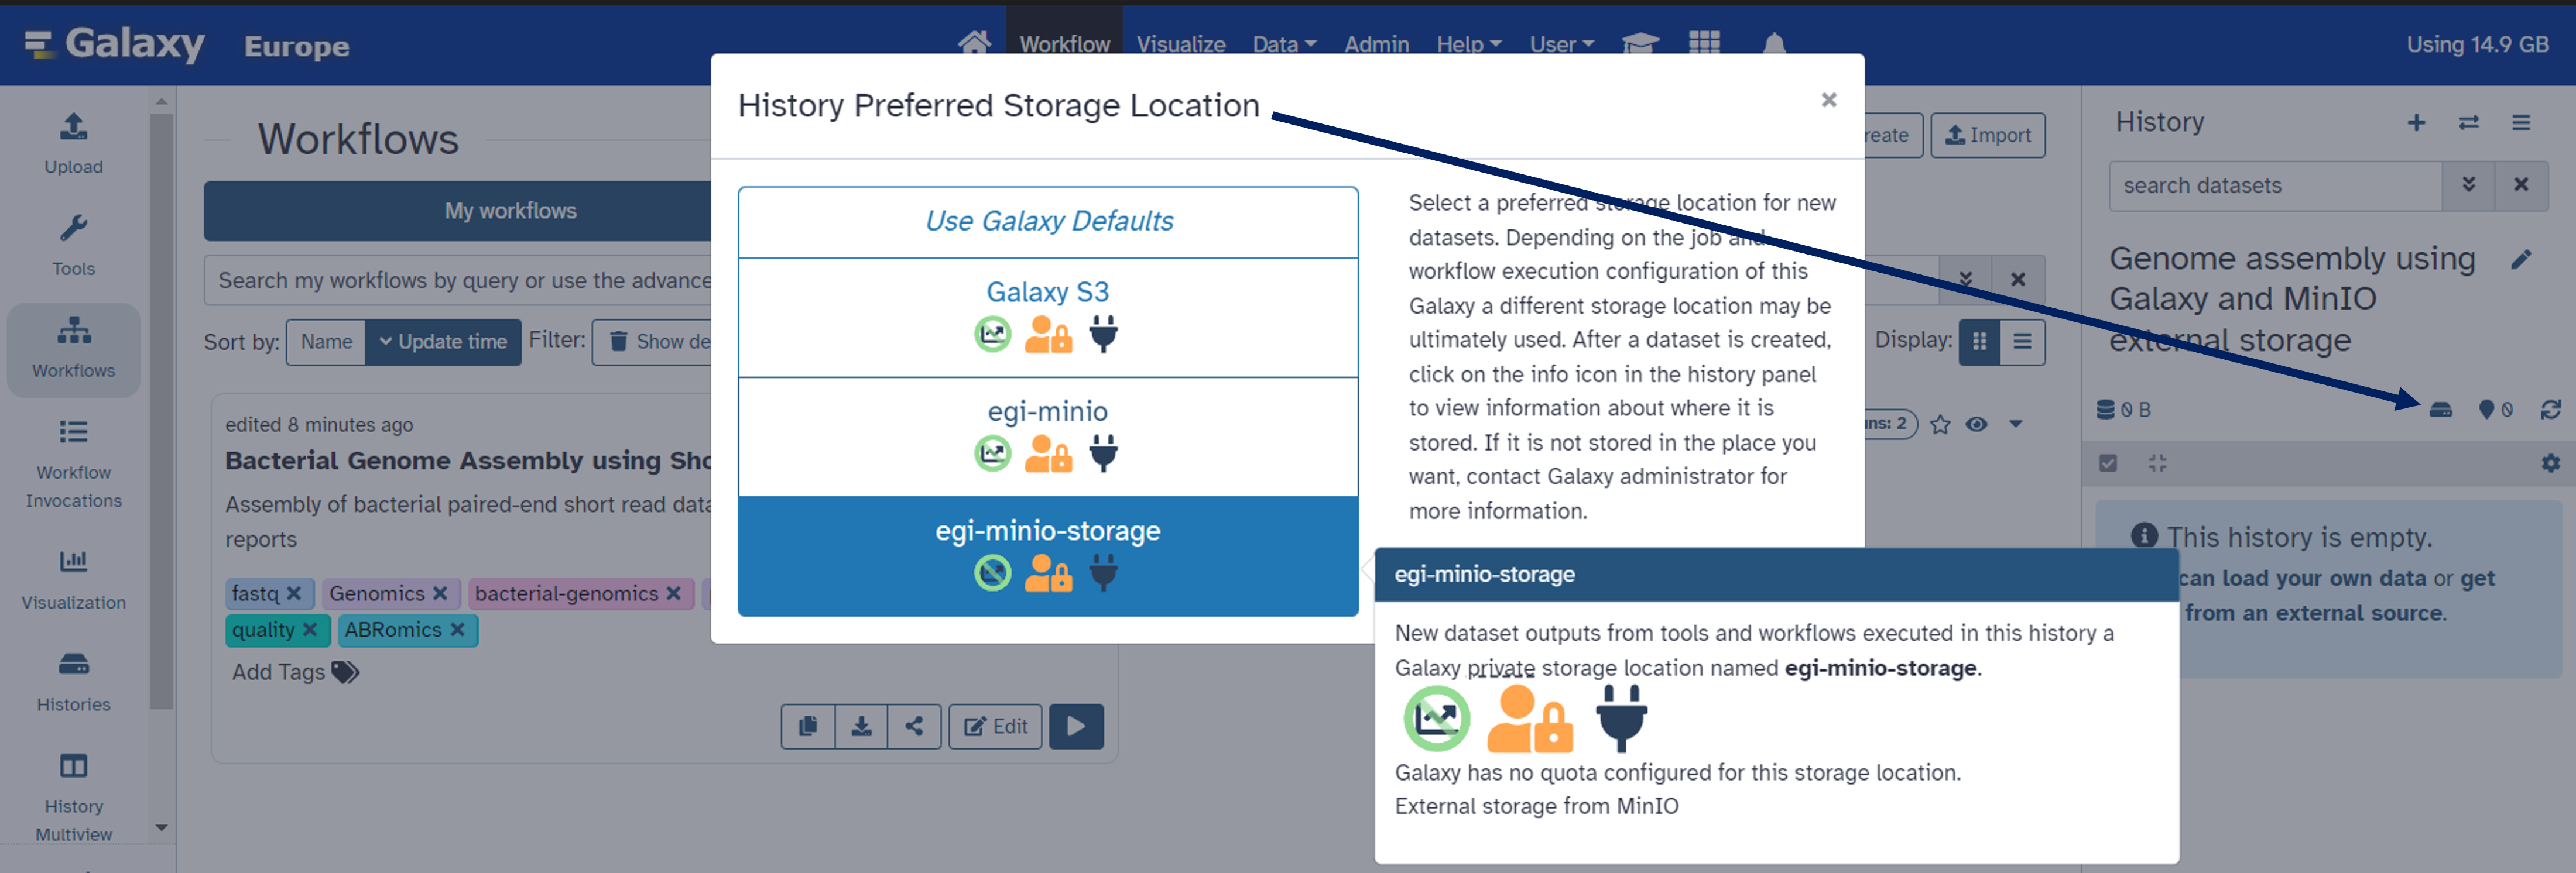
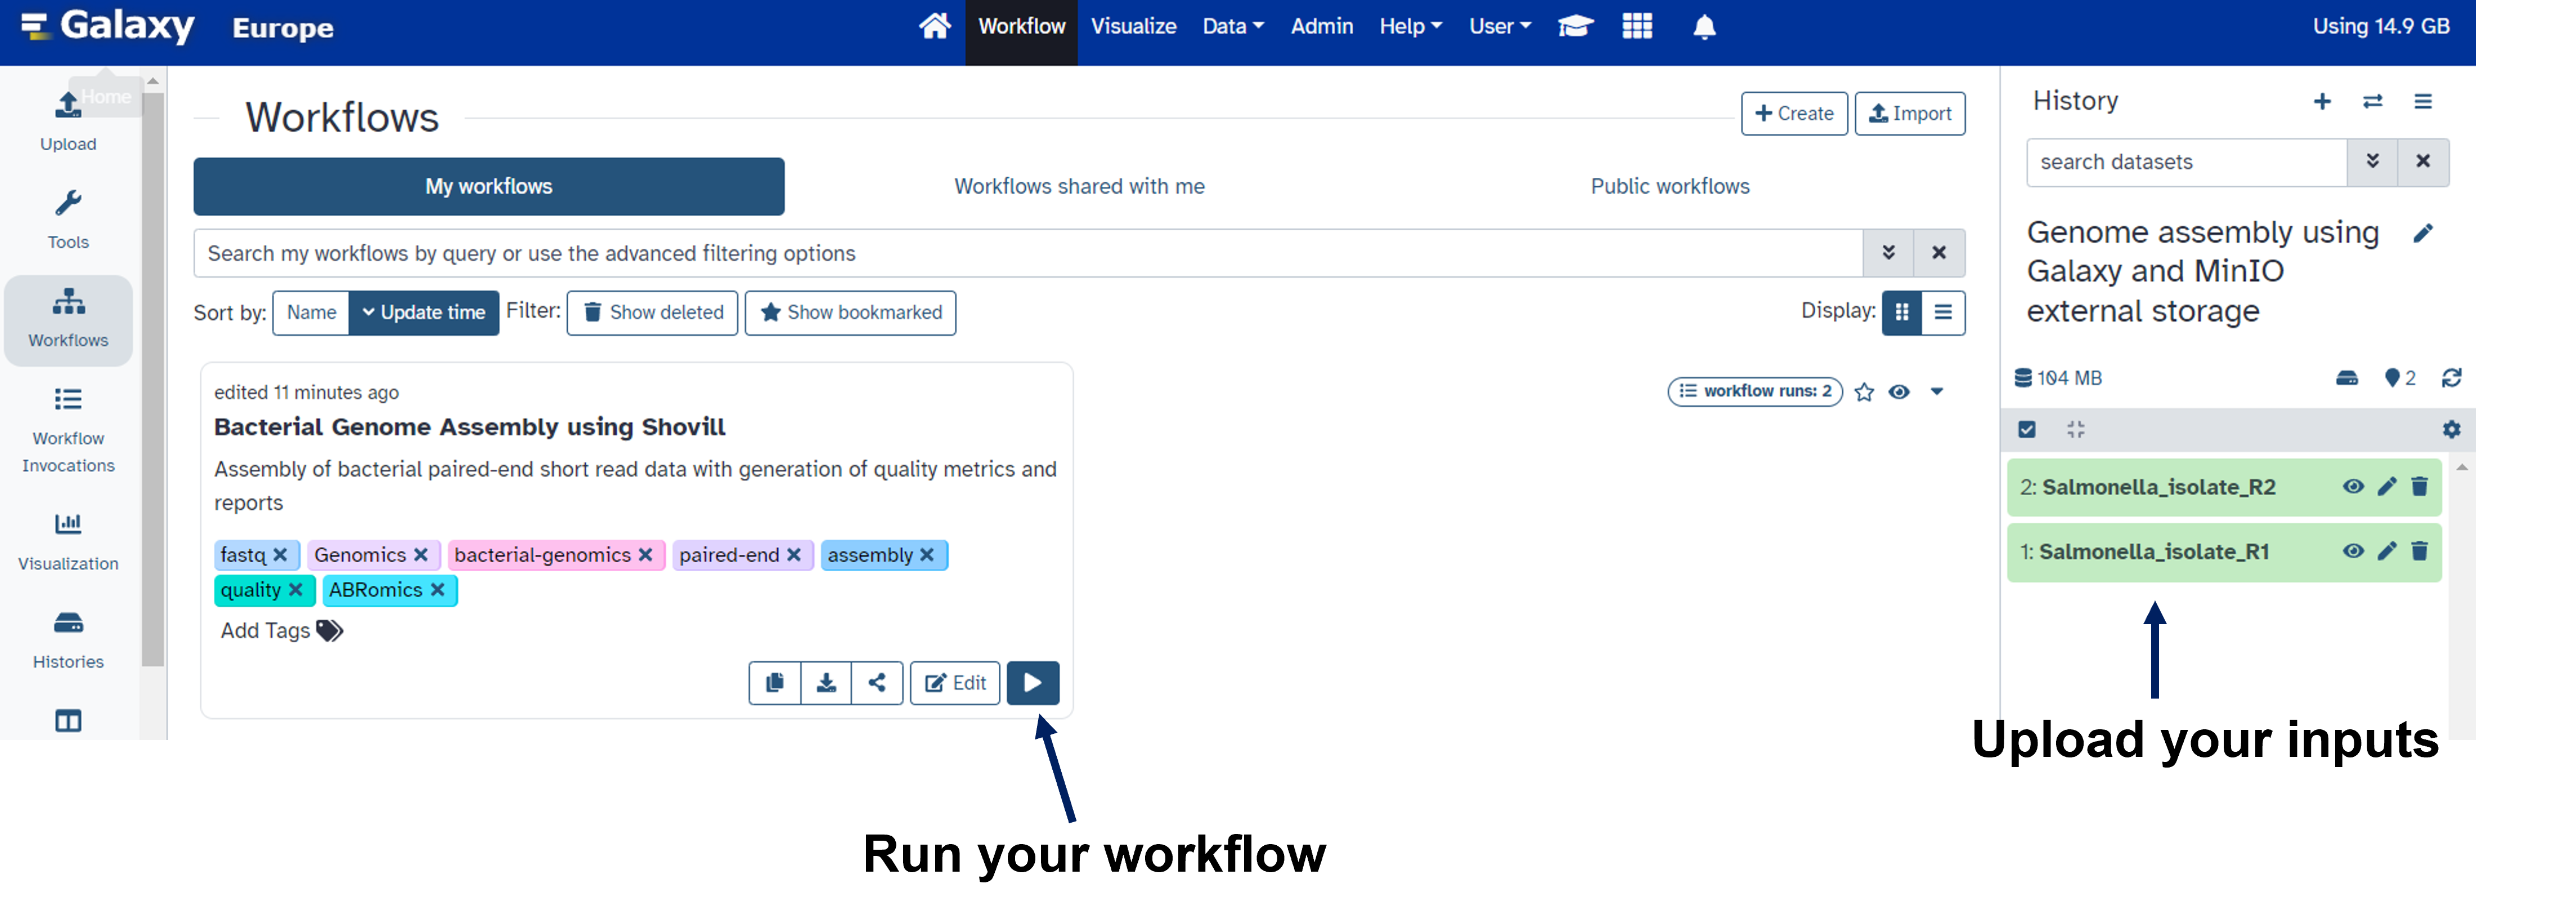
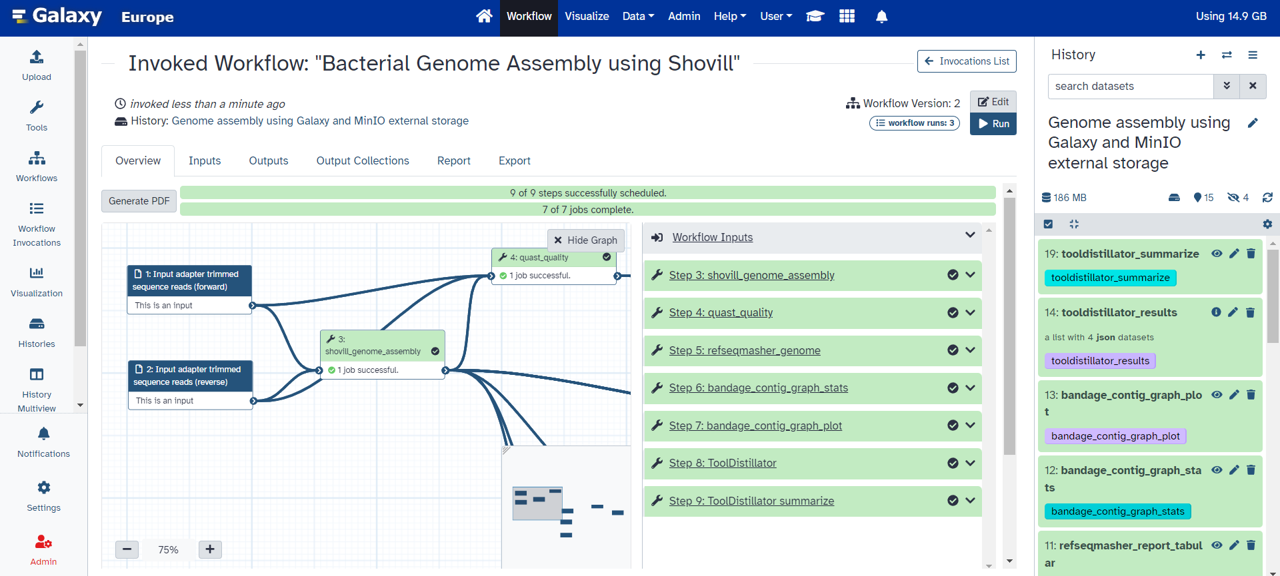
Once all the parameters are configured for MinIO and the VM, the user needs to choose a cloud provider for the deployment. This is done selecting the cloud credentials configured earlier and the Virtual Machine Image for the deployment as shown in the Figure below: (7/19) All going well IM will show the deployment as Configured: (8/19) Now the user should click on the Outputs button under the Actions column to get the URL for both the MinIO Console and the API endpoint. The latter is the URL that needs to be added to Galaxy to connect with this S3 endpoint. (9/19) Along with the URL for the MinIO API endpoint, the user will also need to generate an access and secret key in MinIO that will then be used in Galaxy to connect to this cloud storage: (10/19) Adding MinIO bucket to Galaxy Once the MinIO service is up and running the user can create a bucket in MinIO. This is done by accessing the MinIO Console URL and logging in with the access and secret key generated earlier. The user can then create a bucket by clicking on the Create Bucket button in the top right corner of the screen and adding a name for the bucket: (11/19) The user can then add this bucket to Galaxy by following the steps described at the beginning of this post (Select Any S3 Compatible Storage option from the available templates). The user needs to provide a Name, Access Key ID, Bucket (name of the bucket), the S3-Compatible API Endpoint (MinIO API endpoint), the Secret Access Key and submit the form. (12/19) Once the bucket is added to Galaxy the user can start using it as the default storage location or select it at different levels: per History, per Tool, and Workflow. (13/19) Running workflows in Galaxy with Bring Your Own Storage The user can now run tools and workflows in Galaxy using the newly configured external storage. Below is an example of a workflow that performs the assembly of bacterial genomes using Shovill: https://usegalaxy.eu/?tool_id=shovill a faster de novo assembly pipeline for Illumina paired end reads. Steps to run the workflow:
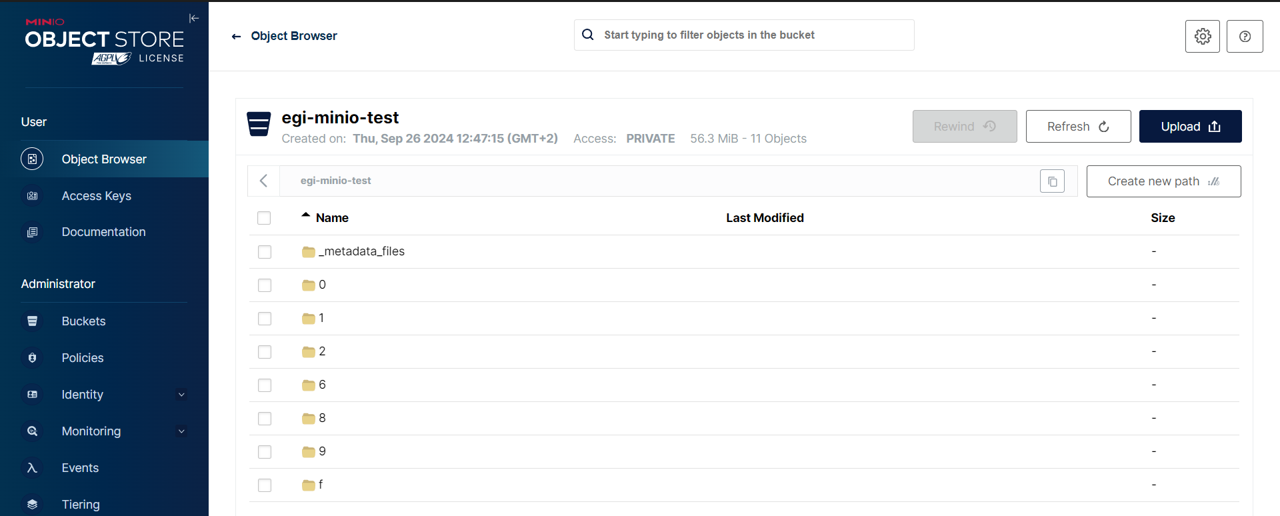
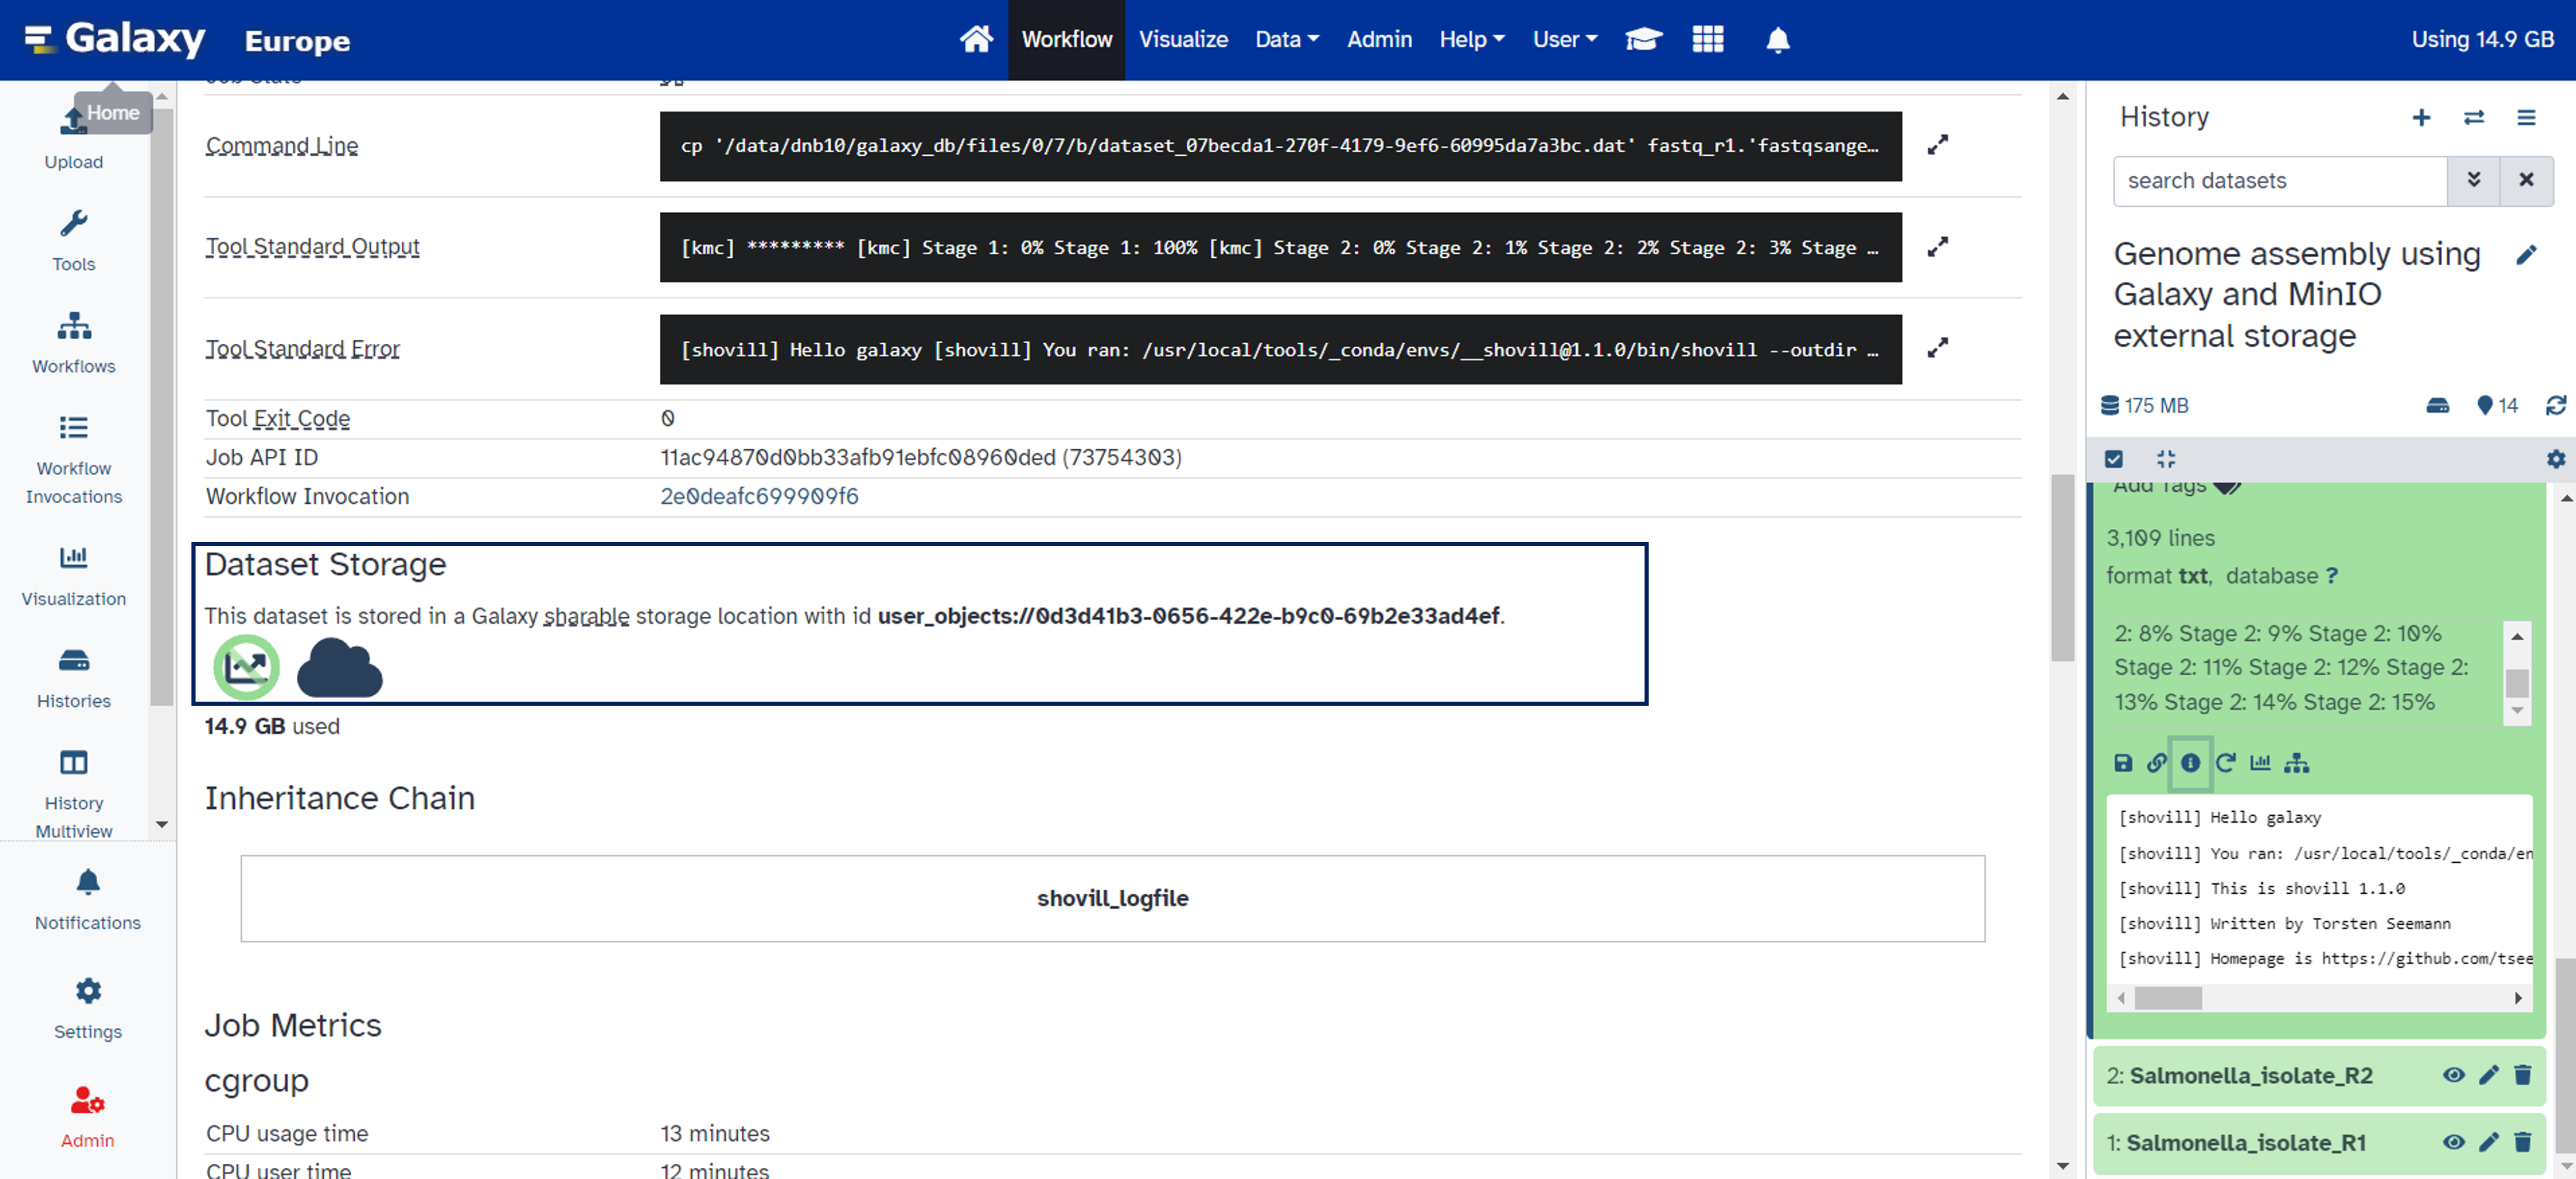
See below the output files in the external storage. (17/19)
Conclusions Having the possibility to connect Galaxy with external storage capacity enables great flexibility for both the end user and the Galaxy administrator. The end user can benefit from extra storage capacity easily. The Galaxy administrator does not have to look after additional storage systems. All in all, this Bring your Own Storage (BYOS) approach allows Galaxy to scale up the number of users in a more sustainable way, thanks to the work of John Chilton and colleagues upstream: galaxyproject/galaxy#18127.
mastodon-eu-freiburg📝 New blog post Released! Introduction The EuroScienceGateway Project: https://galaxyproject.org/projects/esg/ is streamlining the way that users Bring their Own Storage (BYOS) to Galaxy. This post covers a specific case in which a user has access to storage resources in the EGI Federated Cloud: https://www.egi.eu/service/cloud-compute/ and wants to connect it to the EU Galaxy instance: https://usegalaxy.eu/. However, similar steps can be followed to connect a different Galaxy instance with (1/26) storage capacity using Azure Blob Storage: https://azure.microsoft.com/en-us/products/storage/blobs, Amazon Web Services S3 Storage: https://aws.amazon.com/s3/, and Google Cloud Storage: https://cloud.google.com/storage. In order to connect Galaxy: https://usegalaxy.eu/ with external cloud storage, the user needs to click on the User drop-down menu, select Preferences and then Manage Your Storage Locations. This will display a list of the cloud storage services already connected to Galaxy. The first time it will be empty and the (2/26) user can connect to a new cloud storage service clicking on Create. The following options are given to the user: (3/26) Generally speaking the user needs the following information to connect Galaxy with cloud storage:
For Any S3 Compatible Storage the user also needs to provide the URL to the API endpoint. Once filled out correctly the external cloud storage is connected to Galaxy: (4/26) Now one interesting option for the user is to select the external cloud storage as the default storage location in Galaxy. For that, the user needs to click on the User drop-down menu, select Preferences, Preferred Storage Location and then select the newly added connection. (5/26) Instead of using a default storage location it is also possible to select it at different levels: per History, per Tool, and Workflow. Getting S3 storage from EGI Users with access to cloud resources in the EGI Federated Cloud: https://www.egi.eu/service/cloud-compute/ can benefit from the available TOSCA template: https://github.com/grycap/tosca/blob/f8cf9f2b11ba1de4d8639ad04728de23d25d0299/templates/minio_compose.yaml in Infrastructure Manager (or IM): https://im.egi.eu/ for the automated deployment of MinIO: https://min.io/. Below are the steps that a user needs to (6/26) follow to make use of computing resources in the EGI Federated Cloud:
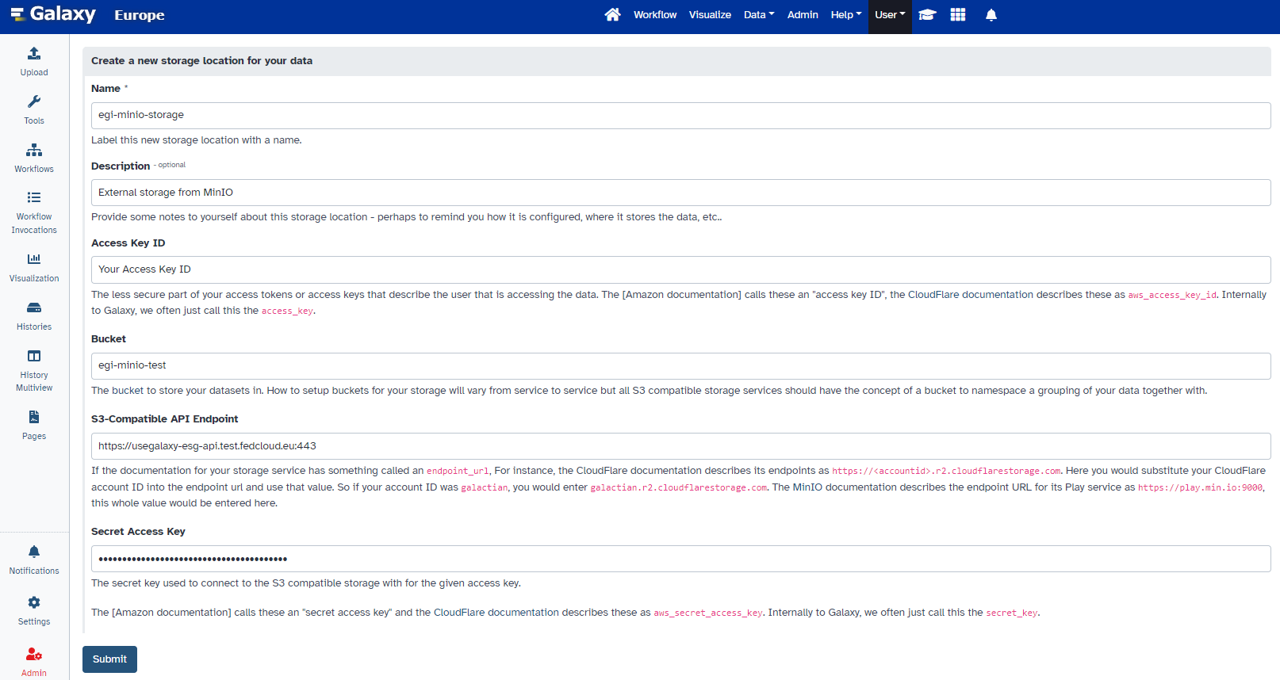
deployment details for MinIO and click Submit. A prerequisite for the deployment of MinIO with IM is the use of some sort of Dynamic DNS service. EGI also offers a Dynamic DNS service: https://docs.egi.eu/users/compute/cloud-compute/dynamic-dns/ for free for users with an EGI Check-in account (see a tutorial: https://youtu.be/waylAJ4p-LA for further help). Using a Dynamic DNS service the user needs to register two DNS hostnames: one DNS hostname for the MinIO Console, and another one for the MinIO API endpoint. IM will deploy (8/26) a Virtual Machine with Docker and MinIO as a containerised service. Therefore, the first step for the user is to select Deploy a VM in IM: (9/26) After selecting the option Deploy a VM in IM the user is presented with several options to deploy services on top of a Virtual Machine. The Figure below shows the filtered output when looking for MinIO. The user needs to click on Add and then Configure: (10/26) In the configuration page for the deployment in IM (see Figure below) the user needs to enter:
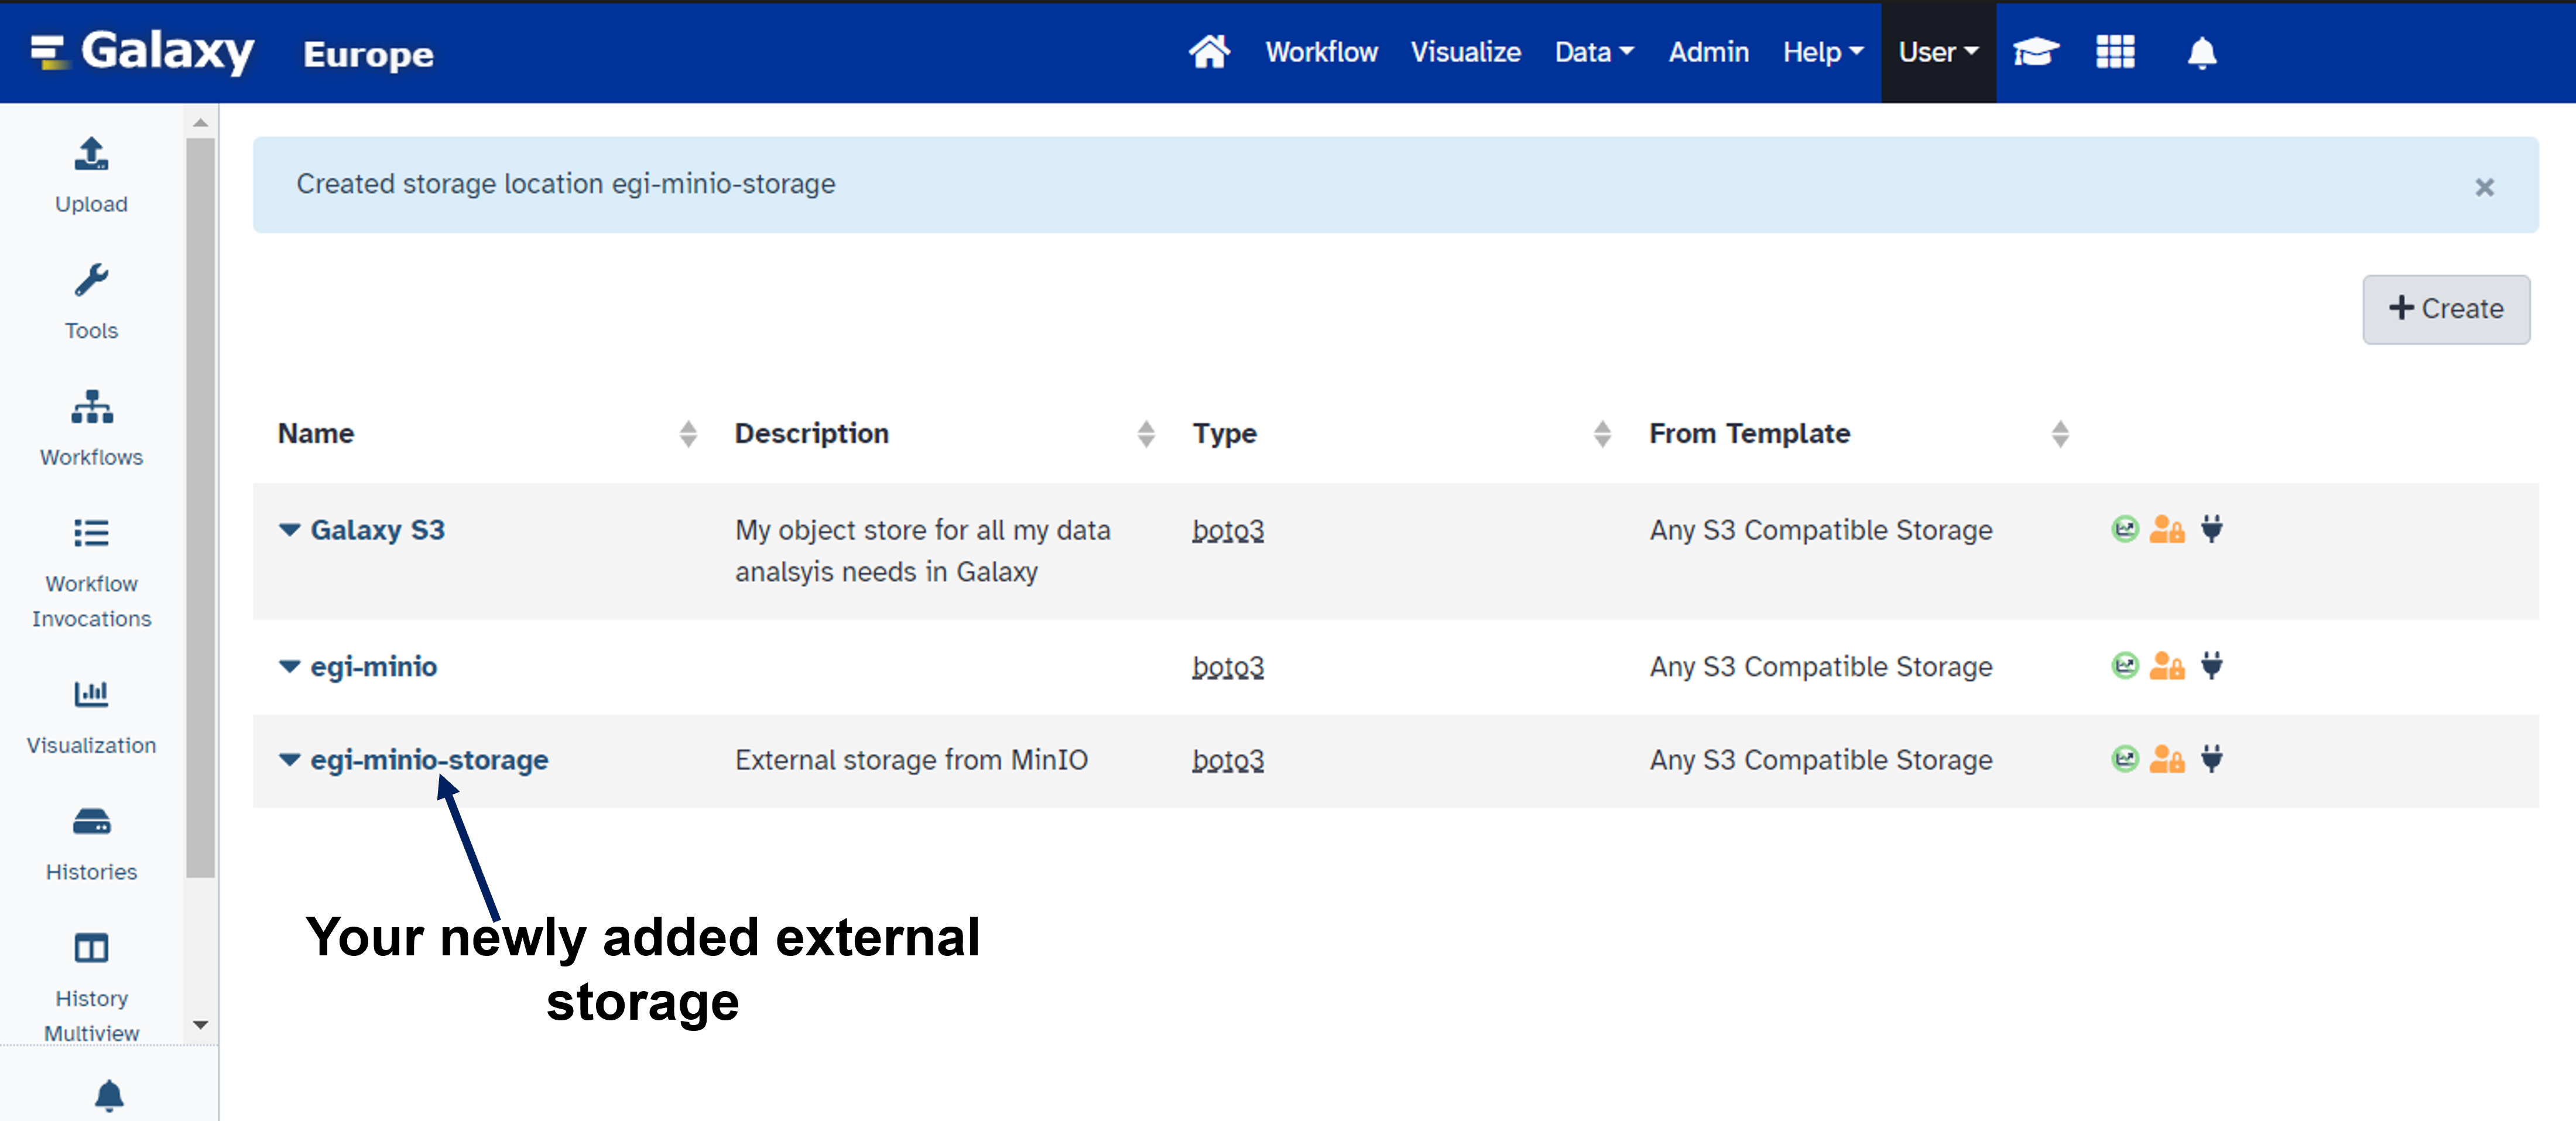
Once all the parameters are configured for MinIO and the VM, the user needs to choose a cloud provider for the deployment. This is done selecting the cloud credentials configured earlier and the Virtual Machine Image for the deployment as shown in the Figure below: (12/26) All going well IM will show the deployment as Configured: (13/26) Now the user should click on the Outputs button under the Actions column to get the URL for both the MinIO Console and the API endpoint. The latter is the URL that needs to be added to Galaxy to connect with this S3 endpoint. (14/26) Along with the URL for the MinIO API endpoint, the user will also need to generate an access and secret key in MinIO that will then be used in Galaxy to connect to this cloud storage: (15/26) Adding MinIO bucket to Galaxy Once the MinIO service is up and running the user can create a bucket in MinIO. This is done by accessing the MinIO Console URL and logging in with the access and secret key generated earlier. The user can then create a bucket by clicking on the Create Bucket button in the top right corner of the screen and adding a name for the bucket: (16/26) The user can then add this bucket to Galaxy by following the steps described at the beginning of this post (Select Any S3 Compatible Storage option from the available templates). The user needs to provide a Name, Access Key ID, Bucket (name of the bucket), the S3-Compatible API Endpoint (MinIO API endpoint), the Secret Access Key and submit the form. (17/26) Once the bucket is added to Galaxy the user can start using it as the default storage location or select it at different levels: per History, per Tool, and Workflow. (18/26) Running workflows in Galaxy with Bring Your Own Storage The user can now run tools and workflows in Galaxy using the newly configured external storage. Below is an example of a workflow that performs the assembly of bacterial genomes using Shovill: https://usegalaxy.eu/?tool_id=shovill a faster de novo assembly pipeline for Illumina paired end reads. Steps to run the workflow:
History. (20/26)
See below the output files in the external storage. (23/26)
Conclusions Having the possibility to connect Galaxy with external storage capacity enables great flexibility for both the end user and the Galaxy administrator. The end user can benefit from extra storage capacity easily. The Galaxy administrator does not have to look after additional storage systems. All in all, this Bring your Own Storage (BYOS) approach allows Galaxy to scale up the number of users in a more sustainable way, thanks to the work of John Chilton and colleagues (25/26) upstream: galaxyproject/galaxy#18127.
matrix-eu-announce
📝 New blog post Released! https://galaxyproject.org/news/2024-09-20-esg-byos-im/ IntroductionThe EuroScienceGateway Project is streamlining the way that users Bring their Own Storage (BYOS) to Galaxy. This post covers a specific case in which a user has access to storage resources in the EGI Federated Cloud and wants to connect it to the EU Galaxy instance. However, similar steps can be followed to connect a different Galaxy instance with storage capacity using Azure Blob Storage, Amazon Web Services S3 Storage, and Google Cloud Storage. In order to connect Galaxy with external cloud storage, the user needs to click on the Generally speaking the user needs the following information to connect Galaxy with cloud storage:
For Once filled out correctly the external cloud storage is connected to Galaxy: Now one interesting option for the user is to select the external cloud storage as the default storage location in Galaxy. For that, the user needs to click on the Instead of using a default storage location it is also possible to select it at different levels: per Getting S3 storage from EGIUsers with access to cloud resources in the EGI Federated Cloud can benefit from the available TOSCA template in Infrastructure Manager (or IM) for the automated deployment of MinIO. Below are the steps that a user needs to follow to make use of computing resources in the EGI Federated Cloud:
A prerequisite for the deployment of MinIO with IM is the use of some sort of Dynamic DNS service. EGI also offers a Dynamic DNS service for free for users with an EGI Check-in account (see a tutorial for further help). Using a Dynamic DNS service the user needs to register two DNS hostnames: one DNS hostname for the IM will deploy a Virtual Machine with Docker and MinIO as a containerised service. Therefore, the first step for the user is to select After selecting the option In the configuration page for the deployment in IM (see Figure below) the user needs to enter:
Once all the parameters are configured for MinIO and the VM, the user needs to choose a cloud provider for the deployment. This is done selecting the cloud credentials configured earlier and the Virtual Machine Image for the deployment as shown in the Figure below: All going well IM will show the deployment as Now the user should click on the Along with the URL for the MinIO API endpoint, the user will also need to generate an access and secret key in MinIO that will then be used in Galaxy to connect to this cloud storage: Adding MinIO bucket to GalaxyOnce the MinIO service is up and running the user can create a bucket in MinIO. This is done by accessing the MinIO Console URL and logging in with the access and secret key generated earlier. The user can then create a bucket by clicking on the The user can then add this bucket to Galaxy by following the steps described at the beginning of this post (Select Once the bucket is added to Galaxy the user can start using it as the default storage location or select it at different levels: per Running workflows in Galaxy with Bring Your Own StorageThe user can now run tools and workflows in Galaxy using the newly configured external storage. Below is an example of a workflow that performs the assembly of bacterial genomes using Shovill a faster de novo assembly pipeline for Illumina paired end reads. Steps to run the workflow:
See below the output files in the external storage.
ConclusionsHaving the possibility to connect Galaxy with external storage capacity enables great flexibility for both the end user and the Galaxy administrator. The end user can benefit from extra storage capacity easily. The Galaxy administrator does not have to look after additional storage systems. All in all, this Bring your Own Storage (BYOS) approach allows Galaxy to scale up the number of users in a more sustainable way, thanks to the work of John Chilton and colleagues upstream. |

|
👋 Hello! I'm your friendly social media assistant. Below are the previews of this post: bluesky-galaxyproject📝 New blog post Released! Introduction The EuroScienceGateway Project: https://galaxyproject.org/projects/esg/ is streamlining the way that users Bring their Own Storage (BYOS) to Galaxy. This post covers a specific case in which a (1/36) user has access to storage resources in the EGI Federated Cloud: https://www.egi.eu/service/cloud-compute/ and wants to connect it to the EU Galaxy instance: https://usegalaxy.eu/. However, similar steps can be followed to connect a different Galaxy instance with storage capacity using Azure (2/36) Blob Storage: https://azure.microsoft.com/en-us/products/storage/blobs, Amazon Web Services S3 Storage: https://aws.amazon.com/s3/, and Google Cloud Storage: https://cloud.google.com/storage. In order to connect Galaxy: https://usegalaxy.eu/ with external cloud storage, the user needs to (3/36) click on the User drop-down menu, select Preferences and then Manage Your Storage Locations. This will display a list of the cloud storage services already connected to Galaxy. The first time it will be empty and the user can connect to a new cloud storage service clicking on Create. The (4/36) following options are given to the user: (5/36) Generally speaking the user needs the following information to connect Galaxy with cloud storage:
For Any S3 Compatible Storage the user also needs to provide the URL to the API endpoint. Once filled out correctly the external cloud (6/36) storage is connected to Galaxy: (7/36) Now one interesting option for the user is to select the external cloud storage as the default storage location in Galaxy. For that, the user needs to click on the User drop-down menu, select Preferences, Preferred Storage Location and then select the newly added connection. (8/36) Instead of using a default storage location it is also possible to select it at different levels: per History, per Tool, and Workflow. Getting S3 storage from EGI Users with access to cloud resources in the EGI Federated Cloud: https://www.egi.eu/service/cloud-compute/ can benefit from the (9/36) available TOSCA template: https://github.com/grycap/tosca/blob/f8cf9f2b11ba1de4d8639ad04728de23d25d0299/templates/minio_compose.yaml in Infrastructure Manager (or IM): https://im.egi.eu/ for the automated deployment of MinIO: https://min.io/. Below are the steps that a user needs to follow (10/36) to make use of computing resources in the EGI Federated Cloud:
before moving on. click Add. A prerequisite for the deployment of MinIO with IM is the use of some sort of Dynamic DNS service. EGI also offers a Dynamic DNS service: https://docs.egi.eu/users/compute/cloud-compute/dynamic-dns/ for free for users (13/36) with an EGI Check-in account (see a tutorial: https://youtu.be/waylAJ4p-LA for further help). Using a Dynamic DNS service the user needs to register two DNS hostnames: one DNS hostname for the MinIO Console, and another one for the MinIO API endpoint. IM will deploy a Virtual Machine with (14/36) Docker and MinIO as a containerised service. Therefore, the first step for the user is to select Deploy a VM in IM: (15/36) After selecting the option Deploy a VM in IM the user is presented with several options to deploy services on top of a Virtual Machine. The Figure below shows the filtered output when looking for MinIO. The user needs to click on Add and then Configure: (16/36) In the configuration page for the deployment in IM (see Figure below) the user needs to enter:
endpoint. Once all the parameters are configured for MinIO and the VM, the user needs to choose a cloud provider for the deployment. This is done selecting the cloud credentials configured earlier and the Virtual Machine Image for the deployment as shown in the Figure below: (19/36) All going well IM will show the deployment as Configured: (20/36) Now the user should click on the Outputs button under the Actions column to get the URL for both the MinIO Console and the API endpoint. The latter is the URL that needs to be added to Galaxy to connect with this S3 endpoint. (21/36) Along with the URL for the MinIO API endpoint, the user will also need to generate an access and secret key in MinIO that will then be used in Galaxy to connect to this cloud storage: (22/36) Adding MinIO bucket to Galaxy Once the MinIO service is up and running the user can create a bucket in MinIO. This is done by accessing the MinIO Console URL and logging in with the access and secret key generated earlier. The user can then create a bucket by clicking on the Create Bucket (23/36) button in the top right corner of the screen and adding a name for the bucket: (24/36) The user can then add this bucket to Galaxy by following the steps described at the beginning of this post (Select Any S3 Compatible Storage option from the available templates). The user needs to provide a Name, Access Key ID, Bucket (name of the bucket), the S3-Compatible API Endpoint (25/36) (MinIO API endpoint), the Secret Access Key and submit the form. (26/36) Once the bucket is added to Galaxy the user can start using it as the default storage location or select it at different levels: per History, per Tool, and Workflow. (27/36) Running workflows in Galaxy with Bring Your Own Storage The user can now run tools and workflows in Galaxy using the newly configured external storage. Below is an example of a workflow that performs the assembly of bacterial genomes using Shovill: https://usegalaxy.eu/?tool_id=shovill a (28/36) faster de novo assembly pipeline for Illumina paired end reads. Steps to run the workflow:
See below the output files in the external storage. (32/36)
Conclusions Having the possibility to connect Galaxy with external storage capacity enables great flexibility for both the end user and the Galaxy administrator. The end user can benefit from extra storage capacity easily. The Galaxy administrator does not have to look after additional (34/36) storage systems. All in all, this Bring your Own Storage (BYOS) approach allows Galaxy to scale up the number of users in a more sustainable way, thanks to the work of John Chilton and colleagues upstream: galaxyproject/galaxy#18127.
|
This PR is created automatically by a feeds bot.
Update since 2024-09-14
Processed:
Bring Your Own Storage with Galaxy