Authenticate Users
There are many different ways in which you might want to incorporate user authentication into Concerto-related projects. In some cases this might involve communicating with an external system, but in the guide below we will show you how to use the form and authorizeUser to implement a basic login page for authentication purposes.
We want to limit access to our test to only users that have a login of some kind. This guide shows you how to add a login form to your page that checks whether the login and password match with pre-specified user account details.
1. Add form node
Right click anywhere in the flowchart area and select the form node from the dropdown. The menu for this node will automatically appear.

2. Add login and password fields to node
Click the edit icon to edit the form fields.

The default template used by this node is the in-built form template. You can also choose a different template using the dropdown if you want the login page to look different.
4. Click the Add new element button twice to add two rows to this table. You can delete any unwanted rows (like the example ’What’s your name’ by clicking Delete on the right of that row or selecting it and then clicking Remove selected elements.
We want to add two fields to the form in this case, which will be login and password. Enter the example data as shown below. For the password field, select ‘Password’ as the Type so that the user input is hidden on the front-end.

5. Add validation
You can also validate each field if the user input needs to be in a particular format. To do this click on the edit icon in the Validation column for a given field, for example the password field. This will bring up another dialogue called Validation – list elements.

Click Add new element to add a new row and select ‘Required’ from the dropdown in the Type column. You can also enter a validation message here in the Alert column, which will be shown if the user’s input for that field fails the validation test.

Click Save on the Validation dialogue, Fields dialogue and the Form dialogue (3 times) to get back to the flowchart. Your flow should now look like this:

If we connect up the nodes now and run the test it will just show a form which collects the information and then will end the test. But in this case we want to check that the inputted data matches a set of user accounts, so we need to add another node.
- Add authorizeUser node
Right click anywhere in the flowchart area and select the authorizeUser node from the dropdown. The menu for this node will automatically appear.

- Choose authorisation type
You can either directly input the data to be used for authentication logic, or select an existing Concerto data table containing the same. Let’s use the Direct method for now.

- Choose encryption type
It is best practice in information security to store passwords and other sensitive data in encrypted format. You can choose from a selection of standard hashing (one-way encryption) algorithms from the drop-down if you know how to hash your passwords in the relevant way. For the purpose of this tutorial, just select plain (no encryption).

- Edit the User list
Click on the edit icon under User list. A menu will appear where you can enter data to be used for authentication. This is where you create users and passwords.

- Click on Add new element.
This will add a row to the table. Click it again to add a second row for this example. If you have already prepared a table with this structure (e.g. in excel) then you can click on the Upload CSV button to fill this window with uploaded data.
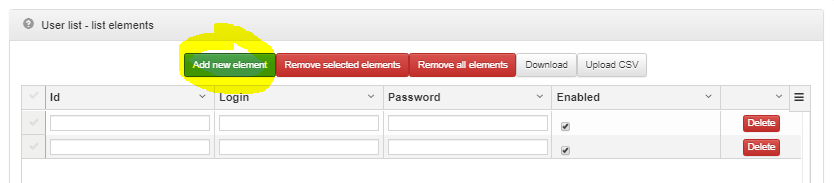
- Input user list data
Every row must have a unique value in the Id column. Enter some data for login (username) and password for the two users as in the example below. These are the values that will need to be entered in order to pass the authentication step of this node. The ‘Enabled’ column is a boolean value which determines whether this account should be active or not. If it is unchecked then it will not be possible to pass the authentication with that user. In our example both are checked because we want both user1 and user2 to be able to access the test.

Click ‘Save’ on the user list dialogue and again on the authorizeUser dialogue when you’re done. Your flow should look like this:

7. Expose form return parameters
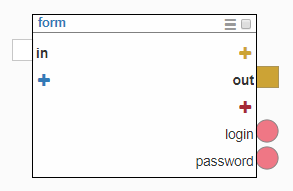
We are going to use dynamic returns to expose the values of the login and password variables. Click on the + icon in the bottom right of the form node to add/expose return ports.

In the Dynamic return box, type login and click Add. You will see a dynamic port appear with that name. Now do the same to add another Dynamic return port called password. Your form node should now look like this.
8. Expose authorizeUser input parameters
We want to pass the two parameters we just created as inputs to the authorizeUser node, so that this node can check whether the values of those variables correspond with the user authentication table we created earlier. To do this click the + on the left-hand side of the node to add/expose input ports.

Check the checkboxes next to login and password to expose these inputs and click Save.

9. Link parameters
Click on the pink circle of the login return port of the form node, and drag it to the login input port of the authorizeUsernode. Do the same with the password ports. This tells the authorizeUser node to use as inputs the value of those two return variables from the form node, in other words the value of whatever the user has written in the two fields. You can also connect the execution out port of the form to the in of the authorizeUser node at this point. Your flow should now look like this:

10. Branch your logic
In this example, we want the authenticated user to be shown a linear test and the unauthenticated user to be shown a page with some failure text. Notice that the authorizeUser node already has two execution out ports which can be used for branching, based on whether the authentication has succeeded or failed. Add a linearTest node by right-clicking on the flowchart, choosing linearTest from the list and clicking Save. Do the same again to add a showPage node. Edit the HTML property in this node directly by clicking the highlighted button:

Type ‘Authentication has failed’ into the editor and click Save twice to return to the flowchart.
11. Connect authentication in flow
Now you need to connect it all up by dragging the out port of each node into the in port of the node that should be executed after it. When you’re done your flow should look like this:

Note that if authentication succeeds the execution flow goes via the linear test, and if it fails then it goes via the showPage node with the text we wrote.
Connect the ports to the relevant positions in your test by dragging the yellow box next to each port to the relevant ‘in’ port of another node. The example below shows an application where users have to log in before they can begin a linear test, otherwise they are shown an error page and taken to the end of the test. Remember to Save your work.
Click ‘Run Test’. You should see a form asking for login and password.

Type in user1 as the login and password1 as the password and click Next. Authentication should succeed (your inputs match the expected data in the authorizeUser node) and you should be taken into a linear test like the one below.

Now go back and run the test again, or refresh the page. This time type aaa as the login and bbb as the password. Authentication should fail because the inputted data does not match with your user table in the authorizeUser node, so the execution flow will go down the other branch to the showPage node, and you should see the message we wrote on the screen:

Well done! Remember, you can use the authorizeUser node at any point in the flowchart, for example if you require users to authenticate after they have completed a test but before they can see their results. It’s completely up to you!